Friday, November 30, 2018

The attention span of a gnat.


It was my intention today to draw out the pattern for the 8 sided motif above, but I posted the pictures of some of the recent snowflakes to Facebook and one of the comments was "I am still learning wish I could do this" which is kind of heartbreaking. For a rank beginner split rings and split chains are just a bit beyond their grasp, but any of the recent designs could be done without using either technique. Split rings and split chains make it EASIER to move from one round to the next without having to cut tie and hide ends, BUT what a lot of beginners don't know, is that cutting, tying and hiding ends makes those techniques unnecessary.

Generally in a concentric design like a snowflake or a doily, the split chain is going to come at the end of the row making it possible to "climb up" into the next row. The solution is to finish the row, cut the thread and start the next row where you left off. That's a generalization and I'm sure that there are exceptions which I'll think of just as soon as I hit Post.

Likewise on this type of design a split ring is usually the first part of a new row which is often placed in the middle of the chain on the previous row. That's because connection points from row to row are typically at the midpoint of a chain. So when you get toward the end of the row you are instructed to tat a split chain which moves your threads from the end of the chain, to the middle of the chain. Then a split ring is the first thing you tat which brings the threads up from the tip of the ring to the base of the ring and positions it in the normal place to keep tatting.

To avoid the split ring just finish the row in the usual manner, cut, tie and hide threads. Then tat the split ring just like you would a normal ring because once you've cut the thread and started again, your thread s are already in the right position. It sounds complicated, but it isn't. The simplest way to think of it is just tat what you need to tat to get to where you want to be.

Thinking of making things simpler I remembered a snowflake that I had designed some time ago but never got around to drawing out the pattern. So when I got stumped trying to draw this 8 sided design I put it aside to go looking for the chain only snowflake I created. Look at what I found! These are some of the snowflakes that I've created over the years. There are more somewhere, but I haven't unearthed them. A lot of the things I've created have been one of a kind snowflakes that I designed and immediately gifted to someone so they're gone out of my possession forever and I don't always remember to take a picture first.

I also found the Elephant Flake.

This is a snowflake that I started, but it kind of grew to a huge 10 inches across and I never did write it out. I'm thinking that I should draw it one of these days..... where was I? Oh yeah, drawing out the pattern for the 8 arm snowflake. See? what did I tell you? The attention span of a gnat.

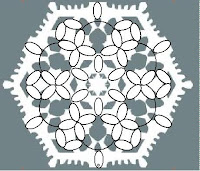
Here's the pattern for the snowflake with 8 arms, which of course, means that it's not a snowflake at all, it's an 8 point whatchamacallit.


Trying to draw this design so that it is reasonably easy to follow and get the stitch counts in, especially along the chains that are joined to each other had me scrapping and restarting this drawing about 5 times. I finally started saving it in pieces so that if I lost or messed up part of it, I'd have backups to work from. I think I got it all in. If I didn't, let me know and I'll go fix it. The pattern starts with a central ring with 7 picots and a mock picot. The mock picot is secured by using a lock stitch, that's an un-flipped half stitch followed by a normal half stitch. Make sure to keep the picots around the central ring both large (double the height of the stitches) and uniform. The large number of stitches on the central ring and the longer picots are what make this design work instead of  having the rings overlap.

Row 1 and 2 end with split chains, but if you don't know how to tat split chains just tat the row like normal cutting and tying the thread at the end of the row. Then start the next row tatting.the rings and joining to the picot in the middle of the chain on the previous row. After that just tat around the row ending with a chain joined to the base of the starting ring. Cut and tie again then start the next row.

By the way, if you haven't seen my blog previously, take a look at the links list on the right. All of the patterns should be accessible by clicking on the Pattern label. The explanation of the legend symbols I use is listed there, as is the link to the tutorial on how to add thread. Since almost everything that comes off my shuttles is a new design, I end up cutting off and starting again lots of times. As hiding a zillion ends isn't my idea of fun, I use this relatively painless method for adding in thread that simultaneously adds in new thread and locks it in tight.

Thursday, November 29, 2018

One stitch makes a difference

Right at the outset I have to say the perle cotton I've used for the past couple of days, is really crappy to work with. It's some old dollar store thread I have in my stash and since these 8 point designs aren't going to graduate into being anything other than experiments, I figured I might as well use up the garbage thread. The up side of the equation is that I use up the crappy thread, the down side is that it's hard to work with, it splits like mad, and it's really hard to maintain an even tension when the thread is so squishy.

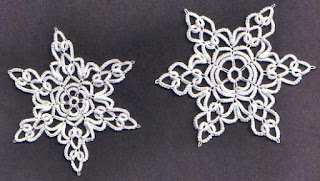
That's right, I re-tatted the 8 point design with a larger centre. One more stitch between the picots in the starting ring so it's 4-4-4-4-4-4-4-4. This time it took very little persuasion to lay flat. The rings don't overlap and the points of the design are fatter and more spread out. You can see the difference when the 2 samples are laid side by side. The first one has narrower points yet the overall size of the motifs are almost the same.
You can see the difference when the 2 samples are laid side by side. The first one has narrower points yet the overall size of the motifs are almost the same, both being about 3.5 inches from point to point. I was thinking that I might tat this design using multiple motifs joined together doing row after row of motifs in different colours. That's not going to happen because I've already fallen out of love with it. Told you. I have the attention span of a gnat.

I have another snowflake on the shuttles, but I guess I better take out enough time to get this one drawn out so y'all can tat your own.

Wednesday, November 28, 2018

It didn't work- yes it did

I added 2 repeats to the November 8 snowflake to see what it would look like. I started with the same ring with 2 more picots and went from there. It looked ruffled when I was tatting it and the ruffles didn't come out when I stretched it. I did a quick blocking, pinning just the outer picot of the points and sprayed it with a shot of alcohol to see if it would pull into shape. The alcohol works the same as water, but dries quicker so that I could see the results.

The finished motif is about 3.5 inches across done in perle cotton size 8 and some of the rings overlap. What do you think? Still ruffled isn't it? I might be able to tweak it possibly by changing the central ring to 4-4-4-4-4-4-4-4, but I don't want to spend any more time on it, since I don't think it's going to work out as I'd imagined.

The good news is, there's another snowflake off the shuttles. This one looks more like a snowflake, it keeps the daisy centre, so maybe I need to call it a "flowerflake" like Muskaan suggested. It's light and airy and fairly quick to tat resulting in a snowflake that's about 3.25 inches point to point done in size 20 thread.

Row 1 ends in a split chain and Row 2 uses lock joins to connect to the first row. Row 3 uses the second shuttle to throw rings off the top of the chains to make the points and that's as complicated as it gets as you can see from the pattern.


The next idea I tried went nowhere fast, so I'm thinking of going back to the rose I started with and see where I end up.

Tuesday, November 27, 2018

Close, but no cigar

The phrase, and its variant 'nice try, but no cigar', are of US origin and date from the mid-20th century. Fairground stalls gave out cigars as prizes, and this is the most likely source, although there's no definitive evidence to prove that. -and why should you care?

I started with the failed design from November 12th because I really liked the reinforced daisy shape, but I could tell the the arms had too many stitches to fit in the available space and rather than waste any more tatting time I cut off the arm and started back at the second row. (I'm not counting the starting ring as a separate row.) After the central ring that daisy shape is made by chains joined to each other and the last petal of the daisy is a split chain allowing the second row to wrap around the top of the petals. Muskaan should love this design since she loves to pick out the flower shapes in her tatting.

Row 3 has short side chains that join side to side and 3 little rings joined into the space above the lock join. I showed that little spot which isn't a picot as a tiny circle where the 3 rings join. Row 3 also ends with a short split chain. Row 4 is ring and chain with a ring thrown off the top of the chain at the tip of the point. I realized as I was writing this out that I had forgotten to shade the ring at the tip to show that it's done with the second shuttle. Of course that meant that I needed to show a second shuttle in my "legend" which I had also forgotten.

In addition to the central daisy, I also like the filigree effect of this design although the rings at the tips seem too small, but I like them anyway. Only, it's not very snowflake-y AGAIN. A perfectly lovely design, just not what I was looking for. I've been on a roll designing and drawing 6 designs in 20 days, but none of them were what I was hoping for. Close, but not quite. So I have the next rendition already on the shuttles.

I'm not sure it's going to work either, but I think I'll give it a break and go back to the November 8 Snowflake as I want to see what it looks like with 8 arms instead of 6. If it sits right and looks good I'm thinking of doing a multi motif design in different colours, but that will depend on how it looks, what colours I have available in the necessary quantities.

And why should you care that it was close, but no cigar? I titled this post, which I had written previously in Notepad but not saved because it was just a short post. Then it occurred to me that such idiomatic expressions don't make sense to international readers so I Googled it to find the source, for your edification. As I was holding down the CTRL key after copying the meaning of the idiom I switched screens back to the unsaved Notepad file which I had previously highlighted to copy it. At that point I accidentally hit the letter T and deleted the whole post!!!

And the whole point of this saga was to provide you with the pattern for the above snowflake, which is posted here:


Monday, November 26, 2018

Unimaginative Snow 11-21-2018

I decided to re-tat the cut out snowflake and see if I could tighten it up and make it more snowflake-y.  An extra outward facing ring at the tips of the points did give the design more of a snowflake shape. The finished flake is about 3.25 inches from point to point.

The unconnected rings with the chain between them still resulted in a big hole in the middle of the grouping. It could probably be covered by a bead, but I wasn't looking for a beady design. I included some insets showing split rings, split chains and directional arrows that will hopefully make the drawing clearer. In order to tat it in one pass begin with the central ring and use a split ring  to climb out. Then tat the short connecting chain to the next 3 ring grouping. The 2 rings of the first grouping thrown off the top of the chain don't get tatted until you finish the row.

It's not what I'd call a successful design, but it's done and it'll look OK hanging on the back of the tree. Since I already had it half drawn anyway I finished the pattern and it's posted below if anyone is interested in this insipid design.


Onwards and upwards, hopefully to something I like more. I picked up the snowflake with the daisy centre that I started November 12th and cut off the offending bits and started again. So far I'm liking it.

Wednesday, November 21, 2018

Decisions, decisions

I went back to the drawing from the cut out snowflake and made another attempt at executing it What and ugly mess. I stated out with unconnected rings which looked pretty. When I tried to climb into the next row things just didn't want to work, mostly because the design required the unconnected rings to be connected. That's the point at which I decided the the drawing while possible to tat, wasn't going to look any good.  So I cut off the second round and went for something different.

At the end of the third row I ran out of thread so I just cut it off. After hand blocking it, otherwise known as pulling it out by the points, it exposed a lot of bare threads and I'm not sure I like the look of it. Shall I scrap it, or re-tat it and see if it's winner.?

The alternative of course is to pitch it and start over. I still have to work something out for the failed daisy from November 12th.

Sunday, November 18, 2018

TA DA! my December 2018 snowflake

I finally got the December 2018 Snowflake drawn. I've designed so many snowflakes that I've started naming them by the date they were created. On the original design I started with a central ring of 2-2-2-2-2-2 and normal size picots, but as you could see when I posted earlier it made for a scrunched up snowflake. I tatted it again with a central ring of 3-3-3-3-3-3 and picots twice as long as normal which made the circumference of the central ring much larger. In case you are unfamiliar with tatting a flat rose, take a look at the links on the right side of the page where I've included a tutorial on how to make them. When making roses try to keep your tension even and make sure you snug up the chains before you make the lock joins.

Even with the larger centre the finished snowflake looks very crumpled, although it did block out flat to a snowflake about 3 inches across. The first chain of Row 5 was 12 stitches, but I changed it to 6-6 with a very small picot on both side of each arm, then joined arm to arm which made the snowflake pull into shape better, made it easier to block and made it look better over all.

Showing those 6+6 chains was a bit of a problem, so I showed the stitch count with little arrows where they ought to go.

That means my Christmas snowflakes are done and dusted and now I can go back to that pattern drawn from the snowflake cut out and play around with it a little more. I think I'll just use a central starting ring this time and not get too creative Until I see where this thing is going. The problematic row should be left ring, right ring, split ring down ring, then chain, up ring, chain and repeat, but getting to that point may be a stinker.

In any event, here's the part you were waiting for, the finished snowflake and of course, the pattern.


If you have any problems with it please let me know, as I dashed the drawing off in a hurry.

Saturday, November 17, 2018

Something is better than nothing

I started tatting my Christmas snowflakes, and as Muskaan mentioned, the inner part makes a nice little snowflake all on it's own. Here's what it looks like after the fourth row.

Cute, isn't it? This little snowflake is just over 2 inches across from point to point. It's nice, but not as large as what I was looking for, so I added the 5th row. I managed to draw it up to the point of this little flake, but trying to get the stitch counts in where the chains are lying against one another is giving me problems so there's no pattern yet.

Actually, that's not true. There is a pattern for the the inner part of my Christmas snowflake which I've called Little Flake. That part of the pattern is included below.


Hopefully, I'll get the rest of if drawn out soon.

Friday, November 16, 2018

I think it'll work...maybe not

My frustration level is getting pretty high about now. Hubby's making noises about sending out our Christmas cards soon which means I need to get a on tatting tear and start whipping out snowflakes.
That's hard to do when you can't even settle on a design. GRRR!

Since things aren't flowing smoothly I thought I'd go back to where they started going off track and resurrected my second try to take another stab at it. I knew the inner section needed to be larger so that the next rows didn't overlap. I began by making the inner ring larger and making the picots longer That made the chains on the subsequent rows correspondingly longer. After that I followed the original design and I think I have a winner. The finished snowflake is 3 inches across from point to point which is what I was aiming for.  You can see the first attempt at the design and how  the final version came out.

There aren't and split rings or split chains to slow me down and I have a pretty flake that flows off the shuttles easily. I just have to sit down now and tat like mad. Then all I have to do is draw the pattern out, but that might take a while.

Hubby has the camera attached to the car and now has to run wiring from the front bumper to the dashboard. A backup camera is wired to the back up lights and it only engaged when the backup lights come on. Since this camera is being wired to the front of the car, the camera would be on all the time unless it's wired to a switch so that it's only on when needed. It needs wire going to the switch and wire going from the switch to the battery as well as wire going to the display. Running wire through tight spaces needs smaller hands, namely mine. Consequently I'm going to be spending the next little while with my hands covered in black grease.

Black grease and white thread don't make for good bedfellows when you want pristine snowflakes.
Wish me luck.

Thursday, November 15, 2018

Back to the drawing board - again

I posted the snowflake cut out that I was using because I though others might want to use it to create their own snowflake. I created a quick sketch to play around with. I drew over top of the paper cut out like the picture shown here. 

Then I deleted the paper cut out and was left with just the drawing and I proceeded to tat it.

I anticipated that I'd have to increase the size of the rings on each row, so I started with inner rings of 5-5 I expected a big hole in the middle of the design because I wasn't starting with a central ring, but I though it might look really cute with long woven picots in the middle so I started with long picots and ran into my first snag. If you want to weave the picots they need to just touch the edge of the ring on the opposite side of the motif, but it's hard to know how long that distance is when you haven't tatted it yet. so I took a guess. I was using a sort of unconnected cloverleaf with the inner rings at 5-5 as mentioned and used 3-3-3-3 for the side rings ending in a split ring up to the next round.

That's where things got squirrely, or I got tired. I needed 4 connected rings of graduated sizes, joining to 2 more larger connected rings. I tatted it, undid it, tatted it again, undid it again, looked at the drawing and reasoned it out and tatted it again, and again. Then I got fed up and cut if off.

At least now I know how long the central picots have to be. Of course I'm obviously NOT using this design which might work when I'm  more alert to figure out what I need to do. But I've decided that since the dozen split rings I'd need to tat would slow down my tatting speed and I either need to rework the design or scrap it altogether, I am once more going back the the drawing board.

Tuesday, November 13, 2018

The computer ate my homework

I thought I'd get back to something simple and see where it lead me, so I started with a simple ring in, ring out design, except that half way through the first round I could tell it was going to cup horrendously, so I cut it off and started again.

This time I went with ring chain, thrown off ring and it looked too simplistic, so I cut it off and started again.

The next  design looked like it was going to work, but after the second repeat I realized that I had intended to have a starting ring, work up one side and come back down the other side to a second inner ring. I lost track of what I was doing and instead of a second inner ring I attached to the second picot of the first ring. There's no way that's going to work. So it's time to snip again.

Since just tatting without any pre-set plan wasn't working I thought I'd start with a paper snowflake template and use it as a basis for a design. Ages ago I designed a bunch of cut outs on the snowdays web site and saved the images for future reference. I grabbed one of the images, pulled it into my drawing program and began laying out rings following the outline of the paper snowflake cut out.

Before I could plot out the placement of the chains and how to tat the design it created, hubby decided we had to rush right out before the store closed to get some nylon screws for the front bumper. He's putting a camera behind the front grill so that he can see how close he's getting to the curb. The front hood of the car is really long and sloped in such a way that you can't see how close you are to the curb in the parking lot and several times we've gotten out the the car and realized that we're not close enough, or we've gotten too close and scraped the bumper. He removed the grill in order to mount the camera and realized that when the car was repaired after a little fender bender, the shop had remounted the grill and broke off the supports so that the only thing holding it on was the license plate.

That was just about the point where I realized that the new set up of my drawing program had defaulted to an inappropriate drawing platform. When what you are trying to create is lace, an electronic diagram template, just won't do.

That's not a problem, all I had to do was bring up a lace drawing, erase it, paste in my partial new drawing and save it under a new name. Easy peasy. It was at that instant that the computer locked up so that I couldn't save anything, couldn't change screens, couldn't close down any of the five programs I had running, couldn't change to a different drive and in fact couldn't do anything except pull the plug. Pulling the plug meant that anything on screen was lost. Gone! Tonight I get to start again.

And after all that, the store we rushed out to, didn't even have the nylon screws we needed to put the grill back in the bumper.

Monday, November 12, 2018

Look Ma, it's a dud!

I liked the daisy shape on an earlier design so I thought I'd try it again. After completing the daisy I didn't really want something that used a lot of split chains so I thought I'd just outline the daisy shape with more chain. I like the effect and started to create another row that would bring in the snowflake shape. I didn't like the effect I was getting so I undid what I had started and began again. I didn't want a lot of rows so I thought I'd do something that went out instead of around.

Once I had completed one arm I could see it was going to start bunching up again so I quit before I got too invested. This is another dud although I may keep the first rows of chain and revisit the design at a later date. I've already got the next one on the shuttles, but I'm not sure I'm going to like it any better that the first few.

Maybe I'll go back to the original design. I liked it but it was too time consuming, only at this rate I may spend all my tatting time creating and throwing out designs as not suitable and still not have anything ready for the Christmas cards.

I had the same problem the first year I did snowflakes to send out and ended up doing a whole bunch, all different. That would have been OK if I'd remembered to write down what I sent to who so that I could rotate them for the next year. Since I didn't keep record I had to design an all new snowflake, which started this whole thing of sending a different snowflake with our Christmas cards.

I guess I'd better get cracking as the mailing date will soon be upon us. Of course if the post office is on strike, the cards aren't going to go anywhere anyway!

Saturday, November 10, 2018

Third try

After not blogging for ages, it looks like I'm on a roll and you can probably look forward to more updates as I'm currently in snowflake mode. This is the third snowflake and I like the design, just maybe not as a snowflake. It begins with a central ring with 5 picots and one mock picot. I normally make my picots so that they're about the same height as the stitches, but since I didn't want the centre all cramped up I made the picots on the central ring about twice the size that I normally do. The daisy shape in the middle of the design is made with chains of 6-6-6-6 The chains forming the petals are joined side to side and the last petal ends with a split chain, putting the shuttles in place to begin the second row.

The chains of Row 2 are likewise joined side to side as are the chains of Row 3, again ending in a split chain. But you can see that for yourself as I've included the pattern below.


I've taken another look at the 2nd snowflake. I had to straighten it out to scan it and I wondered if blocking might work so I pinned it out on my board and left it over night. It might not need a lot of coaxing to fix it. It might just take longer picots at the start. I won't know for a while as I'm on to design number 4 and if we watch a movie tonight I may have another pattern to post tomorrow.


Friday, November 09, 2018

Another failure

My goal is to create a snowflake that's roughly 3 inches across that looks pretty, works up fairly quickly to insert in the Christmas cards for my family and a few other select individuals. The one I showed yesterday is pretty, but not really quick to tat.

On the next one I started with a 3 round centre to save some tatting time and used the same kind of idea and the previous snowflake for the next row, but I wanted the arms to be more pronounced, which they are. However, there are too many stitches too close together so the whole thing ruffles. The ruffling wasn't too pronounced until the last row. While the design worked up more quickly and had some redeeming features it's not going to lay flat without some aggressive blocking. I might fight with one snowflake, but if I'm going to do a bunch of them I want them to cooperate and lay flat right off the shuttles so I'm calling this one a fail. I'm not going to tweak it to make it work and I'm certainly not doing a drawing for it.

So I'm on to the third design which so far I kind of like, but I'm thinking I might want to do it again as an eight sided design instead of a 6 point snowflake. It isn't snowflake-y enough for my taste so this next one probably won't make it as my Christmas design either, but it probably will get drawn out.

Wednesday, November 07, 2018

First snowflake of the season

I started this snowflake yesterday but when I went to whip out the drawing for it I came to a complete standstill.

I upgraded my computer this summer and a lot of my old software doesn't run on Windows 10 so when Hubby asked if I wanted it installed, I declined. I like having all of my old software, but tweaking it so that it will run adequately on Win 10 is a pain in the butt and I'm not even the one that has to struggle with the stupid thing. But you can't create a drawing without the software so I finally asked my sweetie to install it. Which he did and after it was adequately blessed (or maybe it was cursed) I don't know I left the room, it finally worked.

Some things don't seem to work like they used to, or maybe it's that I've been away from using drawing software for so long, but I finally managed to create a reasonable facsimile of the finished lace.

I'd been playing around with some designs that start with a basic flat rose so that's where the snowflake started. It's a rose plus 3 more rows using a basic shuttle and ball of thread and it's pretty straightforward except for the split chain at the end of row 6. Seven rows seems like it ought to be big enough for a doily, but it's just 3.25 inches from point to point. done in size 20 thread. It doesn't work up quickly enough to use in our Christmas cards so I've already stared on another one, which doesn't look like it with suit either so there's bound to be a few more coming off the shuttles.

Assuming that you'll probably want the pattern, I've already included it here.

Enjoy!

Tuesday, November 06, 2018

Colour this doily done

I haven't been blogging a lot. Boy, is that an understatement! We (that would be mostly he) did a lot of work on the old washer before we finally decided enough was enough and bought the new one. (So far I love it.) For some reason when hubby is working on a project I get roped into holding the light, holding one side of the probe for a continuity tester, holding up the long end of the lumber going through the saw, or just generally being a second set of eyes and a spare hand for whatever he's doing. So while I don't have much to show for my activity, he finishes up a lot of projects. When we bought out new washer and dryer, hubby wasn't satisfied with putting new machines on the concrete basement floor, so he built stands for both to elevate them off the concrete. He lifts, I position. See, I'm just a third hand.

I did manage to finish off a project I started in April of 2017. I started with a handful of colours and and I wanted to make a doily that progressed from one colour to the next and used the 3 solid and 2 variegated colours.

I posted some of the progress as it happened and I took pictures of each section, but I don't think I ever showed the final row.

Part of the delay was that I didn't like how the final row ended. I had 8 widely separated points and while the design was symmetrical I kind of wanted more shallow points in between and then some more rows finishing off with a single row of chain in pink.

I wanted those shorter in between points, but after 3 or 4 unsuccessful attempts, I put it aside. I must never put things aside. Putting them aside means never finishing. If I don't finish it NOW, it isn't going to get finished. Last week hubby finally decided to do his weight lifting in the basement and cleared his weights off the end table. Since the table looked bare he suggested that I ought to put a doily on it. So I pulled out the unfinished doily and took another crack at it. No. Nope. Nothing was working. Then I spread it out and measured it. 13.75 inches from point to point. That's pretty much the size you want for a finished doily. So I cut off the offending short points that weren't working and called it done.

I don't love it and I don't hate it. It did what I was planning on doing and now I can reel the thread off my shuttles, pack these balls of thread away, free up some space in my end table and start something new.

Snowflakes anyone?