I get asked so many beginners questions so often, that in defense of my time, I've decided to do a Tatting 101 with the basics and I thought I'd start with the one that is the simplest, but the one that I still get asked: How do I get the thread on the shuttle?
First, there are different types of shuttles. The most basic shuttle is a flat shuttle. Here is a template for one that you can cut out of an old business card.
The shuttles pictured here are the 3 basic shuttle types. The little one on the left is one my hubby made for me out of walnut wood. Some flat shuttles can unwind if you drop them. This one doesn't. The middle shuttle is a post style shuttle, this one is a David Reed Smith shuttle. The one on the right is an Aero bobbin style shuttle.
No matter what kind of shuttle I use, the method of putting the thread on is the same. I use a simple, practical slip knot. Start by wrapping the thread around your hand like this. Then poke a loop of the thread coming from the ball through the wrap like this.
Then hold the thread end in one hand and the loop in the other hand and pull apart.
You end up with a loop and the knot can slide up and down. Which is where it gets it's name slip knot from.
With practice you can arrange the knot close to the thread end, but for now you can just cut off the end leaving just enough to hold onto.
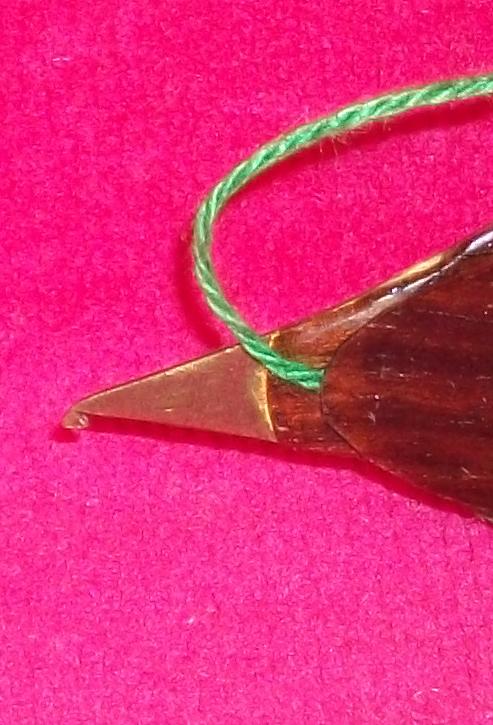
On a flat shuttle, take the loop and position it around the shuttle going into the hole on one side, around the back and out through the hole on the other side. Then holding the thread end in one hand and the ball end in the other hand pull and the knot will slip making the loop smaller and smaller until it's snug against the shuttle.
Then wrap the ball end of the thread around the shuttle in the hole on one side and out the hole on the other until you have the shuttle as full as you want. Some flat shuttles have fanciful shapes and only one hole at one end. These shuttles are often just curved at the other end so the the thread is wound through the hole and around the flat end.
On a post style shuttle the top and bottom sections are called blades that are joined with a post in the middle. They clamshell together at the tips which often look like the pieces are attached, but they aren't. This closeup shows you that the thread actually slides through between the blades.
For this type of shuttle take the loop and slide one end through the blades at the front. Then take the loop around and slide it through the blades at the back so that the loop is around the post as shown here. Pull on the short and and ball end of the thread until the loop is pulled tight against the post.

Then wrap the thread between the blades at the front and the back around the post until you have as much thread on as you want. If the loop isn't quite tight enough you can hold onto the short end until you get it started. You will hear a soft click as the thread passes between the blades. Repeatedly using thick thread can cause the tips of the blades to open up a little as the thick thread is continually passed through them. That will make the shuttle useless for finer threads. Don't overfill (filling it top to bottom of the post and outside the edges of the blades) a post shuttle, especially the more expensive ones. Overfilling the shuttle can cause the blades to separate too much and become "sprung". A sprung shuttle is useless.
Bobbin shuttles have a removable bobbin. Except shuttles like the antique detach a spool shuttles which twist apart to expose the bobbin. All of the modern shuttles have bobbins which come right out.
Take the loop and position it around the bobbin. Pull on both ends of the thread to tighten the loop.
If you have an Aero shuttle, the bobbin will fit on the end of the shuttle making a handle for easy winding. Cheap Aero look alike shuttles that have a similar shape have an end that is too fat to sit inside the bobbin.
Wind the thread around the bobbin and insert the bobbin back into the shuttle.
If you use a shuttle with a hook, pay attention to the direction the hook is facing. I like to wind my shuttle so that the thread comes out at the back on the same side as the hook. I found when I first began to tat that sometimes the hook got caught in my work and sometimes it didn't. Then I discovered that if the hook was turned away from the work it didn't catch but if it was turned the opposite direction it did. Something as simple as which direction you load the shuttle can effect the way you tat. Different people tat different ways so watch how you are holding your shuttle and you will find which direction works best for you.


4 comments:
very nice post! Did you know you were featured on craft gossip? i look forward to your posts
Dear sharon , i wish you all the best for the year 2014 and thank you again for your excellent designer course!
Clear as mud. One of your "like this"s is missing a photo. And what do you mean, cut off the end but leave enough to hold on to? You assume we know how to tat already!
Thanks Julie, I am new to this still trying to Tatt properley and having little luck. Will keep practicing. Using a needle seems to give me the best results at present but will persist with the shuttle.
Post a Comment