
Monday, December 31, 2018
All 26- which is your favourite?
Here's a picture of all 26 designs created this Christmas season. Which is your favourite?
 All but 8 and 15 have patterns. 1 through 18 were tatted in size 20 thread. Then I ran out, so 19 to 26 were tatted in size 30 thread.
Sunday, December 30, 2018
Teeny, Tiny and Small
Tatting tripped off my shuttles today, but all of these are little guys measuring 2 to 2.25 inches in size 30 thread. It's bad enough that I've had to name things by the current date, but these 3 had to get an added xyz to differentiate them.
There's 12-30-2018x

12-30-2018y
 12-30-2018z


There's 12-30-2018x

12-30-2018y


And of course, here are the corresponding patterns. Does that make 25 designs this season? No, I had to recount, it's 26. Madtatter80 commented "Makes me wonder, out of all your patterns which one is the one the public likes best?" I have no idea and probably won't know unless folks want to pipe up and let us know. So which one do you like best.
Oops! Before I forget, here are the most recent 3 patterns.


Saturday, December 29, 2018
Undecided
I finished this snowflake, but I knotted and cut the thread ends rather than sewing them in, which is usually a sign of dissatisfaction with a design. I liked the first round but the end result was a snowflake of 1.5 inches in size 30 thread which is kind of puny in my estimation. Although it might be a good size for earrings. Round 1 looked like this:

The finished piece looks like this and is 3.25 inches across in size 30 thread. I think it's the ratio of lace to space in the finished design that makes me want to reject this one.

I almost didn't bother with the pattern, but I know you guys and someone was bound to just be in love with it even if I'm not.
 It's funny, but when I started publishing patterns over 20 years ago one of my brothers asked me if I thought I'd run out of ideas.... I guess not.
Just a reminder, all of the patterns on the blog should come up when you click of the Pattern label in the sidebar. I've tried to remember to label the post every time I've added a new pattern, although I might have missed a couple.

The finished piece looks like this and is 3.25 inches across in size 30 thread. I think it's the ratio of lace to space in the finished design that makes me want to reject this one.

I almost didn't bother with the pattern, but I know you guys and someone was bound to just be in love with it even if I'm not.

Just a reminder, all of the patterns on the blog should come up when you click of the Pattern label in the sidebar. I've tried to remember to label the post every time I've added a new pattern, although I might have missed a couple.

Thursday, December 27, 2018
Twenty Two
Another snowflake. This one's about 2.75 inches across in size 30 thread and made for a quick easy pattern.


It might have given it a little more interest if I'd added a small outward facing ring in between the points, but I didn't think of that until I was on the second point and I didn't feel like back tracking. It seems to me I've used onion rings in a snowflake before, but I'm not going to stress over whether or not I'm repeating myself, I'm just going with the flow and enjoying the process.
As usual, here's the pattern.

Twenty One
This makes the twenty first design this season, but this one is a little bit weird. It starts with a simple ring and gets a little squirrely on the second round. It starts out simply enough with a split ring into a chain. At the end of the round you have 2 split chains with a ring in between. So you leave enough bare thread for the split chain, tat the ring joining to the picot of the central ring. Join the thread to the base of the starting ring of the round then tat the split chain back to the last ring just completed. Afterward tat the last split chain. It sounds and looks confusing on the diagram, but just do it one section at a time.
As Muskaan mentioned, if you climb out from the central ring into the small ring on the right, you avoid the squirrel-y bit of this pattern and make it simple again. So I re-drew it. The little rings on the tips of the points are split ring up, chain, split ring down. Al kind of weird, but a pretty enough flake.

What's the use of a snowflake without a pattern, so here it is:
 Revised
As Muskaan mentioned, if you climb out from the central ring into the small ring on the right, you avoid the squirrel-y bit of this pattern and make it simple again. So I re-drew it. The little rings on the tips of the points are split ring up, chain, split ring down. Al kind of weird, but a pretty enough flake.

What's the use of a snowflake without a pattern, so here it is:

Wednesday, December 26, 2018
Umbrella?
Things were zipping right along, but after the last join...

I was looking for a snowflake, not an umbrella. Rats!
Next try, more like it. Number 20. Ta Da!
 Not quite 3 inches across done in size 30 thread. Over the years I've developed calluses along the top joint of my left baby finger from constantly wrapping the thread around it doing chains. Except for after nearly a year of minimal tatting the tough skin has gone soft. When I switched to the finer size 30 thread I found it cutting into the joint and I've nearly cut through the skin. Ouch.
This one's pretty and lacy and snowflake-y and of course there's a pattern. Although if my hands don't toughen up, there may not be too many more.
 Hope y'all had a good Christmas. The joy of the season is Jesus.

I was looking for a snowflake, not an umbrella. Rats!
Next try, more like it. Number 20. Ta Da!

This one's pretty and lacy and snowflake-y and of course there's a pattern. Although if my hands don't toughen up, there may not be too many more.

Monday, December 24, 2018
Nineteen
A rather simplistic design done in Aunt Lydia's size 30 thread because, of course, I ran out of the size 20 thread I was working with. In the size 30 it's about 2.5 inches across, but I'm guessing it would be about the same size as yesterday's snowflake if it had been tatted in size 20. I like the centre, but I'm not crazy about the cloverleaves. If I'm going to have 20 done by Christmas I need to speed things up a little.
 The pattern follows.


Sunday, December 23, 2018
All Gone
Thread, that is. I started designing this season's snowflakes with a mostly full ball of size 20 Aunt Lydia's thread. I got half way through the last round of this last snowflake and ran out of thread. Fortunately I had another ball with just a few wraps left on it, with enough to finish it off.

Here's a pic of the group of them. I've been hanging them on the lampshade where they look pretty with the light shining behind them, although you can't seen them clearly. I couldn't get all of them in one picture so here's one with the light on and one with it off encompassing the whole group. That's eighteen snowflakes designed from one ball of thread.


The last snowflake starts with a basic rose and another row added. I haven't used any cloverleaves in any of the previous snowflakes so I used one here.

Of course the pattern is included below.

Eighteen is an "odd" number. Maybe I ought to design a couple more to make it a nice even 20.
Saturday, December 22, 2018
Did you miss me?
I've just spent the last week and a half getting intimately acquainted with my pillow. Some sweet soul just couldn't help sharing and gifted me with their Christmas blessing of the flu, which I obligingly passed on to my darling hubby. The wretched thing knocked the zip right out of me. The cough medicine prescribed by the doctor added dizziness and nausea to the mix with the result that the cure was worse than the sickness.
I started another snowflake with the same general idea hoping for a more compact result. I'm blaming it on sickness that I miscounted on one of the dimpled rings making it bulge on one side. I figured it would be easy enough to cut out the offending heart and patch things up but when I ended up with 3 thread ends instead of 2 my addled brain couldn't figure out how to attach and invisibly hide 3 ends. (How do you end up with 3!!! ends?)

At that point is was easier to just start over, which I did, but I kept falling asleep and it took me 3 days to tat one snowflake.

The good thing about working with similar elements and creating row by row drawings is that I can often just grab the same row and start with part of the drawing already completed so in spite of not being up to full energy yet, I do have a drawing for this one that works out to be 4 inches across.

Wednesday, December 12, 2018
The computer ate my homework-AGAIN!
It's not really the computer that's at fault, it's me. It's 4:15 AM as I type this and I think my brain is frazzled. I was SO close to having this drawing done. I mean it's only 3 rows, so how hard can it be? Hubby was up working late so I decided to go ahead and work on the drawing. I finished the first row then had to go back and re-work it to get the split ring right. Then I remembered that the second row had rings off the top of the chains and had to re-do that part. The 3rd row had rings in 2 different sizes and when I placed them it threw things off so I had to start again and just as I was saving the final drawing I hit the wrong key while nudging the mouse and shifted a 3 inch drawing to zoom out to half a page in a format where I couldn't hit undo. Grrrrrrr!
I'm stubborn, so I didn't quit. The drawing is done. I think. Like I said it's after 4 in the morning and who knows what I'm doing.
Here's the picture again.

and a pattern to go with it.

I'm stubborn, so I didn't quit. The drawing is done. I think. Like I said it's after 4 in the morning and who knows what I'm doing.
Here's the picture again.

and a pattern to go with it.

Let me know if anything is out of whack and I'll take another look at it when I'm functional again. I'm signing off for the night. ZZZZZ
It's huge!
I have another snowflake done. It has hearts. It has points. Just for Muskaan it has a flower. It's 5 bloomin' inches from point to point.

What it doesn't have yet is a pattern.
Working on it.

What it doesn't have yet is a pattern.
Working on it.
Sunday, December 09, 2018
It didn't look that way in my head
I was trying for a design with dimpled rings on top of chains like hearts on a telephone pole and I figured it would need some rings part way up the telephone pole to hold it together. After the first heart I realized that the chain up and chain down weren't going to make a pole. There was a gap between making another flower shape. OK, I can live with that, so I kept on tatting. Because I was in a mind set that said heart on a pole I planned on the snowflake points being between the hearts rather than on top of them. As I was finishing the second row and it was buckling like mad and far too open to be useful and I realized it would need another row to get points of any kind on it and the points weren't going to be where I wanted them, so I just decided to quit. PFFT!

I'm not drawing this one.

I'm not drawing this one.
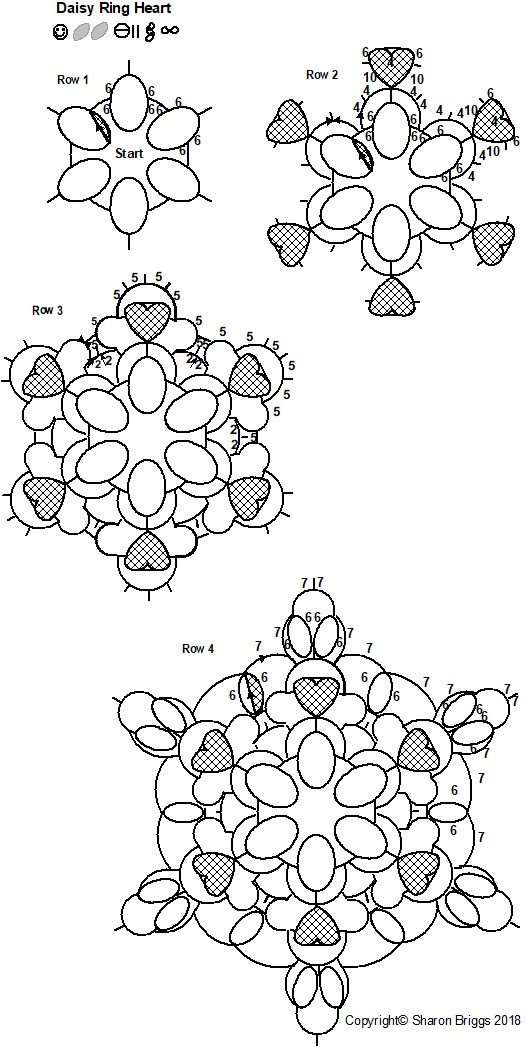
Test tat anyone?
I tatted another snowflake with dimpled rings since it seems that some of you really liked that idea. This one uses a regular 6 ring daisy as a base which does tighten up the centre and gives it more stability. The chain around the daisy let me climb out on a split chain instead of a split dimpled ring and simplified the pattern. I tatted the row around the hearts (Row 3), using only a single picot over the top of the heart, but when I did the next row to form points over the hearts I needed picots where I hadn't planned any, so I wiggled my hook in between stitches 5 and 6 and did the join anyway. You can see that on the last row I used a stitch count of 6 which worked on my sample, but you may have to use a stitch count of 7 on the chains to compensate or use really tiny picots on Row 3. I've shown the picots on the diagram and it should work OK but I'm not going to re-tat it right now as I'm already on to the next. GRIN
Oh, you wanted to see what I was talking about? Here it is:

I guess you want the pattern too, don't you?

Oh, you wanted to see what I was talking about? Here it is:

I guess you want the pattern too, don't you?
If anyone's feeling adventurous and wants to give this one a try and let me know how it turns out, I'd be much obliged. Otherwise it'll have to wait until I get through this spate of designing for me to have the time to re-tat it.
Edited to add: Muskaan graciously test tatted this and noted that using tiny picots and increasing the stitch count to 7 as I suggested worked when she tatted it, so I've modified the drawing to reflect the change.
Saturday, December 08, 2018
Hexagon or Snowflake
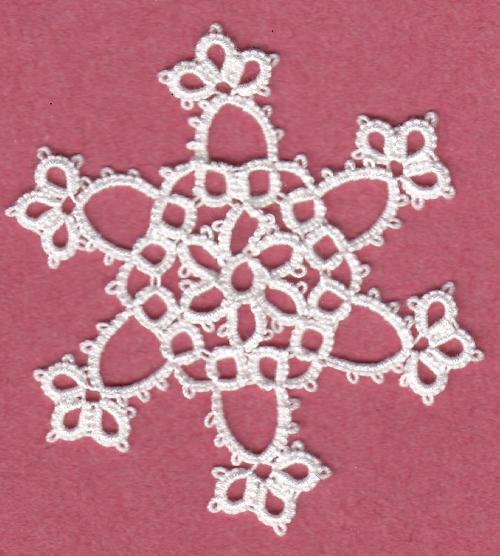
Hello, hello, anyone here? I found a new bobbin and opted for working with one good and one so so shuttle and whipped through this snowflake that I had roughly sketched out. A proper daisy made with rings would have had a tighter, more structured centre that would have lent the design more stability. I didn't want to repeat the chain up to the sides of the dimpled ring, but still wanted to isolate the heart shape, so there are long connecting chains from side to side. My initial drawing had chains going from the middle of the long chain to the pair of rings over the heart, but I could see as I was tatting it that it was going to make for a huge unsupported chain so I chose to go with a shorter chain joined back to the side of the ring ad 2 short chains between. There are still points. Sort of.

This design is about 4 inches across from point to point, but it's too light and airy to hold it's shape without stiffening. It would be OK hung in a window, but it will flop over hung on a tree and the outline is more hexagon than snowflake. I've designated this design as difficult only because it has a split dimpled ring following a split chain. Some people have a heard time getting a dimpled ring to close and when you add in the complication of making the dimpled ring split, it just makes it that much harder. It's at exactly that point where you've already tatted half of the design and you have to pull extra hard to close the dimpled ring, that the thread is likely to break.
I can't make my mind up whether I like this design or not. I could add another row to make the points more pointy, but after a good night's sleep I think I have an idea for doing it with a proper 6 ring daisy, which luckily I already have tatted! LOL

BTW I'm merrily zipping along designing and drawing snowflakes and posting the results here, but not getting a lot of feedback. Has anyone tried tatting these designs? Any suggestions for new ones?
Off to tat more flakes.
Friday, December 07, 2018
Too many designs. Too little time. Too little thread.
I have some ideas. I planned on doing another snowflake with a daisy centre and I have the daisy tatted with both shuttles full of thread attached. Then I noticed on Facebook several people commenting that they really liked the snowflake with the hearts.... Which sidetracked me into thinking of more designs incorporating hearts... Then I wondered if it would be possible to design something starting with a central ring and really long chains terminating in dimpled hearts... And then I took a look a the daisy and realized that it was the same size as the rose used in the Hearts'N'Flower snowflake. So I started drawing it out and then realized that it's possible but difficult to throw a dimpled ring off the top of another ring. It's even more difficult to do it 6 times in a design.
That's when I pulled up the earlier drawings that utilize chains to make the daisy shape and they'll definitely work.
So now my dilemma. I've misplaced all of my shuttles except for the ones that are too loose and the bobbins spin. Or my wooden ones that take too long to load and unload. Or the ones that are full of thread, but already have a daisy attached to them. I have designs floating in my head that have to get out NOW or I'll lose them and no shuttles available. Do I tat like mad to get the daisy design which is currently laying limp in the back recesses of my noggin and is sure to be a disaster because I'm just not feeling it. Or do I wind a couple of worn out bobbins with rubber inserts and limp along getting these fresh designs out into thread?
Then there's the other problem. I'm running out of white thread. I started this exercise with a full ball of Aunt Lydia's size 20 thread and I can already see the cardboard core. I can feel a bunch more flakes in the offing but I'm going to run out of thread before I run out of ideas and the last time I checked the store, they didn't have any more. Lots of size 10, which I don't need because I was gifted with 20 balls of the stuff that I never use, but no size 20.
There are too many designs that want tatting, not enough time to tat, not enough working shuttles, and not enough thread to play with. It's enough to cause a nervous breakdown!
Thursday, December 06, 2018
Another daisy centre
When I'm designing I have no idea whether I'll need a lot of thread, or just a little bit so I tend to just fill my shuttles and tat. Tatting lots of snowflakes has meant that I've ended up with lots of fairly long cut off thread ends. That can get wasteful so sometimes I just start tatting with the left over bits and add in more left over thread as I run out just to use up the thread bits. Sometimes I end up adding in new thread 2 or 3 times in a small snowflake, but the alternative is throwing out a lot of thread.
I'm playing around with 6 ring daisy centres which usually end with a split ring so that you can climb out to the next row. The last one I did I was using up some of the left over thread from previous snowflakes and I've run out of thread just as I was finishing the daisy so it didn't seem worth while to tat a split ring just to tat a partial chain and then have to stop and add thread. This sort of haphazard way of tatting means that I always have to stop and think about it when I draw it out. I need to draw it for what should be done with full shuttles, not what I actually tatted doing my trial piece.

This next snowflake is the second one I drew out, but the arms look too straight... or maybe not. In any event it's 2.75 inches from point to point.
As usual, here's the pattern.

That makes 12 snowflakes I've designed since November 7th. I'm not including the Chained Flake because it was designed a long time ago and just drawn up recently. I wonder if I can come up with a few more before I run out of steam?
Wednesday, December 05, 2018
Baby Flake
I thought I'd try something using a 6 ring daisy. The first attempt made an arm that looked like garbage so I cut it off. I drew out a couple of variations and then started to tat. Here's the first one that I name Baby Flake because it tiny and cute and about the smallest thing you could tat for a snowflake. It's just under 2 inches from point to point.

And since I'd already drawn it before I tatted it, there's a pattern to go with it.


And since I'd already drawn it before I tatted it, there's a pattern to go with it.

Edited to add: The pattern calls for the last ring in the daisy to be tatted as a split ring so that you can climb out into the next row. Since I did this one in a hurry late at night I neglected to show the split ring in the legend although it is shown in the drawing. See that shaded edge of the ring? That's the split.
Tuesday, December 04, 2018
Hearts and Flowers
I went to sleep last night thinking about a snowflake with a rose centre surrounded by points with hearts in them. I mentally kicked around several ideas then I pulled up the drawing program to see what it might look like. It kind of looks like this.

Then I sat down and started tatting it. The rose looked like a rose and the hearts surrounded it but when I added the chains around the hearts it looked like petals, not snowflake points. So I added a row with inward and outward facing rings that gave it points. After tatting the first arm it looked like crap. I kept on tatting and amazingly, it looks like a snowflake!
Complete with pattern of course.

Uh-oh BRB
I'm back, did you miss me? I just realized I didn't label the rows, so I had to stop and fix the pattern. Then I realized I'd missed the stitch count for the chain on either side of the dimpled rings. I wanted to keep the lines around the hearts clean so that the hearts would stand out. Although the design is mostly chains the snowflake still holds it's shape, which is good because I hate wet noodle tatting.
Monday, December 03, 2018
Back to roses and snowflakes
A basic rose plus another row made a cute 2.5 inch snowflake. Simple, quick and easy both in tatting and in drawing. No splitz just shuttle and ball, it just falls off the shuttles.


Wet noodle tatting
I finished another snowflake. I'm not sure if I can say anything about it. It doesn't have an attractive profile and worst of all, it's limp. I don't like designs that don't hold their shape. When I was tatting this one I started with a central ring with large picots, but If I were to tat it again I'd do it with small picots. I didn't join the small rings on the last row, but if I were tatting it again I would join them to give the design more stability. As it is, this design has as much structure as a wet spaghetti noodle.

I'm calling this one a fail and I won't be writing out the pattern for it.
Revised:
After asking which of the 26 designs the public liked, this one, that I called a fail was surprisingly popular. The tiny picots weren't joined on the original design, I just knotted them together with sewing thread to see what it would look like. I re-tatted it, joining the picots and making the picots on the central ring smaller.

It's still kind of limp but it does have the spiky outline of snow crystals which is what I'm guessing people like about it. So, seeing as I've re- done it, I've also done the pattern for it.

Sunday, December 02, 2018
A first for December
This first design for December starts with the same daisy flower and outline row used in the November 27 snowflake. After I got to that point I decided I wanted another row of chain which I tatted forgetting that I needed some picots on it to attach the next row, Then I added the picots and another row with rings joined to those picots and chains from petal to ring to petal. Which put too many stitches in place so I cut it off and started again and the next try wasn't much better.
Then I opted for the simple ring and chain arrangement which also looked like it was going to ruffle. On the next row I just tatted two rings joined side to side to pull things in and I think I finally have a design that I like. It didn't look too promising until I blocked it pulling out the picots on the sides of the points.

Would you like the pattern? Of course you would. So it's here:
 That makes 7 new designs so far this season, not counting the little flake that's just the inner part of another design. Maybe I'll go for an even 10.
Then I opted for the simple ring and chain arrangement which also looked like it was going to ruffle. On the next row I just tatted two rings joined side to side to pull things in and I think I finally have a design that I like. It didn't look too promising until I blocked it pulling out the picots on the sides of the points.

Would you like the pattern? Of course you would. So it's here:

Saturday, December 01, 2018
It's really simple - or really hard
The comments of newbie tatters always hit home. I learned to tat sort of by accident. I had no idea that you needed a shuttle to tat with, I'd never seen tatting and was totally clueless. Then when I'd finally managed my first ring that closed, I had no one around me that tatted and no pattern books. Which is why when I began teaching I came up with a chain only bookmark that can be done in size 10 thread. It's something that a beginner can do in a short amount of time that results in something useful. For your edification I've included it here:

Those of us who shuttle tat know that it's easier for a beginner to work with chains using 2 colours of thread. The different colours make sure that you know when your stitches have been flipped. If it's the shuttle colour, you goofed. If it's the ball colour, all's right with the world.
So, I thought wouldn't it be a great idea to design a chain only snowflake for beginners? This is where theory and reality hit head on. If you're designing something with the idea of it being a simple beginner's pattern you don't want to muddy the waters with teaching a bunch of "exceptions to the rules".

I thought I was being clever but tatting with just chains makes for some other complications. To begin with, there's no starting ring so right away the novice tatter has to learn how to tat a mock ring. Then to keep the picots space from closing, they have to learn about a lock stitch. And then of course all of the joins are shuttle joins rather than the normal type. To top it all off, every round is cut and tie, unless the tatter knows how to tat split chains which brings everything full circle.
I though I was being clever making a chain only design- never mind. Let's just forget about it. I guess that's why I never did get this one drawn out--- until now.
I took the time to draw this one out and you can do it chain only, although this sample obviously starts with a central ring. And, of course, every round ends with a split chain climbing into the next row. I have shown one pathway through this maze of chains, but of course you can tat it any way you want. You can ever forego the split chains and cut the thread at the end of every row. Unfortunately that will mean about a bzillion ends to hide.
Anyway, here it is the really hard - simple chained snowflake.

Subscribe to:
Posts (Atom)
