Wednesday, November 27, 2019

I finally did it

We've been playing darts since August 10, 2019 when we bought our first dart board. I thought the highest score you could get was the bulls-eye in the middle, which just shows how little I knew. For those who don't know much about darts, the green part of the bulls-eye is 25 points and the red inner part is 50 points. The narrow strip around the outer part of the target doubles the score and the narrow strip around the middle triples the score. So the highest score for a single dart is the triple area under the 20 which counts as 60 points. The pros often get 2 or 3 darts in that little space giving them a score of 120 or 180.

On September 24th my sweetie, who excels at everything, got 2 darts in the triple 20 spot (60), which was so significant I had to take a picture.

Then he repeated it with 2 60s and a bulls-eye. Since then he gets 2 60s almost every time we play.

Meanwhile, I'm still bouncing dart off the wall, floor, and ceiling. Until today. I finally did it! 2 darts in the 60 spot! Of course you'll notice that the 3rd dart isn't even on the scoreboard. :(

Monday, November 25, 2019

My new toy

A few years ago we were out riding our bikes and as we crossed the intersection a lady making a left turn hit me, breaking my leg and demolishing my bike. When I was able to ride again we went out and bought a cheap WalMart bike. I went from a street bike, to a mountain bike, because that's what was available at the time and I just wanted to be able to ride again. I also rode with our big blue and gold macaw who liked to do things like chew on brake cables and take chunks out of handles so I didn't want to spend a lot of money on a bike. It had the hardest seat imaginable which left me bruised after every ride, I was hunched over riding it,  and half the time the gear shift didn't work. The gears didn't shift and then suddenly I'd be riding and they'd slam into place. I've hated the bike from the first day I got it, but once I had a bike I wasn't going to go out and buy another one, especially since for the last couple of years we've hardly ridden at all.

This spring we went for our first ride of the season and I came home so bruised I couldn't face getting on a bike again. My sweetie keeps saying I should get a softer seat, but it isn't just the seat, it's everything about the bike that I hate. We happened to be in WalMart and saw an e-bike that was fairly light weight, an important feature when each use requires hauling it up and down stairs, and being electric it would save on my knees which have begun to bother me. It had an $800.00 price tag but I was seriously considering it since we no longer have the parrot, but it just seemed like a lot of money for something we might not use that much, especially since last year we took the bikes out only once and then put them away again for the summer.

I wanted to get a different bell for my horrible bike and maybe take a look at some different e-bikes, so we went into the Cyclepath store which specializes in bikes. When I mentioned the bruising I was getting from my bike the clerk showed us an assortment of softer seats and then as I discussed my dislike of my bike he suggested that maybe the problem was that the bike was just the wrong size for me. Maybe the problem was the distance between the handlebars and the seat and he suggested I try one of the street bikes design for ladies. It fit. Perfectly. I wasn't hunched over, the seat was well padded, (I have enough padding of my own, just not in the right places) and it had lovely Shimano gears that shifted back and forth like a dream. It also cost a whopping $600.00 for a non electric bike.

My new toy. It's a joy to ride. I can sit upright, not hunched over and the gears shift properly every time. I can carry it up and down stairs with one hand, which is a big plus. We've been out for dozens of rides this summer and I'm liking being on a bike again. It was expensive, well maybe not for an avid biker, but it was expensive for my budget, and I really love it. It's another reason I didn't get much tatting done this summer.

Thursday, November 21, 2019

The summer saga


In August I had this weird notion that we ought to get a dart board and start flinging some darts. I have never thrown darts, but I figured we could nail a target up in the basement and give it a try.  When we went to buy the board, hubby balked at paying $50.00 for a board that we might not use all that often, but was persuaded that we should give it a try.

We got the board and  a couple of cheap sets of darts. We thought that we might hang it on the front door which is metal and would withstand any errant darts. That was until we looked at the rules for how high the dart board had to be positioned (5 feet. 8 inches from floor to the center of the bull's-eye) and how far away from the firing line, called the oche (7 feet 9.25 inches). The height meant that we would be aiming through the light fixture in the hallway, so that relegated it to the unfinished basement with concrete walls and floors.

We hung the target in the only bare spot in the basement and started throwing darts. My first few throws bounced off the cement wall and landed on the concrete floor because I wasn't throwing hard enough and every other throw, the flights, those colourful things at the top, popped off. I know I have horrible aim and I didn't want to fire wildly with great force and break something. But I persisted and every now and then I actually hit the board. LOL  To protect the walls, we put styrofoam  around the board which I quickly peppered with enough holes that it started disintegrate, so the foam was replaced with half inch plywood. Please note that all these puncture marks are mine.

We started with the cheap brass darts weighing about 20 grams that were about $10.00 a set, The flights, kept popping off every other throw, so hubby used epoxy glue to hold them on. That was OK, until he got good enough to put the a lot of darts close together which caused him to put the steel tip through the flight or down into the tip of the shaft already in the board.and eventually broke the plastic shafts. It's something they call a Robin Hood because you actually splitting the dart that's already on the board. Since they were glued together, we needed to replace both the shafts and the flights.


We replaced the plastic shafts with aluminum shafts which were not only more durable, but the flights didn't pop off with every throw. It was while we were buying the new shafts that we found a slightly heavier 24 gram brass dart, which hubby liked much better. He also liked transparent flights that let him see through the dart to the target below. That's important when you get them grouped together like he does and can't see the target underneath.

We watched some of the pros on You Tube and noticed that their darts were much thinner which made it easier to put several side by side in the narrow triple spots, so we investigated and bought some more expensive tungsten darts for roughly $50.00 a set. I got a set at 22 grams with a scalloped barrel that made it easy to hold the dart in the same position for each throw. My sweetie got a front weighted set at 26 grams which he liked a lot more except for his Robin Hood problem and when he broke even the aluminum shafts, we started looking for other options.

Of course I was still hitting the plywood backing and bouncing the darts onto the cement floor...so we bought a whole bunch of those interlocking foam mats with a wood grain pattern on one side. The floors are more comfortable to stand on for long hours and the darts aren't getting blunted from bouncing on the concrete, they just stick in the foam rubber. Yes, I did say hours. We've been practicing throwing darts for an hour or two almost every day since we bought the first board.

We also invested in a 5000 lumen work light to spot light the dart board as hubby insists we need a brightly lit area just like the pros. (Who's he kidding? I'm bouncing darts off ceilings, walls and floors which makes me as far from professional as you can get.)  Of course the new light means wiring in a new outlet on the ceiling for it... which put the power switch out of reach, so a new light switch was required as well.

Meanwhile, I'm still having trouble just hitting the board. My darts are dropping out of the air before they reach the target and after watching a bunch of professional tournaments on You Tube, I'm persuaded that my darts are still too light. The brass ones were 20 grams and the tungsten ones were 22 grams and my sweetie is breaking the shafts on his making the darts unusable.

Off we went in search of heavier darts and a solution to someone who consistently imitates Robin Hood. We had to travel quite a bit to find a games store that dealt with darts and the clerk who assisted us asked about what we were looking for and then had us try out a whole pile of different darts.

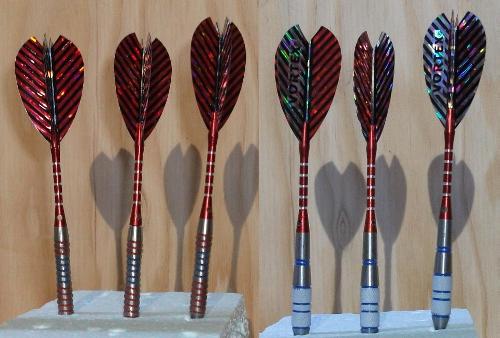
The set that I liked were 95% tungsten, 26 grams, slim, elegant and perfectly balanced as well as gorgeous, but with a price tag of  $179.00. Get this, I'm bouncing darts off the walls and floors, but I'm still willing to fork over a couple hundred bucks for this set of darts. They came with plastic shafts that just don't hold the flights tightly and after my sweetie Robin Hooded his darts, I want metal shafts on all my darts, so I changed the shafts and since they were so pretty, I opted for nicer looking flights as well. All told, I spent about $200 for a set of darts. Is that crazy, or what?

Hubby went for a set that was a hefty 34 grams but only a $95.00 price tag, Then he went for Fit Flights which have special shafts and one piece shaped flights the fit over top of the shaft. Your can't damage the shaft because the flight fits over top of the shaft instead if fitting down into it. The flights spin out of the way when hit and deflect the dart away from the shaft so he can't Robin Hood them as easily, which added another $25.00 to the cost. You can Robin Hood them, but it isn't easy and the flight is usually OK even if it gets pierced.

Then we looked at the dart boards. We first bought a basic wired board and even though we'd only been playing for a few weeks, we'd hit the wires and bounced darts off them repeatedly, and the wire was starting to pop out in places. The better boards use really fine, embedded, knife edge wires, so of course we had to upgrade. Then they had really neat LED light rings that went around the board to light it up which hubby was persuaded would make it easier to see the target. The bill for the new darts, new board, new lights and upgraded shafts and flights came to over $500.


Since we bought the initial dart board on August 10th we've spent hours in the basement throwing darts and even with the cushy foam rubber, standing for that long is tiresome, but getting up and down from a regular chair is hard on the knees. So when they came on sale, we bought 3 padded rotating bar stools at $60.00 a piece.

The end result? We spent probably close to $1,000.00 on darts, boards and related paraphernalia. Before August this year I had never thrown a dart and now we're spending more than an hour a day flinging them. I still can't hit worth beans but we're all getting a laugh out of all of the times I bounce a dart off the ceiling and into the target. Yesterday my second dart fell out, just as I threw my third dart and knocked it into the bulls-eye.

Trying to get the dart high enough to score 20 I keep aiming higher and often bounce the darts off of the duct work in the ceiling. Surprisingly enough the ricocheted darts do land on the target and as often as not they hit the 20 even occasionally hitting the triple 20.  I don't think I'm getting any better at playing darts, but I'm certainly good for a laugh as we all marvel at how 2 out of 3 miss the target entirely and the 3rd ends as a bulls-eye!

We spent a lot of money on these toys, but we're certainly getting a lot of use out of them. Darts anyone?

This one's blue

I haven't blogged in ...forever..., but I didn't drop off the face of the earth. One of our neighbours lost his wife earlier this year and he's understandably finding it hard to cope. According to him, his adult son who lives with him spends most of his time in his room barely talking to his dad. He leaves Friday night and drives up north to stay with his friend over the weekends and comes home Sunday in time to sleep, so our neighbour feels like he might as well be living alone and it's been really hard on him.

Consequently he's been spending most of his time here, joining us for supper several times a week, which has impacted our home life, but it's what we would like other people to do for us and we don't mind. We have an extensive library of movies and we've been playing them to help him keep his mind off his loss. Grieving is a process and it will just take time, but being able to focus on anything but her death helps him to adjust to life without her. Needless to say, I haven't been able to do much tatting.

I did get another doily done. This one is in blue, which is my favourite colour. This is a small one, only about 9.5 inches across, but it's big enough to fit under the table light. I'm not a fan of doilies with floppy ragged edges, but at this point it just looked finished to me and when I contemplated making it larger I knew I'd have to repeat the large negative spaces and to add enough of a border around that was going to make for a very big doily with some very big holes in it and I knew I didn't have enough thread on hand to do it, so I've called it done.

Monday, July 08, 2019

Doily re-make

A couple of years ago I thought of doing a book of doily patterns and started out by whipping out a couple of doilies. I like to work in nice basic white which gives me a good idea of the geometry of the doily before I waste lovely colourful threads that are harder and more costly to replace.

 I recently started an order for about 10 balls of thread that priced out at about $50 US, but the shipping was $47 US and then add in a roughly 25 % increase for the exchange rate to Canadian currency and a wee little project like this, which was only the first stage, got real expensive, real fast. I didn't bother to complete the order, but I know I'm going to have to bite the bullet soon because I NEED white thread before the urge to tat winter snowflakes hits again.

In any case both of the initial doilies bombed out. Usually I can go start to finish and end with something that's reasonable and needs only a little tweaking. The first one looked okay but it ruffled a bit and it didn't really grab me. The second one I kind of liked but it started to ruffle and I thought that I could pull it in on subsequent rounds but it just kept getting worse. The result was something I might have liked if it hadn't ruffled badly. (Is there a good way to ruffle?) ((Psst, anyone remember those ruffled monstrosities that had to be starched into a border of hills and valleys? They took forever to crochet, and forever to starch into shape every time you washed them, and you couldn't put anything on them except in the very centre. Who was the moron who thought that was a good idea?))

Anyway this is the unfinished, ruffled doily.

The other day I thought to myself that I ought to re-visit the design and see  if I couldn't keep the bits I like and ditch the ruffles that I didn't like. I used variegated Island Breeze 130 and it's complimentary colours of  635,657,658. I started the central rose with 620 before I decided to tat the doily, which is why I didn't used the pink that matches Island Breeze. I wanted that central rose to stand out and thought that jumping right into the colour scheme might not look all that great so I grabbed an old ball of Aunt Lydia white, which was the only white I thought I had. It's more cream than white, but it works. Then I grabbed the darkest blue and the Island Breeze and started tatting.

What I really liked about the design was the band of chains half way through the doily and I chose to use the violet thread as sort of a darker version of the pink in the central rose. In keeping with what I had done for the centre I added the second row of white after the violet. Then I followed a similar design as the first doily making the rows of ring and chain much tighter to stop the ruffles.

I almost stopped at the penultimate row, but it still wanted to ruffle a bit so I added the last round. All in all I think I like how it turned out.

I'm not especially good with doing things in colour unless I have a very specific goal in mind. but after this one was done it made me happy looking at it, so I'm satisfied.

(Grumble. grumble, I'm finished, now what am I supposed to do with myself?)

Friday, March 15, 2019

A long time coming

For a really long post, but it's worth it, I think.

I started designing flowers for my wedding. They were really ugly first attempts but I persisted creating several credible blossoms. One of the flowers most used in wedding bouquets are roses, but they are also difficult to create. Mary Konior has a design called Rosa Frivola which is essentially a length of scalloped edging rolled into a coil that only looks as good as the way you coil it. I haven't tatted it, but I wonder how well it will hold it's shape and my suspicion is that it won't.

Roses get their shape from layered petals and to repeat that in tatting means tatting lots of individual petals. Typically roses used in bouquets are buds and not full blown roses. Years ago I made an attempt at many layers but I ended up with a lump of tatting that didn't have any real shape so I tatted a cup shape to enclose it. Lots and lots of tatting and when I was done, it was just a lumpy mess like this and I might have persisted with it, but who wants to invest hours and hours to tat one single flower?


The trick is how to get something roughly rose shaped with a suggestion of layered petals without having to tat and tat and tat, while at the same time making the petals have some kind of shape. I considered one possibility would be to start with a small styrofoam ball, cover it in a base of tatting and add petals around the outside. The ball would give it the bud shape and structure and then the tatted petals wouldn't have to do anything more than attach to the ball base. I discarded the idea because the styrofoam ball would show through the lace which would necessitate figuring out a simple way of making the ball the same colour as the thread. Over the years I've made several attempts, but they just didn't work for me.

One of the other flowers I wanted to create was a blue florist iris. Not the big flashy bearded iris, but the simple skinny florist iris, not only because I like them, but also because it's one of the few flowers that is blue. The trouble is that those skinny little flat petals are hard to hold in shape. Then I looked at some of the irises used in bouquets and I realized that they were mostly buds that haven't opened out flat and it gave me and idea. It looks like the idea worked and maybe I can extend the idea to create a more open iris.

In the interim, working on the iris gave me and idea for tatting a rose and I think I might have got it. It isn't quite what I want, but it does have dimension and shape and individual petals that give the suggestion of a rose. It doesn't require oodles of tatting, although it does take a fair amount of work. from the base of the sepal to the top of the petals it's roughly 2 inches in size 20 thread, and about 2 inches wide. The petals can be wrapped around one another or the tips can be curled out just like a real petal. It isn't perfect, but it's the closest I've come. Want to see?

Ta Da!


This design works only because the chains are tatted tightly. Let me repeat, tat the chains tightly, it's the only thing that gives the design shape. Usually you don't want your tatting to curl, but in this instance that's exactly what you want. The flower is worked in 2 layers, both of which are joined to the same starting ring. The starting ring has 6 picots and the inner layer is joined to picots 1, 3 and 5, while the outer layer is joined to picots 2, 4 and 6. The inner layer is done in 3 segments so you begin tatting up one side of the first segment and then down the second side, joining back into the first picot of the starting ring. Cut the thread leaving 5 or 6 inches, tie and knot and insert the thread ends through the starting ring. Skip over to the 3rd picot and start again working up the first side of the segment joining to the appropriate chain of the first segment. You'll see insanely long picots in the diagram with tiny red star markers on them. DON'T TAT THEM THAT LONG! They are normal size picots, but the drawing is flattened out resulting in those enormous lines. It's one of the things that happens when you show 3D tatting in 2 dimensions. Tat the second section leaving long ends, tie and insert through the starting ring. Tat the 3rd section joining the chains to the other 2 sections. You'll end up with an odd sort of tube shape.

Start the second layer joining to the 2nd picot of the starting ring shown grey in the diagram because it's already tatted. Tat a chain of 5, RW tat a tiny ring of 3 and join to the picot on the first layer where marked with the star and finish the ring with 3 more stitches. Continue following the diagram working up one side of the petal. There are 3 smaller rings are joined to the larger ring which doesn't exist yet. Tat the first of the 3 rings with a fairly large picot and join the other small rings into it as you tat them. Tat the large split ring joining it into the 3 ring grouping as you go, then join it to the single small ring at the bottom of the petal, finishing it as a split ring. Tat the next large split ring and work around the second side of the petal. At the bottom of the petal join back into the 2nd picot of the starting ring

For the second row, tat the chain up the side of the petal joining into the base of the tiny ring. Tat the next chain joining to the base of the small ring, and follow the diagram up the side of the petal. At the top of the petal tat one small ring joining it to the base of the large ring on the first row. Then make a join at the star on the first layer at the top of the petal followed by another small ring joined to the base of the second large ring. Tat down the second side of the petal. Cut the thread leaving 5 or 6 inches and tie the ends poking them down through the starting ring.

Repeat for the other 2 petals. You'll note that the petals formed by the second layer are joined to the first layer once at the bottom at the beginning where the tiny ring is and once at the top near the end of the petal between the two small rings at the top.

Now all that's left is to tat the sepal. You can begin with the starting ring of the sepal and enclose all of the thread ends in the ring before you close it, or pull the thread ends down through the sepal after it's tatted. Tat the split ring to climb out of the staring ring and continue tatting ring and chain ending with a split chain. Start the next row with a split ring. The inward facing rings are joined side to side, but  the larger outward facing rings are not. Cut the threads 5 or 6 inches long, tie and feed down through the sepal. Insert one end through the starting ring of the rose and knot the ends. This will tie the sepal and the rose together. Pull all of the thread ends of the rose down through the sepal and pull up on the outer rings of the sepal pushing the bottom of the rose firmly inside the sepal. 

Take an eighth inch dowel and file down one end. Push it up through the centre of the starting ring of the sepal, it's going to be tight, and if you can, through the starting ring of the rose. Wrap dowel and thread ends with florist tape. The thread ends are what hold it onto the dowel. You can omit the leaves if you choose, or tat them,  ending with a chain or just threads and wrap the chains or threads with florist tape joining it to the stem of the flower.

So here it is at long last.
The diagram is necessarily huge, so if you have trouble viewing it, please let me know.

Monday, March 04, 2019

Daffy - dil

This design nearly drove me daffy. If I haven't mentioned it before, I have rather strict guidelines for flowers. They need to be relatively life size and life-like. They need to hold their shape without the use of wire. I figure that if you want a tatted flower you want it for display and you don't want it to flop over like a wet noodle. I also figure that if you're going to invest that much time in tatting it, that you want it to last for a lot of years and wire, even coated wire can leave rust spots. The flowers I designed for the Transitions in Tatting book have been sitting in vase for years and they're still holding up 20 years later. I vacuum the dust off regularly and I did wash and fluff them once about 5 years ago but without wire, starch or glue they're still looking like flowers.  Those requirements add a few more constraints to your designing.  Having designed a daffodil before, I knew what I needed and just had to execute it.

Sounds easy, right? Not so. I complicated things by wanting the yellow part of it to have more than just concentric rows of ring and chain and distinct petals unlike the earlier design shown here:

After referring to various pictures I wanted the trumpet section to have a slight flare and finish with a ruffled edge. Everything I tried was too tall too short, too wide, too loose, too ugly and in short, it took multiple tries to get a finished result I could live with.

Then I started drawing it and if the tatting made me want to throw shuttles, the drawing made me want o throw the computer. It's not the computer's fault, more like I was just tired and frustrated with the design already. You never realize how hard it is to explain the construction of 3D lace until you try it. In simple terms the flower is a flat back with a tube stuck in the middle of it. Trying to show a tube shape in a flat drawing is a bit of a problem, so what I've done is to draw it as if it were stretched out so you'll see what appears to be insanely long picots between rings. I initially used normal picots with a dotted line between them, but that seemed more confusing because it might have been interpreted as picots that weren't joined.

I also considered breaking the design down row by row, but that would have made for an enormous drawing, so for now it's just 2 drawings, the back and the trumpet. The yellow petals will overlap a little bit, just like in a normal flower. The chain that is drawn in red on the base is where the trumpet attaches to the base. There is a chain in yellow tatted for the base. When beginning the trumpet tat the same chain in orange joined to the same points as the underlying yellow chain. There is a picot in the middle of the yellow chain but at the same point in the orange chain there is a left and right ring pair 7-7, with each pair joined to the pair beside them. Clear as mud, right?

Anyway, here's the pattern. If anyone tries it out and has a problem, let me know and I'll see if I can't make things clearer.

I forgot to mention, this flower is about 4 inches stretched point to point and the trumpet is about 1.25 inches tall.

Sunday, February 24, 2019

Frustration

I had an idea and set about putting it into lace. Part way through, what was supposed to be a petal was conforming more to the shape of a hexagon, so I cut it back and started again only to discover that the only way to accomplish what I wanted was to have outward facing rings on each petal point which I hadn't done. Sooooo, I unwound the bobbin and pulled back all of the rings and chains on the previous row and then re-tatted it with the outward facing rings now in place.

Then I started on the next section and the ring size I had chose was too big. I unwound the bobbin and pulled the thread back to the beginning. I have no problem with undoing 3, 4 or 5 rings and chains one stitch at a time, but 12 or so is just too many so I unwind the bobbin and pull the thread back.

(To explain for newer tatters, on the chains I go to the beginning of the chain and using a hook, pull on the core thread until I can pull it out from under the stitches. On the rings, I wiggle the hook between stitches until I can pull a bit of the core thread. Then I go to the base of the ring, separate sides and pull the core thread right out of the ring. This method is faster than undoing individual stitches.)

By the way, I noticed in one of the earlier comments someone mentioning that they tat tighter than I do. When I began tatting, I had such a stranglehold on the thread my stitches were so tight, I couldn't have wiggled a hook between stitches and I had to use a needle, frequently breaking the thread. One of the first things I tatted was a hanky edging in size 80 thread. Once I completed the edging I laid aside tatting and picked up another hobby, but I was plagued by the loss of feeling in the fingertips of my left hand. I had a series of tests done to find out why my fingers were numb, although by the time the tests were scheduled the feeling had begun to return, and I took my shuttles along to the hospital to fill in the hours between tests. Funny thing, as soon as I started tatting my fingers went numb again. The prognosis was that I had desensitized my fingers. Well duh, I kind of figured that out for myself! Consequently, I had to make a conscious effort to tat looser, or give up tatting altogether.

Back to my current project, I have just finished this round of 24 rings and chains and they all have to come out. AGAIN! I have a limited amount of this thread colour, so I can either take a chance that I'll have enough to complete the project and cut it off, or save the thread and undo another 24 rings and chains. I'm tired of pulling this thing apart and sewing in ends from all of the starts and stops.

I think maybe it's time to go read a good book and leave this disaster until morning.


Friday, February 22, 2019

Paperwhite - Ow!

I thought that since I was in the mood for spring, that I'd continue in the daffodil family and tat a paperwhite. Paperwhites are little and they grow in clusters. To get the right shape I thought that I'd tat up one side of a petal and down the next using graduated ring sizes to get the wider middle section. The trumpet shape on a paperwhite isn't very pronounced so I decided that beads would give enough of a suggestion of stamens and a single row of tatting would do for the trumpet shape. The central ring is tatted with 3 beads on alternate picots of the centre, beginning with a bead on the first picot leaving the last one as a mock picot. The first row has short chains with a picot in the middle. You'll note tiny stars on this picot in the diagram as row 2 and the trumpet shape both join into this picot.

The rings forming the petals are tiny with lots of joins. The rings at the tips are 3-1-2 or 2-1-3, with the longer side (3) to the outer edge of the petal, and the other side joined to the ring beside it. Over 10 joins on each petal for 6 petals, made for jabbing the hook through the picot and against my finger over and over again nearly 100 times for each flower and since they grow in clusters I did 3 of them in a 24 hour period, finally wearing a hole into the side of my finger -owie.

The flower is about 1.75 inches across done in size 30 thread. I think it might work in size 20 thread if one ring and chain repeat was omitted from the middle of each petal, but I'm not going to try it as my finger is presently out of commission. Size 40 thread would make a slightly smaller flower, but it still roughly the right size for a paperwhite.


The pattern for this little gem is really very easy without any split rings or split chains or really anything special but it does make a cute little flower. There are a lot of stitch counts in a very small space, so let me know if the pattern isn't readable and I'll get it reposted in a larger format.
                                                                                                                                                                                                

Monday, February 18, 2019

Would you believe?

You know all those twisty turny tangles we try so hard to keep out of our tatting? Well I've just spent a ridiculous amount of time trying to get them in. Aaannnddd once I got them in they didn't stay in. So I opted for teeny tiny knots. Would you believe it took almost as much time to tie these idiot knots as it did to tat all of the yellow bit?

No, you wouldn't. Well you ought to. And why would you want to tie itty bitty knots? To make stamens of course. I'm tired of cold and snow so I was thinking spring. Does this say spring to you? It does to me.

3D tatting can be challenging, but you just have to take it one step at a time. Beginning with these frustrating knots I started with a central ring in yellow of 2-2-2-2-2-2, but that left things empty in the middle. Then I tried alternate small picots and large picots with a stitch count of 1 between. Bend those ridiculous stamens out of the way tat the split ring and carry on joining into the small picots. Stretched out I allowed about 1.5 inches for the long picots. Just enough so that I could tie a knot in the tip of the picot. You want to keep all the long picots about the same size. See what the first round looks like - alien antennae.

Take note of the little stars shown on the first row. More about them later.

The large rings on row 2 are 4-4-4-4 and I made the side picots a little bit longer than usual so that the trumpet part of the flower would have a bit more flare. You'll notice that although the pattern shows this row as being outside the first row, the tatting is actually perpendicular to it. At this point you may want to pull on the tatting and stretch it into shape. It should kind of look like a thimble. Here it is completed.

Change to white thread and join to row 1 of the yellow trumpet where marked with stars. You'll actually be joining to the picots on the bit with the antennae. There's already a row 2 of the yellow trumpet in these joins at the tip of the picot, so you have to make the white join into the picot beside the yellow. You can join to the left or the right of the yellow join, but be consistent. Once you have the first row of white done you can start to see the flower taking shape.

Blocking 3D objects can be problematic which is why I don't usually bother with blocking it. I pull the lace into shape tugging and stretching the lace. On this design, you could block the white part of the lace, but on the yellow part you'll have to be content with finger blocking. Finish it off by grasping all of those tiny knots and pulling them up to sit neat and pretty in the middle of the flower. The finished flower is about 2.5 inches from point to point done in size 20 thread. These samples were done in Lizbeth Lemon Yellow and White.

I guess you need a pattern to do that don't you?  Row 2 shows a dashed line connecting the side picots of the rings. The picots are obviously not as long as that. Row 2 is vertical and to show it from the
top all you'd get on the visual is a straight line. Showing it flattened out  makes for those longer lines.

You'll note that on the rest of the diagram row 2 is omitted because you join into row 1 and continue on from there. I probably should have taken a picture after the first row of white was done, but I didn't think of it.


I tatted the first one using twisted picots and tiny outward facing rings on each petal. I did the second one with teeny tiny knots on the stamens and omitted the outer ring on each petal. I think I prefer it with the outer rings and that's the way it's drawn, but you can use them or omit them, whichever way you like it.

For those of you thinking I'd go for a spate of tatted eggs, sorry to disappoint, I'm more in the mood for flowers.

Tuesday, February 12, 2019

Be my Valentine

Here's a listing of the hearts and the pages with the patterns. They're listed in the order that they were designed and the list below links to the pattern for each heart. I have to say it's not my best work, but with Valentine's Day looming tatters are always looking for new heart designs and I'm sure you'll find one or two you like and you still have enough time to tat one or two before Valentine's Day.

1-   Heart 1-12-2019
2-   Heart 1-13-2019
3-   Heart 1-13-2019b
4-   Heart 1-14-2019
5-   1-23-2019 Heart
6-   Heart 1-25-2019
7-   1-31-2019b Heart
8-   2-2-2019 Heart
9-   2-3-2019 Heart
10- 2-6-2019 Heart
11- Heart 2-11-2019

I've also labelled this page Feb 2019 Hearts so that it will always be easy to find.

One last heart

Here's the latest design. Like I said, I had to tat one side, then tat the second side joining it at the appropriate points, and finish it off by tatting the bottom cloverleaf. (Edited to add: Now that I'm looking at it again, I think this one needs an outline row, or maybe not.)

I'm not thrilled with the results, but there it is. I swapped shuttles to change the curve of the chain and I think I have correctly shaded the rings to show which shuttle they are tatted with, but trying to remember what was done working upside down and backwards, I might have goofed. Not that I think anyone's going to want to tat this one, but I've been wrong before 😄 So here's the pattern anyway.


By they way, I got an odd notice from Google saying they were making a change to the comments:
"Google+ Comments: Support for Google+ comments will be turned down, and all blogs using Google+ comments will be reverted back to using Blogger comments. Unfortunately, comments posted as Google+ comments cannot be migrated to Blogger and will no longer appear on your blog."
To the best of my knowledge I haven't used Google+ Comments so that shouldn't be an issue, but if you have problems leaving comments please let me know using sharon at rsbriggs dot com (See I remembered that if you can't leave a comment you can't tell me!)

I think I pretty much have the hearts worked out of my system, but for convenience I'll do a listing like I did for the snowflakes as it makes it much easier to find the pattern you're looking for.

Monday, February 11, 2019

Did it again

I thought I'd start with a 4 ring motif and drew out what looked like a decent first half of a heart pattern and began to tat it. The first side went great, then I started working back up the second side.

See the problem? No? Well follow the yellow brick road and look at what happens when you tat it in reverse. There's another cloverleaf (not shown) on the bottom but then when you try to work it up the second side you join into the previous join...Wait a minute, there is no previous join because that part doesn't exist yet. OK. just slip in a paperclip or safety pin or scrap of thread as a marker and continue tatting...Oops, there's another one, and another. Rats, they're all over the place. The only sane way to do this design is in 2 pieces. Right side, left side and finish with the cloverleaf on the bottom.

Phooey!!! And it was going so well up until then. That's the second drawing I've done that looked good on paper, but was a stinker to execute.

On another note - did you see what Muskaan did with the January 31st heart and flower design? First she did the dimpled ring and the little bottom ring in one colour and the rest of the heart in a second colour. Then she did the dimpled ring in red, the flowers in yellow surrounded in green with an outline in a creamy beige. Outstanding! I may be able to design patterns, but I doubt that I'll ever have her flair for colour.

Thursday, February 07, 2019

Hearts within hearts

When you look at a heart, it's generally a triangle shape. I wanted to try a heart with more hearts inside so I went for a generally triangular shape with a dimpled ring at the apex of each point, which gave me a really odd looking outline. It smoothed out a little with the next row, but I really wanted a lacier outline. I got the lacier outline, but the bumps at the top could have been more pronounced. The finished heart is about 3.25 inches across and 3 inches high done in size 20 thread.

For some reason the drawing of this one is really compressed at the top. I might be because the thread of the dimpled rings on the top bends down toward the bottom of the heart making more space than what appears on the line drawing. In any event, I had to cram too many stitches for too many rows in at the top, so I showed the stitch count for the rings of the repeat motif inside the rings. The joins for this ring, chain, ring motif at the top of the heart, are into the base of a ring, or to joins, of the previous row. Try getting that to fit into a drawing and then fit in the stitch count without a lot of aggravation! I did an inset to show the proper stitch count and to show the imaginary picots of where the joins are made, so the drawing should be clear enough. I suppose I could have done the drawing over top of the heart JPG which would have fixed that, but when I realized that would have been a better way to go, I already had it mostly drawn. So there you go.


I design because it's fun. When designing or creating drawings becomes too onerous, it isn't fun anymore, and at that point, I quit. The design and the drawing thereof may not be great, but there they are. As long as I'm enjoying it I don't mind churning out patterns. They may not be the most elegant patterns around, but hey, what did you expect?😉 I keep telling you I have the attention span of a gnat and I'm already on to the next thing.

Sunday, February 03, 2019

The dimple that grew

I've already written about what happened when I started with a dimpled ring and tried to make the heart shape grow by adding rows to it. That didn't work! So I thought about it and realized that I needed to have space between the dimpled ring and the next rows. I drew out a possible version and tatted it to see if it works. What do you think?


It's about 3 inches wide and 2.25 inches tall in size 20 thread. And since I'd already sketched it out, here's the pattern. Begin with the dimpled ring and then start the chain around the outside, ending the row with a split ring to climb into the next row. Do the same thing with the next row and finish with the small outward ring on the bottom of the heart. The dimpled ring is only shown as an inset to avoid having the stitch count crammed into little places.


Saturday, February 02, 2019

Simpler is better

Sometimes there are designs that are created, just to see if you can. They're often one of a kind designs as in Carol Amich's 3D tatting, like her haunted house. If you haven't seen her 3D tatting, take the time to go wander through the back posts on her blog that's linked above. Some of these designs get shared, but a lot of the time they exist just because the tatter wanted to play around and see if an idea, percolating in a fertile mind, might just be possible. In those instances, it isn't about making a pattern others can follow, it's just about creating.

When a designer is creating specifically so that others can tat, it isn't about, yes you can create it, it's more about can you make something other people will enjoy tatting. Have you ever worked on a design where you had to refer back to the pattern after every ring or chain to see what to tat next? If the design doesn't flow in a logical progression it makes it, not really harder to tat, just not as enjoyable. Consequently, when I design now, I settle as much as possible on a single ring size and a standard repeat of stitches and picots for both the rings and the chains. That makes it easier for the tatter to get into a rhythm, and enjoy the process rather than struggle with each ring and chain. Making it simpler, doesn't necessarily make a better design, but it does make for a better tatting experience.

This heart is simpler than the last design. It's a basic 5 lobe heart with a couple more rows around the perimeter.
I could have added another row on the outside to smooth out the curves but I decided it looked good as is. The finished size is 2.5 by 3 inches in size 20 thread. The pattern follows:

There's just one split chain on the penultimate row and you can tat the pattern without the split chain by finishing the row normally, cutting the thread and beginning the next row. That will make for hiding the ends on both of the last 2 rows instead of just the final row. See? Simpler.