Thursday, October 06, 2022

Another variation

This is another of the bookmarks with a 4 ring motif as a base. This one also has the motifs joined in a square rather than a diamond. The variegated thread in this one is in the inner row of motifs and again the pattern shows separate start points for the motifs and the outer row because of the colour changes.


I don't think I did one utilizing onion rings in the outer row, or one with the outer row with rings laying on the side. So maybe I need to do a few more just so I can experiment some more. The pairs of tiny rings made for a shorter row so this bookmark is a little thinner than some of the others.


I must have been on a roll with these because the inner row of motifs are again all 5-5-5-5 but the tiny pairs of rings are 3-3 and the chains are all 3-2-2-3.

Wednesday, October 05, 2022

More DIY

I outlined some of the things we did in the past year and my sweetheart has uploaded a lot of work-in-progress pictures of our activities. I know we did a lot, but when I review what he's posted I realize we did even more than that. In one of the bedrooms we had shelves along one whole wall, which we removed and then built in a lot of shelves in the closet instead. We now have one large closet mostly full of toilet paper, boxes of tissue and rolls of paper towel. Remember the toilet paper shortage? We don't. The closet was already full.

Before we did any of the floors we went through and painted each room. It just made sense to splatter the old carpet we were removing, rather than mess up the new flooring.

You know how I said we painted the walls, well painting them was the least of it. All of the ceilings have that horrible "popcorn" finish, so if you brush against it it falls off like dandruff. What's worse is that if it gets wet like with the edge of a brush or roller touching it, the popcorn starts to slide all over the place getting stuck in the paintbrush and roller and transferring to the newly painted walls. YUCK!

Then there's the stairwell which was previously painted with a gloss paint so the whole area had to be sanded down completely before it could be painted. Even with the extension ladder I couldn't reach up near the ceiling, (the ceiling with the horrible popcorn on it so it was necessary to be especially careful.) That meant of course the Rob had to sand and paint that area because he's taller and could reach it. 

You know what's really, really scary about that? Rob has Meniere's disease, so he's ALWAYS dizzy. If you want a recipe for disaster, put a dizzy person on the top of an extension ladder propped up in a stairwell. I spent most of my time clinging onto his legs just to make sure he didn't fall.

Once we got the floors and walls done, we finished off each room by buying new blackout drapes and getting rid of the ugly old shades, drapes and blinds.

If you like seeing DIY projects in process, take a look at what my sweetheart uploaded the other day. There are pictures of the cannonball bed being made along with some speeded up movies from the garage camera. http://www.rsbriggs.com/bed/

Then there are pictures of each of the rooms before and after we worked on them.  http://www.rsbriggs.com/lam/

Another 4 ring bookmark

This is another bookmark based on a square 4 ring motif. I found what I thought was the pattern in my archive but when I started counting stitches, it wasn't the same. I looked back through previously published work and I can't see this one anywhere so I'm posting it now.


These bookmarks were all done in multiple colours and there was no need to climb out from one row to the next, or at least not in the colours I used. Consequently, there are 2 start points, one for the square motifs and one for the outer row.


Just remember 5. The rings are all 5-5-5-5 and the chains are all 5-5. Super easy.

Most bookmarks are really edgings with the second side a mirror image of the first. A lot of them will also look nice on a cuff, collar or the edge of a pocket. Just another use for a versatile bit of lace.


Monday, October 03, 2022

4 ring motif bookmark 1

OK I'm out of practice and keep forgetting things that I ought to include like the starting point and the direction of work, and how to use the software and... you get the idea. 

When I'm on a designing roll, I often use the same bit as a starting point. What I mean is that if I design one thing with a rose base or a daisy base or some other little bit, I often design a lot of things with the same base. It lets me do a lot of, "what if". Like, what if I make this ring bigger or do a smaller pair of rings instead. I already  know what my stitch counts have to be in order to work because I have a functional sample to base things on. It also lets me start with a partially written pattern because I just have to draw in the bits I did differently and change the stitch count if necessary. 

I started several bookmarks using a little 4 ring base motif. Some of them had the little motifs joined 2 rings in a square and others with the motifs joined point to point in a diamond shape.


This one alternates a diamond with a square. That means that the rings in the diamond shape are split down the middle and the square shape ones are split out the side. In both cases half the motif is tatted with the first shuttle and half with the second shuttle. (Except for the first and last motifs, obviously.)


Since this design was intended to be done with one solid and one variegated colour, the second row starts over rather than climbing out which is why I've shown 2 start points. But, you're the tatter, you make it the way you want. It could just as easily have one solid colour for the centre motifs, a complimentary colour for the 2nd row rings and a matching variegated for the outer chains. Or it could be all done in one colour. You decide. 

I'm back to hiding ends and making tassels. 

Colour

I'm half way through finishing off my collection of bookmarks. These were just little bits I tatted while watching TV just to keep my hands and mind busy and I wasn't going to draw out the patterns, but I've changed my mind. 


I did this one first in mauve/white/green and one solid thread in mauve, then again in deep blue with a variegated blue/white/yellow. I really like them. They were easy to tat and just seemed to flow and the colours blended nicely. These were done in 2014 and I suspect that the last one was done at the same time. The solid colour is a green that matched the green in the variegated thread perfectly, but when I did the bookmark in this colour combination, I didn't like it at all! I think it's just too many colours. That may be why I never bothered to finish it off. It's done now and waiting for gifting. 

I have the pattern already drawn, but I can't see anywhere where I published it. So here it is:


I used the same variegated thread paired this time with a solid red, but again I don't care for the final result. At first glance I thought I'd done this one before too, but it's totally different.


Here's the other one done in monochromatic black and white:

https://sharonstattedlace.blogspot.com/2014/03/new-bookmark.html

Colour really does make a difference.

I'll see if I can't get this last one drawn out later today and you can do it in colours more pleasing to the eye.

Just for your information, I keep getting notices that the blog posts aren't optimized for multi platform use. I use my computer to post and I can view everything easily on my tablet so I'm not sure what Blogger wants me to change. So if you have issues please mention them in the comments.

Saturday, October 01, 2022

Bookmarks

One of the things that I tat a lot of are bookmarks. They're fun frivolous quick little bits of tatting that are nice to have on hand for little gifts. I was sure that I had three or four finished off and stored inside little zip lock bags ready for gifting.

What I have is a mess like this.


I do have six finished bookmarks, and by finished I mean the ends are hidden and there are tails and tassels or motifs so that these can just get tucked into little zip lock bags for storage. I know that storing lace in plastic bags isn't ideal, but the bookmarks and tassels store better and don't get tangled with one another when they're in their individual pouches and they aren't there for long term storage.


I don't mind tatting up bookmarks, but fussing with tassels isn't something that can be done easily in dim light and since my tatting light causes a glare off the TV, I often end up with bookmarks that need to be finished off with tassels and tails. Wherever I can I make a little matching motif rather than fussing with tassels. When I need a tassel I keep the leftover threads from the shuttles to make them, so that I match the right colours and use up the thread. That's why there are little skeins of threads stored with these.


Consequently, what I have are a lot of almost finished bookmarks that need ends hidden, motifs tatted, tails done and tassels made. All the finicky parts that I like least. I have 14 bookmarks, 6 finished, 4 needing end hidden, tails and tassels or motifs made, 3 stored with balls of thread looking like they maybe want another row and 1 needs some major fixing.


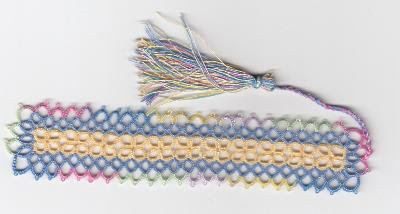
This last one was created with a foundation row using a subtle variegated yellow thread. When I have a piece of lace finished I finger press it, pulling it more or less into shape. That usually gets rid of puckering and ruffling, showing what the finished piece looks like. I think the yellow thread must have been some vintage stuff, because when I pulled it into shape the split ring broke. Foundation row. Everything else is connected to it. Broke in the middle.


It can be fixed. I think. I un-tatted several split rings to get thread ends long enough to hide. IF I fix it, I'll have to match the variegation of the foundational row of split rings, then I'll have to tat in the first broken ends. As I'm tatting the split ring I'll have to join into the second row of tatting, but there aren't any picots to join into, the picots were on the foundation row and what's left is the joining. That means joining into something that isn't there which is going to make the connection of the repaired part tighter than the original on both sides of the split ring. Then if I succeed in doing that, I'll have to invisibly incorporate the 2 other broken ends along with the 2 new ends from the new split rings.


You know what? I'm just going to scrap it. It's a pretty design and I'm just going to re-tat it. Re-doing 3 rows of lace will be faster and easier that trying to fix this thing and life's too short to waste time when I don't have to. So I guess that means I only have 13 bookmarks done or sort of done. I'm off to hide and bunch of ends and make a bunch of tassels.