Showing posts with label Pattern. Show all posts

Thursday, October 06, 2022

Another variation

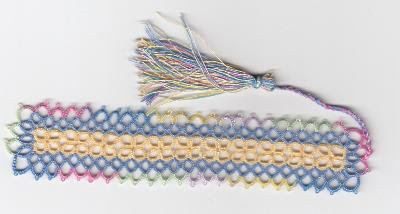
This is another of the bookmarks with a 4 ring motif as a base. This one also has the motifs joined in a square rather than a diamond. The variegated thread in this one is in the inner row of motifs and again the pattern shows separate start points for the motifs and the outer row because of the colour changes.


I don't think I did one utilizing onion rings in the outer row, or one with the outer row with rings laying on the side. So maybe I need to do a few more just so I can experiment some more. The pairs of tiny rings made for a shorter row so this bookmark is a little thinner than some of the others.


I must have been on a roll with these because the inner row of motifs are again all 5-5-5-5 but the tiny pairs of rings are 3-3 and the chains are all 3-2-2-3.

Wednesday, October 05, 2022

Another 4 ring bookmark

This is another bookmark based on a square 4 ring motif. I found what I thought was the pattern in my archive but when I started counting stitches, it wasn't the same. I looked back through previously published work and I can't see this one anywhere so I'm posting it now.


These bookmarks were all done in multiple colours and there was no need to climb out from one row to the next, or at least not in the colours I used. Consequently, there are 2 start points, one for the square motifs and one for the outer row.


Just remember 5. The rings are all 5-5-5-5 and the chains are all 5-5. Super easy.

Most bookmarks are really edgings with the second side a mirror image of the first. A lot of them will also look nice on a cuff, collar or the edge of a pocket. Just another use for a versatile bit of lace.


Monday, October 03, 2022

4 ring motif bookmark 1

OK I'm out of practice and keep forgetting things that I ought to include like the starting point and the direction of work, and how to use the software and... you get the idea. 

When I'm on a designing roll, I often use the same bit as a starting point. What I mean is that if I design one thing with a rose base or a daisy base or some other little bit, I often design a lot of things with the same base. It lets me do a lot of, "what if". Like, what if I make this ring bigger or do a smaller pair of rings instead. I already  know what my stitch counts have to be in order to work because I have a functional sample to base things on. It also lets me start with a partially written pattern because I just have to draw in the bits I did differently and change the stitch count if necessary. 

I started several bookmarks using a little 4 ring base motif. Some of them had the little motifs joined 2 rings in a square and others with the motifs joined point to point in a diamond shape.


This one alternates a diamond with a square. That means that the rings in the diamond shape are split down the middle and the square shape ones are split out the side. In both cases half the motif is tatted with the first shuttle and half with the second shuttle. (Except for the first and last motifs, obviously.)


Since this design was intended to be done with one solid and one variegated colour, the second row starts over rather than climbing out which is why I've shown 2 start points. But, you're the tatter, you make it the way you want. It could just as easily have one solid colour for the centre motifs, a complimentary colour for the 2nd row rings and a matching variegated for the outer chains. Or it could be all done in one colour. You decide. 

I'm back to hiding ends and making tassels. 

Colour

I'm half way through finishing off my collection of bookmarks. These were just little bits I tatted while watching TV just to keep my hands and mind busy and I wasn't going to draw out the patterns, but I've changed my mind. 


I did this one first in mauve/white/green and one solid thread in mauve, then again in deep blue with a variegated blue/white/yellow. I really like them. They were easy to tat and just seemed to flow and the colours blended nicely. These were done in 2014 and I suspect that the last one was done at the same time. The solid colour is a green that matched the green in the variegated thread perfectly, but when I did the bookmark in this colour combination, I didn't like it at all! I think it's just too many colours. That may be why I never bothered to finish it off. It's done now and waiting for gifting. 

I have the pattern already drawn, but I can't see anywhere where I published it. So here it is:


I used the same variegated thread paired this time with a solid red, but again I don't care for the final result. At first glance I thought I'd done this one before too, but it's totally different.


Here's the other one done in monochromatic black and white:

https://sharonstattedlace.blogspot.com/2014/03/new-bookmark.html

Colour really does make a difference.

I'll see if I can't get this last one drawn out later today and you can do it in colours more pleasing to the eye.

Just for your information, I keep getting notices that the blog posts aren't optimized for multi platform use. I use my computer to post and I can view everything easily on my tablet so I'm not sure what Blogger wants me to change. So if you have issues please mention them in the comments.

Friday, December 31, 2021

Resistance is futile

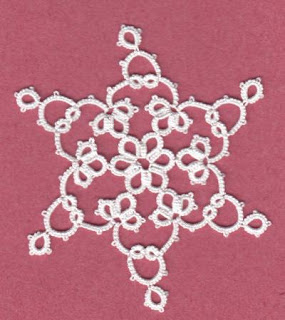
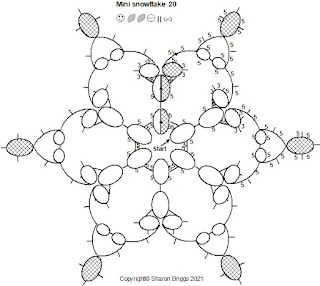
I can't stop with thread left on the shuttles, I can't resist using it up. If I'm going to put away the white thread until next Christmas I can't just leave that thread dangling there. Can I? Can you? I have to do just one more before we say good bye to 2021. Just to finish it off with a nice round 20 snowflakes. Right? 


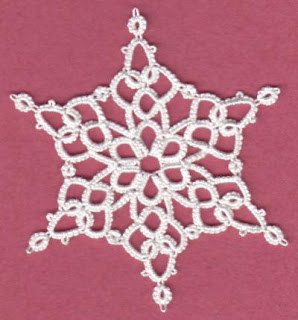
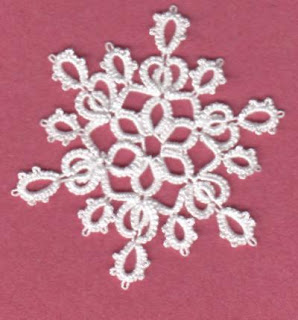
Here's number 20 measuring 3.75 inches from point to point. This one is back to a basic daisy with one more row of tatting. It has a nice lace to space ratio and an airy feel to it. I made the side rings on the cloverleaves slightly smaller because I wasn't sure how it would fit together and I didn't want the row to buckle. That's the same reason I didn't join the cloverleaves together and I'm happy that I didn't.


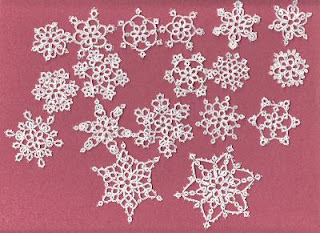
I think that's all the snowflakes for this season and of course the group picture which shows you their relative sizes. I did try to place them on the scanner in order, but had to shuffle them around a bit so that they'd all fit. Sixteen mini snowflakes and 4 not so mini snowflakes.


Thursday, December 30, 2021

There was thread left on the shuttle

 That's my excuse and I'm sticking with it. Another not so mini flake. It's actually quite large measuring 4 inches from point to point. It's also one that I kind of like although I didn't think I was going to after the first row. I decided to use large rings like the central daisy but then I had this big gap point to point and I chose to fill it in with tiny split rings which resulted in an almost round motif. When I added points on the next round I had a hexagon motif and still not a snowflake shape. 


The last round finally resulted in some proper points. And a proper pattern... sort of. I've just noticed that I marked a split chain in the pattern. but neglected it in the legend. I'll fix it if I get a chance, which I probably won't.


19 is a strange number... and I had to add thread onto the shuttles to finish it up. That means I still have thread on the shuttles.....Whatever will I do?

Thursday, December 23, 2021

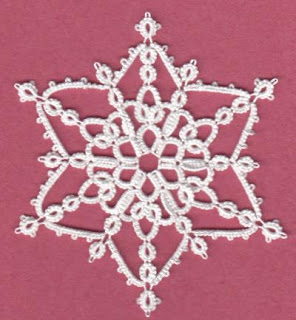
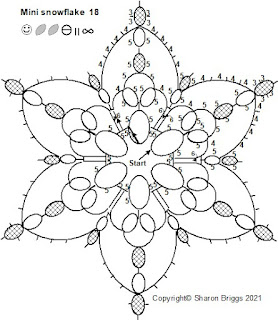
Definitely not mini snowflake 18

I needed a snowflake for gifting and I wanted something a little bit bigger, so this one has the base daisy plus two rows of tatting. It is 3.25 inches point to point and I like the symmetry, but I'm not fond of  "spaghetti chains". That's what I call long unsupported stretches of chains. I want to add another row to give it more stability, but that would wreck the overall look of the design which kind of looks like an explosion going outward.


The larger size of this drawing might have resulted in  hard to see numbers, so let me know if you have a problem with it.


This might end the batch of "mini snowflakes" which is just as well because I don't think I can fit much more on the scanner for a group shot.


Wednesday, December 22, 2021

Not so Mini Snowflake 17

 I never thought when I started playing around with this idea that I'd be able to come up with so many small snowflake designs with a daisy base plus one row of tatting. Just when I think I'm done another idea pops up. 


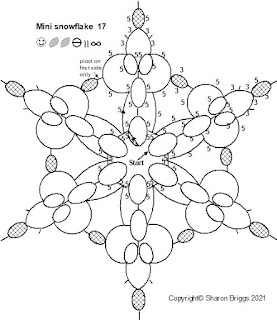
This one made a nice finished flake with a good lace to space ratio and joining the arms side to side with the small ring made a really stable design that won't flop over after it's hung for a while. The finished size is 3 inches across which makes quite a respectable snowflake.


Have you ever had someone ask you "what is your favourite?" I have, and I never know how to answer. Is my favourite the one the one that is most aesthetically pleasing? Is it the one that is quickest to tat? Is it the easiest to tat?  Is it the one that is most mentally challenging? When I start out each Christmas season to make the snowflakes for our cards, my parameters are often set by, how much tatting time do I have and how much thread do I have on hand as well as what kind of a design am I going to make. Sometimes I go with a simpler design because I'm pressed for time and the intricate one I'd really like to make will just take more hours than I have in a day. So my favourite that year may be the one that I have time to make not the one that I find personally most attractive.

How about you? What kind of parameters make a favourite snowflake for you?


Tuesday, December 21, 2021

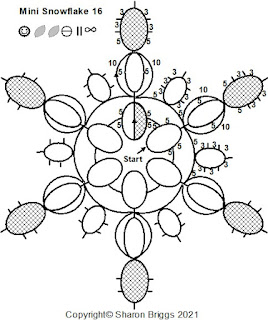
Mini Snowflake 16

 I haven't run out of thread yet, so here's the latest. 


There's still more thread on the ball, but I had to break out a new ball of thread to make something large enough to be gift-able. This one is only 2 inches across.


When I run out of thread on the original ball, I'm done, but that's still a couple of snowflakes away.

Saturday, December 18, 2021

Mini Snowflake 15

Number 15 is one of those designs with long skinny arms that tend to flop over, but it's small enough not to sag too much. It's roughly 2.5 inches across. 

It also didn't take much thread, so I have another one on the shuttles.


I like using size 20 thread for tatting most things like snowflakes, doilies and Christmas ball covers. but I use size 80 for hanky edgings and bookmarks. Size 20 thread has disappeared from the stores long before Covid started impacting the supply chain, so I went online to order some, but talk about sticker shock! Handy Hands has the best supply of great threads and who can beat $4.25 US a ball for thread...except that converted to Canadian it's $5.50 which is still a great price, until you add in $35 for shipping which is $45 Canadian and the $4 ball of thread suddenly costs $50.00! Would you pay $50 for a ball of thread? I tried playing around with increasing the order hoping to exponentially reduce the cost per ball, but there wasn't any variation that worked.

I went back to looking for Canadian suppliers and many of them were out of stock on white thread but I finally found some at Stitch-It Central (https://www.stitchitcentral.ca/) Lovely folks, great to deal with. I ordered 2 balls of white thread in October so that I could tat my Christmas snowflakes and it only cost me $28.00 Canadian including shipping. That was only $14 a ball as compared to $50  which is a real steal!!! (Yes I'm being a little bit sarcastic.) I understand, Covid is changing a lot of things but my Scottish roots really want to pinch the pennies.

That being said, I'm finding myself being very stingy with the thread I have. Hence using scrap threads for the designs with multiple thread joins in teeny tiny bits of lace. There's still more thread on the first ball. You know what that means... More snowflake designs!

Friday, December 17, 2021

Mini Snowflake 14

This is the largest mini flake at 2.5 inches across done in size 20 Lizbeth thread. This one is pretty and fairly dense and make a nice all around snowflake that isn't puny and has enough structure to hold it's shape.


It took me a while to draw this one because I copied a previous design and accidentally renamed it so that I lost the original and had to re draw it before starting on 14. Good thing these are small designs!


I was asked on Facebook "Do your little snowflakes come out stiff enough to hang as is or do they still need to be stiffened with something?" That's a hard question to answer because a number of variables come into play. I know some people are firm believers in stiffening their lace but personally, I rarely stiffen my tatting since I see no purpose to it.  


First of all, whether the lace is stiff enough depends on the design and so far all of the mini designs will probably hold up. Designs the have skinny little arms without much support will need a little help. This design called "Flowerpoints" from my Tatted Flurries book is 5.5 inches across and it's a perfect example of what I mean. It has really long, really skinny arms without a lot of structure to hold them up.


Secondly it depends on whether you shuttle tat or needle tat. Needle tatting isn't as firm. Before you needle tatters get upset, let me explain what I mean. Needle tatting forms the tatting on the needle, so that your tatting will always conform to the size of the needle. When you remove the needle, you leave behind the void left by the needle. If you use a big needle, it will leave behind a big hole, it has to. A big hole won't make for firm lace. If you are a skilled needle tatter working very tightly with a tiny needle, then your lace will be firm enough to hold it's shape. Shuttle tatting forms the stitches directly on the thread and is typically a firmer lace. Thirdly, then, whether you shuttle tat or needle tat, it depends on how tightly you tat.


I shuttle tat and I tat tightly. I have a display stand my husband made for me that is currently holding about 30 snowflakes that you can see here. Do they look like they need stiffening? None of these snowflakes have been stiffened, except for the 3D design on the top right. Do they look like they need stiffening? They have been hanging like this since they were made in 2010 and they haven't wilted yet. 


The 3D snowflake shown on the top right on the stand was stiffened. I wanted to be able to use it as a tree topper and I didn't want a limp looking piece of tatting. I wet the snowflake and then applied white glue diluted with water. It's stiff enough to stand on it's own or to be used as a tree topper. Like the other designs it has been hanging on the stand for the last 11 years. and is still holding it's shape.


Beaded designs  may not hold their shape as the beads will weigh down the lace and make the arms flop. The lace without beads may stay in shape, but once you add beads everything changes.


For more information you may want to look at this post on Blocking, Stiffening and Storing Tatting.

http://sharonstattedlace.blogspot.com/2007/04/blocking-stiffening-and-storing-tatting.html

BTW I mentioned that I must have designed about 100 snowflakes and out of curiosity, I pulled the snowflakes off the stand and out of my drawer and I currently still have 89 snowflake designs that I haven't given away. I'll post a picture of them all when I get a chance. I have another mini on the shuttles and more thread on the ball, so I guess I'm not done yet.


Tuesday, December 14, 2021

Mini Snowflake 13

I really like number 13 for a lot of reasons. It's an easy tat, it's got a nice lace to space ratio and it looks very snowflake-y. I generally like my snowflakes to be around 3 to 3.5 inches across so keeping to the smaller dimensions has been challenging and restricting myself to a starting daisy plus one row has added a bit more to it. I've done 14 so far and I'm thinking I can manage one more for the season.


This one measures just a little under 2 inches across.

I was just looking at my snowflake stand and thinking about all of the snowflakes I've designed over the years. I did over 30 for the Tatted Flurries book and another 30 for the 2018 batch as well as designing at least one every Christmas for our family cards. So far there are another 14 mini snowflakes and counting. That's over 75 snowflakes with just those. A lot of things I design and give away so I don't have all of the designs, but I think I might pull out all of the ones I do have just to take a picture of them all together. I guess there must be nearly 100 of them. That's a lot of snow! It's the kind I like, you don't have to shovel it :)

Monday, December 13, 2021

Mini Snowflakes 11 and 12

Two more tiny snowflakes. BTW the smallest of these (6, 7 & 8) are about 1.5 inches and the largest (which isn't here yet) is about 2.5 inches. The largest so far is number 10 at about 2 inches, unblocked, because I'm just doing these for fun and not hiding ends or blocking them.


Number 11 is roughly 1.75 inches across.


I suppose I should have been letting you know how small these mini snowflakes are, but I didn't think of it at the time.


Number 12 is about 2 inches across.


I have 2 more to draw, but they'll have to wait 'cause I got cookies to bake!

Sunday, December 12, 2021

Mini Snowflake 10

 This is the 10th mini flake, but I'm noticing that the "mini" size, if it isn't getting bigger, is at least getting denser. That means they'll take a little longer to tat. I'll have to curb my enthusiasm a bit to keep them truly mini.


This one has a 5 ring cluster at the tip of each point. There's a larger ring, a short chain and then a cloverleaf of smaller rings, followed by another short chain and a larger ring and a join to the base of the first larger ring. The diagram shows the joins with a thin dashed line which may not show up clearly in the drawing. That's why I mentioned it.


I have 4 more snowflakes done, but not drawn and hopefully I'll get to them soon. I started with a new ball of Lizbeth size 20, did my 7 large family snowflakes and then began the mini flakes. I may have just enough thread for another snowflake if it stays truly mini, otherwise I'll have to quit just because I've run out of thread.

Friday, December 10, 2021

Mini Snowflake 9

 Another variation on a theme. Back to the basic daisy with rings of 5-5-5-5 and a simple, ring in, cloverleaf out, for the second row. The cloverleaf gives the outer row a little more substance and it might look even better if the middle ring was larger.


As usual, here's the pattern.


Thursday, December 09, 2021

Mini Snowflake 7

I know I drew this one out a couple of days ago and just had to add the numbers, but when I went to look for it today it was missing. I guess I must have saved one of the other designs over top of it. 


It's real simple with a chain of 3 and a tiny ring of 3-3 repeated for 5 tiny rings but it give a pretty effect.


Wednesday, December 08, 2021

Mini Snowflake #6

 Another slightly wonky picture. This one is similar to the first snowflake except that the outer pair of rings are joined between the rings of the daisy instead of at the tip.


I'm being lazy with the drawings, just using the same daisy and superimposing the second row. You'll see the number 5 being partially hidden by the second row. If these were stand alone drawings I'd re-draw everything and adjust it so that you can see everything, but by now you know that the base daisy is 5-5-5-5 so I'm not going to worry about it.


Tuesday, December 07, 2021

Mini Snowflake 5

Here's another one. These guys are small enough that you can still do several before Christmas. For any new tatters that haven't learned split rings yet, just tat the basic daisy and tie it off. Then join in your CTM threads where the arrow shows the next row starting and carry on. CTM continuous thread method, where you wind the first shuttle, pull thread off the ball cut it and wind the cut end onto a second shuttle. The thread between the shuttles is continuous.


Just in case you were wondering why the snowflakes look a little wonky, the snowflakes haven't been properly finished. I didn't hide ends or block the tatting. I was using up left over ends from my Christmas card tatting and occasionally just knotted the ends of the scrap thread together, which makes for some very rough looking lace! 


Mini snowflakes 3 and 4

Some of the mini snowflakes are quite similar which has made drawing them faster. Here are snowflakes 3 and 4.


Monday, December 06, 2021

Welcome to the 2021 blizzard of Mini Snowflakes

I like to send my family a new snowflake in their Christmas cards and I often design several before settling on one. I did a blizzard of tatted snowflakes in 2018 and shared both pictures and patterns here. 

http://sharonstattedlace.blogspot.com/2019/01/the-results-are-in.html 

The snowflakes are numbered and the list below the picture links to the blog post with the pattern.


This year I started with a basic 6 ring daisy and the first one off the shuttles was a winner, so I just had to make a bunch more of the same design. Once the family snowflakes were done I still had thread on the shuttles and after making the basic 5-5-5-5 ring daisy I challenged myself to see what I could do with just a daisy and a second row of tatting.


Welcome to the mini snowflake blizzard of 2021. The first one ended up being the same as number 11 the Baby Flake from 2018 which I'd forgotten about. The only difference was that last time I used a daisy of 6-6-6-6. and this one uses 5-5-5-5.


The second snowflake is much the same with onion rings on the points.


And of course here's the pattern.