
I've been feeling for a long time now like I was missing part of my e-mail "conversations". It's kind of been like missing a sentence here and there in a dialogue. Very disconcerting.
Yesterday hubby was using the DVD burner on my PC to convert some home movies to DVD so I used his computer to check mail. Imagine my surprise to find that several of the messages from my e-mail lists identified as SPAM! Since our IP introduced spam filtering my husband and I have had far fewer ads for Viagra, mortgages and the rest. What a relief to be rid of all that garbage mail.
Some time ago hubby went in and changed our spam filtering from normal to aggressive. It was about that time that I started to feel left out of the conversation. My e-mail is set to delete spam off the server. I never see it. Yesterday I changed my e-mail settings so I could see what was happening. Yep. The system has been deleting my tatting e-mail.
The good news is, I'm not losing my marbles, people aren't talking behind my back, it's just a good old computer glitch.
Saturday, July 29, 2006
Tuesday, July 25, 2006
Another simple book mark

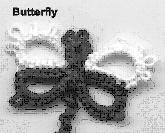
Each of these little bookmarks allows beginners to learn new little techniques. This is another of the bookmarks that can be done using chains only, but it requires the use of a paperclip to make mock rings (MR). Begin at the base of the butterfly and when completed the end is used to make the optional long zigzag chain.
Slip the paperclip over the shuttle thread before you begin. A large paperclip gives you something that is easy to hold onto and it will hold open the beginning space so that you can close the mock ring. Start where marked, tat the required number of stitches and then pull on the paperclip. This pulls the core thread back through the stitches to open up a loop. Slide the shuttle through the loop and pull the MR closed. First mock ring completed.
Again slide the paperclip over the shuttle thread and tat the next MR joining it to the first. The tiny ring at the top has 2 picots for the butterflies feelers.
Repeat for the second side of the butterfly. Join to the base of the first mock ring and add a zigzag chain to complete.
A zigzag chain, is also known by the names ricrac and sometimes rickrack, sets or Victorian sets. A regular chain wil curve because the top of the stitches is slightly wider than the bottom. If you want a straight chain you do a zigzag chain. This is produced by tatting the first half of the doublestitch for 4 or 5 stitches and then doing the second half for 4 or 5 stitches. Each time you switch from first or second halves the direction of the top part of the stitch changes giving the chain a zigzag top.
Friday, July 21, 2006
A Change of Style
It was pointed out, that if I'm going to post patterns for people to try, I ought to change the background so that they can print it. Duh. I must have been having a blond moment not to have realized that myself. I knew the patterns could be printed just by doing copy and paste since they are visual, but any textual information on a pink background wasn't going to be readable.
So, we're now plain boring practical white.
One of the reasons I like white for tatting. It goes with everything. It doesn't detract from anything you put it with or on. It just always adds to the mix.
White is nice.
So, we're now plain boring practical white.
One of the reasons I like white for tatting. It goes with everything. It doesn't detract from anything you put it with or on. It just always adds to the mix.
White is nice.
Wednesday, July 19, 2006
Small Bookmarks

There are lots of sites on the internet where you can learn how to tat including mine at www.tattedlace.com so I don't want to duplicate that information here. What I do want to cover in the next few posts are some simple beginner patterns both for those who want to learn how to tat, and for those who want to teach others.
One of the easiest ways to learn how to tat is to begin with chains using 2 contrasting colours of thick thread. Thick thread like size 10 or bedspread cotton means that you can actually see the stitches as they are being formed. Using 2 colours lets you differentiate between the shuttle thread and the ball thread.
The problem with tatting chains is that you can't really make much with them. Can you imagine going in to your first tatting class and having the instructor say "Today we are going to make a long string of knots ." Not a very interesting project to generate enthusiasm for tatting.
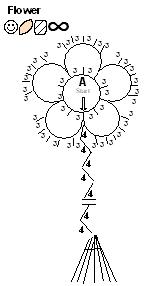
I developed several small designs that could be done in size 10 thread to make little bookmarks, a couple of which use only chains. The flower bookmark shown is one of them. When worked in variegated thread you can still see which is the ball thread and which is the shuttle thread. Each of these designs was created so that it is finished off with a long zigzag or rickrack chain and a tassel. If you know how to crochet you could do a crochet chain instead of a tatted one. Or you could just tie on a fine ribbon.
The Flower bookmark begins with a ring shape. So you could tat a ring. Sometimes if I am teaching a small class and I have the time I wind the thread onto throwaway shuttles that I cut out of plastic lids, like the kind you get on margarine or coffee. (I'll do a template for the throwaway shuttles in another post.) I wind the ball end of the thread onto my business card, and I tat the central ring. That way we begin class with shuttles already wound and the students only have to learn how to tat chains.
If I have a large class or I don't have the time, I wind the thread and attach a paperclip between the shuttle and the business card. Instead of beginning the bookmark with a true ring, we do a mock ring, or a Self Closing Mock Ring (SCMR). A mock ring is just a chain curled around and joined back to itself. So, hold onto the paperclip and begin tatting where marked in the diagram. Tat 3 doublestitches, then a picot, 9 times. Tat 3 more doublestitches. This will bring you back to the beginning where the paperclip is holding your place open. Pull on the paperclip to pull the core thread out enough to push the shuttle through the loop. Then pull on the shuttle to close the loop back up again and the central ring is formed.
The next row is a chain joined to alternate picots of the base ring. The point where you start has to look like it's a picot. It isn't a picot, it just looks like one and it's called a mock picot. Any time you have the shuttle thread and the ball thread forming what looks like a picot in the finished piece, it's a mock picot. Similarly, when you tat a row of split rings you have the 2 threads, one from shuttle 1 and one from shuttle 2 forming what looks like a picot between the rings. That is also a mock picot
If you just start the chain, as soon as you tighten the chain up, the gap that looks like a picot will disappear. To prevent the mock picot from disappearing you do a lock join. A lock join is created by an unflipped half stitch. Do the first half of a doublestitch, but don't flip it, then do the second half. Since the thread in a lock join isn't flipped, it won't slide. That's what makes it a lock join.

Tat a chain around the ring. Skip the first picot and shuttle join into the next picot. Usually you insert the hook into a picot, pull up a loop of the thread wrapped over your hand and then slide the shuttle through, as shown in the picture to the left. For the flower bookmark insert the hook into the picot and pull up a loop of the shuttle thread. Slide the shuttle through the loop and pull the thread tight. Shuttle joins don't move so make sure that you have pulled out all of the slack and that everything is in position before you tighten the join.
Continue the chain around the mock ring skipping one picot and doing a shuttle join into the next picot until you come back to the beginning. Join into the mock picot at the beginning of the row, pull one of the threads, either the ball thread or the shuttle thread through the mock picot and tie the ends in a square knot.
A square knot is formed when you tie the thread left over right, right over left. Or, right over left, left over right. A granny knot won't hold and you don't want it to come undone.
To complete the bookmark add a fine ribbon or crochet a chain and add a tassel or tat a chain using a Zigzag stitch. You will have noticed when tatting the flower that chains tend to curve. If you want a straight line instead of curves you need to switch back and forth between tatting the first half and tatting the second half of the doublestitch. Tat 4 or 5 first halves then 4 or 5 second halves. Repeat for the desired length. Zigzag stitches are also known as Sets or Victorian sets. Once the straight chain is completed, a tassle can be added to finish off the bookmark.
In this one small bookmark, the tatter will have learned 5 additional techniques. Mock ring, SCMR, mock picot, lockjoin, and shuttle join.
Beginners

I've been thinking about doing a series of posts including things for beginners. I really want to put the stuff on my web site but that requires intensive input from Rob. If it isn't perfect he won't put it up. Useful takes a while, perfection takes longer and I'm impatient. I really want to do this. Do I have time for it? Probably not, but if it's in a blog I can do it in little pieces and then when/if it gets moved to my web site everything will be complete. Sort of. Well my part will be complete, perfection will come by and by.
On several of the e-mail lists we've had discussions about what makes a pattern difficult and I have always maintained that a technique such as split rings ought not to be part of the equation. If a pattern calls for split rings and you can't do them the pattern isn't difficult, it's impossible. If you can do split rings the pattern may actually be very easy. So when I started doing patterns for publication I devised a legend so you can see at a glance what the pattern needs.
The picture at the top are the symbols I selected. A happy face means it should be easy for anyone to tat. The not so happy face means it will take concentration. Doesn't the little guy look like he's concentrating? The symbols that look like a pair of canoes are shuttles. There's only one when a pattern calls for one or more when more are needed. The next symbol is a ball of thread. doesn't it resemble threads going around a ball? The circle split in the middle is used for split rings. The pair of vertical lines are used for mock picots, I don't usually mark them in the pattern. I think it's overkill for something that just happens as you work. The eternity symbol is what is use for continuous thread (CTM) , no beginning no end just lots of thread. (Don't we just wish that our shuttle threads were endless!). The last symbol of linked paperclips also looks like chain links, so I use it to show split chains.
There are some other symbols I use from time to time, but so rarely that I describe them when I do. Like the symbol for a really hard pattern. I've only ever used it once or twice. The first time I used it on the Orchid pattern in the Transitions book. That pattern was such a stinker to do that I only tatted it twice. It's also the only pattern I really had to have proof tatted. The end results are pretty, but Oyyyy what a pain to work on.
I think I'm going to begin this beginners series with some of the patterns I use to teach with. I'll need to tat up some samples first and right now I really ought to be doing other stuff... If I have time after Bible Study tonight I might get to it. Bible Study has really been great, we've been going through the book of Mark looking at how Jesus operated and seeing what He did to get the results He had. It's been very thought provoking and challenging.
Tuesday, July 18, 2006
The Wedding
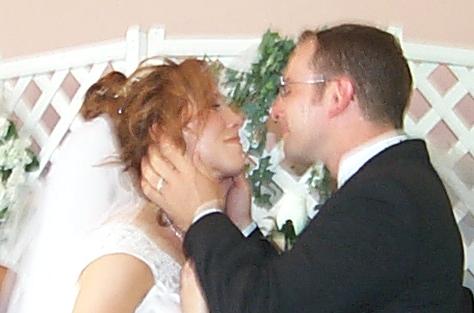
Aren't they a cute couple? Rick and Lora's wedding was on Sunday at Westfield Heritage Village, a very quaint locale with historical buildings and people wandering around in period costumes. We had been concerned about being rained out, but the day was bright and sunny with the temperature soaring to a skin crisping 97 degrees F. The ceremony was held in the Mountsberg Church and of course the buildings were not air conditioned.
The bride, not being satisfied with the job the hairdresser did, took the time to re-do her hair making her about one hour late for the wedding. Picture a quaint frame building packed with men in suit coats and ties, ladies in elegant finery and add 100 degree temperature and an hour wait for the bride to show up.
Fortunately, one of the wedding party had been thinking ahead, so the program was printed using stiff card stock in dark red, (to match the dresses) for the outer blades of a paper fan. They used a teardrop shape with a rivet at the base so you could spread out the pages to read the program or fan yourself. Never mind reading, we were too busy fanning! The music was provided by a very talented choral group, friends of the bride and groom. Since candles were not permitted in the village they used a sand ceremony where the mothers of the couple poured red and white sand into a large glass bowl. It was very pretty, and a nice touch to the ceremony.
The photographer, anxious to get just the right picture, took an abundance of shots at numerous locations on the grounds and the wedding party was quite wilted when he was finally done. The Inn, where the reception was held was air conditioned, but crowded with hot bodies it didn't stay cool for long. Due to the lateness of the wedding and the excesses of the photographer the reception started an hour and a half late. We were entertained with delightful live classical guitar music so the wait was enjoyable except for the grumbling tummies. The food was yummy, a buffet with lots of choice and nothing seemed to suffer for having been delayed. I think the staff knew that the wedding was late and had delayed the food preparation. All in all it was a delightful day.
The Album
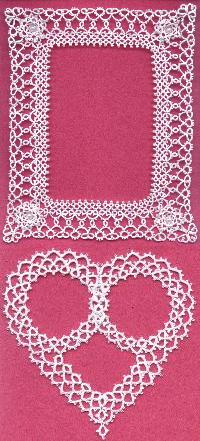 I haven't posted much lately as I was working on the album cover for my niece's wedding. I was still working on it the morning of the wedding! It seems to me that the tatting is the easy part. I constructed the album covers so that they were simple sleeves that could be removed for laundering. Although I tried to buy albums that were white to start with, the best I could do was a white album with a small circular picture on the front and back.
I used white satin fabric for the cover but the picture showed through so I lined the cover to make it thicker. I didn't want any raw edges showing so I just sewed the satin and lining together like a long tube, turned it inside out and then folded the long ends in and blind stitched them together fitting it to the album as I went.
I had the choice of attaching the lace to the fabric and hoping that I got it positioned correctly or making the cover and then attaching the lace. Not wanting to spend hours sewing down picots in the wrong position, I opted for making the cover first. The difficulty of course is that I had to work from the outside of the cover sewing the lace down to the satin, but not through the lining. I used a small plastic cutting board in between the layers which worked really well. It took a little longer but I was assured of having the frame in the right position on the front of the album. It was a little off, I think because the satin was so slippery and it was hard to pin the tatting in place and then remove the cover from the album to stitch without the pins sliding out.
In the mad rush of getting dressed for the wedding I didn't have time to take a picture of the finished album but here are some scans I took earlier. The frame uses an edgings and flowers that were in earlier editions of the Tattedlace Pattern Collection newsletters. I wove a gold ribbon around the row of open rings and tacked them down under the flowers in the corners.
I was going to use a musical theme for the interior, but since I hadn't met Rick I didn't know whether he was as musically inclined as Lora was so I decided against it and went for a heart shape. I needed an open area for names and the date and began with the idea of 2 intertwining hearts that would let me embroider a name inside each one. I doodled in the drawing program with a round motif adding points at the bottom and played around with different ways of linking them together, none of which I liked the look of.
Time was running short so I tatted up my 2 round ring and chain motives as I considered how best to proceed. Once I had them done I laid them side by side I realized that the two round shapes made the 2 top curves of a heart. Adding an open point on the bottom gave me the space to embroider the date. I un-tatted the last motif until I could open it up again, linked the two motives together and joined it back together. After I added a ring and chain point to the bottom of the linked round motives, all I had to do was add another row of chains to join everything together and my heart was done.
Tuesday, July 11, 2006
It's a mystery. This afternoon I was intrigued by several shiny discs glinting on the back patio stones. They appeared to be about the same size as the plugs we removed from the junction box when we wired in the downstairs lights. There was no way the plugs could have gone from the garbage pail in the garage to the backyard, so I sent Rob out to investigate. He came back in with 3 shiny quarters. How do quarters get dropped onto the fenced in patio when no one has been in the backyard?
Three was an odd number so I sent him out to look again for the fourth quarter. He came back with 2 dimes and a nickel. Curiosity fully aroused, I went out to see this phenomenon myself. Scattered over our yard, on the lawn,in the flowerbeds and around the outside of the fence $3.70 in nickels, dimes and quarters but no pennies.
Our first thought was that the grass cutter had lost it out of his pocket, but why no pennies and why were they in the flowerbed. Even if you back up to get the lawnmower into position you don't stand in the flowerbed to do it. That explains why there would be coins on the patio, but not the flowerbeds.
Did the tooth fairy lose the coins during the night. Did someone in a fit of exuberance throw a handful of coins in the air to land where they may and if so, why only in and around our yard not in the back greensward or the neighbouring yards?
I expect we'll never know, but it would make an interesting plot for a story.
Subscribe to:
Posts (Atom)
