Wednesday, June 28, 2006


Row 2 - A working corner

Well, I finished row 2 and pinned out the frame, but as often happens when you work from the outside in, my internal dimensions aren't what I hoped they'd be. I want a regular 5 x 7 picture to be able to nicely sit inside the frame. My dimensions are 5 x 7.5 which means that the picture will fit, but the white border will be visible. I'm going to need another row and that's both good and bad.

Good, because I did want to have pearls outlining the picture which I couldn't comfortably do with the design I was using and now I can. Bad, because it means I need to do another row and I don't really have time to do it. Looks like the holiday weekend will be spent furiously tatting.

Before I go on to do another inside row I want to take a stab at doing the musical notes just to see how they go. If it works as expected each medallion for the note should take about 2 hours to complete. I want to see what the finished size looks like before I decide about the frame.

Monday, June 26, 2006


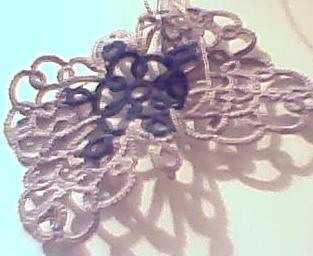
The corner isn't working.

The corner of the picture frame was going well until I hit the inside corner and ended up with too much tatting for the space it had to fit in. I like the way the side is shaping up, but the bit shown here is the third attempt at going around the corner. The thread ends are from cutting and starting again. I'm afraid that I may have to cut the thread and do something creative with the inside corner. I don't have time for this!

We had an interesting weekend. Our 18 year old car needed some cosmetic work done on it. The interior roof started sagging down and my ever resourceful hubby decided to fix it. The fabric cover was removed excess debris vacuumed up and then we proceeded to brush on the fabric glue. What a disaster. The brush on adhesive which was supposed to dry clear, dried white on the navy blue fabric. The fabric shrunk.

Rob decided that since that job wasn't going well he'd start on another project. He wanted to hang his compressor in the garage where it's easy to use it for filling car tires and blowing wood and grinding dust off projects. He built a solid frame out of angle iron and mounted the compressor with rubber spacers to reduce the noise. Then he decided that he wanted it wired into a switch that was more easily accessible so that he could put a timer on it and keep the compressor full at all times.

Just as he was tightening the last screw on this project the screwdriver hit the edge of a metal button inside the control panel in the garage and everything went black. None of the fuses looked as if they had blown and everything in the house was still working so he checked the main fuse panel in the basement. The garage fuse tested fine, but just in case was replaced with a spare. Still no power in the garage. Each line coming into the garage fuse panel was tested. One set of lights in the garage was working, but all of the other lights and outlets were dead. An hour later we're back to the main fuse panel. According to the label there is only one fuse for the garage Then I notice that some items are showing 2 fuses. After a closer check we discover that one of the fuses on the main line coming into the house has blown. Luckily we had a replacement and in minutes everything is back up and running, including the newly installed compressor.

After a quick trip to the fabric shop we started over again on the roof, this time using a spray adhesive. Much better, except for the stuck together fingertips where we had to hold the fabric in place while applying the adhesive. The car is all back together again and looking spiffy, the compressor is hung and has been used to fill all the tires and Rob is aching from hacksawing angle iron, drilling holes, and hanging upside down, inside the car trying to get the roof lining in and out. He forgets that he isn't as young, agile, and flexible as he used to be. So he spent the rest of the weekend taking it easy.

I spent the rest of the weekend working this corner again and again.

Friday, June 23, 2006


Wedding Album
Well, I'm half way around the first round of the rectangular frame for the front of the album. It's a pattern from my Tatted Lace Pattern Collection that I now have on CD, called Hearts and Flowers. I'll add another row of ring and chain to the inside to make a wider edging. I'm doing it in size 20 thread with 3mm seed beads on the dip of each dimpled ring. I think I'll do the ring and chain edging with a small ring thrown off the top of the chain and join that ring to the middle picot of the chain on the first row.

I'm not going to do the big heart shaped frame that I did for the first album. You can see thumbnail pictures of the first album on my website. http://www.gagechek.com/slb/cd/ The rectangular picture frame is near the middle of the page and the heart frame is below it. For this album I want to do something musical so I'm thinking of tatting some musical notes and embroidering their names inside the notes I may do some crocheted chain for the straight lines although I'd really like to do it all tatted. Time is against me on this one. I went into the fabric store and they are renovating and out of dress fabrics right now. I have a choice of plain white cotton or traipsing out to another store. If I'm going to embroider the names I might do the straight lines as well. Or maybe not. Like a lot of things I'll just wing it.

I'm not sure where to put the wedding date. I may add a small tatted heart with an open centre, or I could do tied eighth notes and embroider the date in the space between the bars at the top. Whatever I do it leaves me with one month to come up with the 5 new designs for the August newsletter. I love pressure-NOT.


Wednesday, June 21, 2006


I've just heard from my sister and my niece's wedding invitation which was sent out 3 weeks ago, didn't arrive. I was wondering what had happened. I was told about the wedding some time ago and have been waiting for the invitation to see what it looks like. I was hoping it would give me some ideas.

I did a wedding album cover for the last 2 weddings. It was more work than I want to ever have to do again. Two tatted frames; a rectangular one for their picture on the front, and a heart shaped one with their names and the date of the wedding on the interior, plus a whole lot of chained edging for the rim of the album. I have been looking at other options that won't kill my hands to complete before the wedding.

My niece is a pianist, vocalist and artist so I'm wondering if I can make a musical symbol into a picture frame for the front. It would be different, but the wedding is July 16th, 2006. I don't think there are enough hours in the day. I wish I could draw creatively, then all I would have to do is fill in the drawing with lace.


Baby Birds

This year, like every year, the sparrows have taken over the bird house in my yard. The bird house sits on the top of the bird feeder pole, which is high enough to keep the squirrels off. It sits right outside the second storey window where my computer room is, so I can work all day and watch their antics. I put it up to house the little red house finches that sit and sing so prettily. The tiny hole was made just big enough for a finch. Perfect.

Someone forgot to tell the squirrel that a bird house is for birds. I woke up one morning to the sound of something industriously chipping away at the wood. By the time I had chased the squirrel away from the birdhouse, the tiny finch size hole had been enlarged. Rob took a sheet of aluminum and wrapped the front of the house in it. Try and chew THAT! The birdhouse had been saved, but with a bigger hole. Just big enough for sparrows. So now every year I have a new batch of sparrow babies to watch grow up.

They start out making tiny little peeping noises you can barely hear, but as they grow the chirping gets louder until they get to the stage Rob calls Darth Vader birds. They're at that stage now. Soon they'll all fly away.

I keep hoping that one year I'll actually see one leave the nest. They get bigger and bolder every day. At first I can just see the tip of a beak and sometimes make out the top of a tiny head, deep within the dark recesses of the bird house. It doesn't take long before I can see the whole head with the beaks that seem to take over their whole faces. Baby beaks are a different shape than those of the parents. It's like they are hinged so that the whole top of the head lifts out of the way for the parents to feed them.

It's interesting all of the little things you learn when you get to watch them year after year. Things like, both birds build the nest. Papa bird crams the nest with all kinds of building stuff that Mama bird re-arranges and sometimes discards. Both birds feed the babies. Papa feeds whoever has his head out the hole at the time. Mama bird goes right into the nest to feed the littlest ones as well. All of the babies leave the nest on the same day. If one, the eldest jumps out a day or two too early, it will stay near the nest and the parents will feed it on the ground.

It's amazing to see the grown babies sitting in the middle of a pile of seed and still go running to the parents chirping incessantly, wings at the side flapping so wildly they're just a blur, mouths gaping open. They'll pick at the seed if the parents aren't around but they'd rather the parent pick it up off the ground and stick it in their beak than try and pick it up themselves. I wonder if their wide shaped baby beaks don't work as well for picking up seed.

One of these days I'm determined to see them "fly the coop", if not this batch, then the next. They always have at lease 2 clutches of eggs before the heat of summer sets in so I know I'll have several opportunities before the summer is over.


Saturday, June 17, 2006

You'd think the little challenges with creating a newsletter would end once the publication was done. Think again. After sending out all of the newsletter e-mails I had a couple of people tell me they didn't get it. That happens occasionally when either their IP or their e-mail program has a limit on what they can receive. Usually I can just re- send and they get it OK. Every now and then the size of the newsletter just exceeds what they can get in e-mail.

It's not a major problem now that I know what the issue is. A secondary web site is created where they can go and download the PDF. Walking a novice through how to download Adobe's Acrobat and assuring them that the program is perfectly legal and safe to use; explaining to them how to set up their browser so that they can receive the file and change back the settings after it's received has just become part of the process.

Suddenly with this newsletter my website software decides to throw a hissy fit. One minute the password access to the secondary website is working and the next minute it isn't. I would have been having fits, but being married to a programmer does have it's advantages. Rob checks all of the html coding just to make sure nothing's wrong in the uploaded files, re-sets all of the security settings and trys again. And again. And again. Finally he makes the call to Tech support.

Two hours later, most of which has been spent with either Rob or I on hold waiting for their most senior tech, they admit they don't know what's wrong and tell us they'll check it out and call back. An hour later they call and report that it's working now. They can't explain why it wasn't working before, they don't know why it was working intermittently, not can they assure us that it won't work intermittently in the future. Give me back my shuttles, I need to be making lace.

Friday, June 16, 2006


Have you ever tried to clearly map out a 3 dimensional drawing? Places where parts of the lace ovelap other parts mean that on a flat drawing, all of the tiny little numbers are stacked one on top of the other. It's hard for a tatter to tell which of 3 numbers occupying the same space actually ought to be used without guessing. After trying repeatedly to clarify the same tiny bits of drawing I finally gave up and started one more time. After all of that, you'd think that a very plain and simple edging would be a piece of cake. No way, not this time. As I rounded the 3rd corner of the hanky I suddenly realized that the ring joining into the corner treatment of the very first corner, was attached at the wrong point. There's no way I was going to re-tat the whole edging. Two little -snips- and the offending ring is gone. I have 4 ends to hide in one ring now, but the corner is finally attached in the right place.

At this point I should have realized that there is something definitely wrong with the way things are going, but being I glutton for punishment I push onward. As I finish off the blue base for the columbine and pull out my shuttle full of white thread to do the inner section of the flower I realize I have a different type of thread on this shuttle. It's not the size 8 perle I thought it was but some size 20 or maybe 30, 3 ply bedspread type of stuff. Not the same size or the same texture. I discovered the problem in time and all I had to do was change threads.

Except that I did't have a ball of white thread. All I had were some short pieces left over from
other projects. I could work with short threads, but it was going to take me that much longer to
get things done. I pressed on, knowing that there was light at the end of the tunnel even if I couldn't see it. As I worked on the second white petal I looked at how the flower was coming together. The construction was OK but the white part was way too long and out of proportion with the base. The best thing to do with it was cut it off and start again. Only, I couldn't start again, I didn't have enough thread. After debating with myself about all of the possibilities I decide I have to cut it off and I also have to save as much thread as possible. So, very carefully I cut the rings at the top of the petal throw away the tips and add in some new thread. With the crisis over I whip through the rest of the flower adding in new thread 3 more times.

At this point I'm thinking "Isn't tatting fun?" NOT! I finally have the columbine done and it's down to the homestretch. One more pattern to draw and pull into the newsletter, and I'm done. I get the drawing for the base completed and I'm thinking it won't be long now. The base is completed and I just have to do the cup shape for the centre of the flower. Then I run into another snag. I need to show how the pieces are connected, but it means changing the colour of all the different rows and redrawing part of the middle so that I can keep the rings and chains of one part distinct from the other part. Step by step I manage to get it done. I bring the drawing into the publishing software and then the colour starts dropping out to the diagram. I change to colour of one chain and another goes from black to green. I've been down this road before and I'm just too tired to play the game. One click of a button and my drawing is a picture. No more unexpected changes to my drawing. Finally, it's done and I'm ready for bed. Unfortunately it hasn't finished tormen ting me enough. BUT, that's a story for another day.

What happened to my Tatting?


I think there must be a time warp in the house, or maybe it's a black hole or something.
I've just finished uploading all of the information for the latest newsletter and while none of the projects were especially difficult, putting out this edition has been a real challenge! We had to go out of town for a while and I knew I wasn't going to be able to do much tatting while I was away so I left my shuttles home, confident of the fact that I had 3 projects and an edging nearly completed and ready to be drawn out...or so I thought.

I was experimenting with taking a six sided snowflake shape and modifying it into a butterfly. Upon my return I discovered that the lovely blue and purple butterfly I was working on, looks great on one side but on the other side there are all these extra rings I don't remember putting there... The circular motif at the centre of the snowflake has these floating rings coming off the chains that make the base for the head and tail but I didn't need those rings on the wings so I just ignored them and tatted the butterfly as if they weren't there.

Imagine my surprise when I pulled this misshapen mess out of my sewing basket to create the drawing and realized that this completed project either had to be patched in no less than 4 places with teeny tiny little thread ends, or I had to re-tat the whole thing. I re-tatted it as being a faster way of getting the job done.
The other butterfly that had been done in a pristine white fell into my teacup. I wasn't about to re-tat yet another project so I just made sure it was dyed uniformly tea colour. I didn't really need more work that had to be re-done!

Which brings me to my 3rd so called, finished project. Now I ask you, when was that last time you saw a pansy with 4 petals?. The rows that I thought were lying all neat and pretty are a mess, twisting every which way but right. The colours are ugly together, the design is pathetic and even if I wanted to just add in another petal to fix it, why bother? What it really needs is a quick burial.

So as I re-tatted yet another design I wondered how quickly I could design and tat a nice representation of a 3D columbine to round out the newsletter. Well, at least there were some partial designs already sitting in my drawing program, I would just have to finish things off and make them look pretty. Wrong again. Since the initial sketches I had used didn't work out in thread the way I thought they would, I'd had to alter the design from the ground up, or in drawing terms, from the centre out. So all of my partial diagrams had to be erased.