

There are lots of sites on the internet where you can learn how to tat including mine at www.tattedlace.com so I don't want to duplicate that information here. What I do want to cover in the next few posts are some simple beginner patterns both for those who want to learn how to tat, and for those who want to teach others.
One of the easiest ways to learn how to tat is to begin with chains using 2 contrasting colours of thick thread. Thick thread like size 10 or bedspread cotton means that you can actually see the stitches as they are being formed. Using 2 colours lets you differentiate between the shuttle thread and the ball thread.
The problem with tatting chains is that you can't really make much with them. Can you imagine going in to your first tatting class and having the instructor say "Today we are going to make a long string of knots ." Not a very interesting project to generate enthusiasm for tatting.
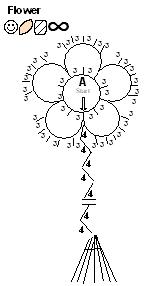
I developed several small designs that could be done in size 10 thread to make little bookmarks, a couple of which use only chains. The flower bookmark shown is one of them. When worked in variegated thread you can still see which is the ball thread and which is the shuttle thread. Each of these designs was created so that it is finished off with a long zigzag or rickrack chain and a tassel. If you know how to crochet you could do a crochet chain instead of a tatted one. Or you could just tie on a fine ribbon.
The Flower bookmark begins with a ring shape. So you could tat a ring. Sometimes if I am teaching a small class and I have the time I wind the thread onto throwaway shuttles that I cut out of plastic lids, like the kind you get on margarine or coffee. (I'll do a template for the throwaway shuttles in another post.) I wind the ball end of the thread onto my business card, and I tat the central ring. That way we begin class with shuttles already wound and the students only have to learn how to tat chains.
If I have a large class or I don't have the time, I wind the thread and attach a paperclip between the shuttle and the business card. Instead of beginning the bookmark with a true ring, we do a mock ring, or a Self Closing Mock Ring (SCMR). A mock ring is just a chain curled around and joined back to itself. So, hold onto the paperclip and begin tatting where marked in the diagram. Tat 3 doublestitches, then a picot, 9 times. Tat 3 more doublestitches. This will bring you back to the beginning where the paperclip is holding your place open. Pull on the paperclip to pull the core thread out enough to push the shuttle through the loop. Then pull on the shuttle to close the loop back up again and the central ring is formed.
The next row is a chain joined to alternate picots of the base ring. The point where you start has to look like it's a picot. It isn't a picot, it just looks like one and it's called a mock picot. Any time you have the shuttle thread and the ball thread forming what looks like a picot in the finished piece, it's a mock picot. Similarly, when you tat a row of split rings you have the 2 threads, one from shuttle 1 and one from shuttle 2 forming what looks like a picot between the rings. That is also a mock picot
If you just start the chain, as soon as you tighten the chain up, the gap that looks like a picot will disappear. To prevent the mock picot from disappearing you do a lock join. A lock join is created by an unflipped half stitch. Do the first half of a doublestitch, but don't flip it, then do the second half. Since the thread in a lock join isn't flipped, it won't slide. That's what makes it a lock join.

Tat a chain around the ring. Skip the first picot and shuttle join into the next picot. Usually you insert the hook into a picot, pull up a loop of the thread wrapped over your hand and then slide the shuttle through, as shown in the picture to the left. For the flower bookmark insert the hook into the picot and pull up a loop of the shuttle thread. Slide the shuttle through the loop and pull the thread tight. Shuttle joins don't move so make sure that you have pulled out all of the slack and that everything is in position before you tighten the join.
Continue the chain around the mock ring skipping one picot and doing a shuttle join into the next picot until you come back to the beginning. Join into the mock picot at the beginning of the row, pull one of the threads, either the ball thread or the shuttle thread through the mock picot and tie the ends in a square knot.
A square knot is formed when you tie the thread left over right, right over left. Or, right over left, left over right. A granny knot won't hold and you don't want it to come undone.
To complete the bookmark add a fine ribbon or crochet a chain and add a tassel or tat a chain using a Zigzag stitch. You will have noticed when tatting the flower that chains tend to curve. If you want a straight line instead of curves you need to switch back and forth between tatting the first half and tatting the second half of the doublestitch. Tat 4 or 5 first halves then 4 or 5 second halves. Repeat for the desired length. Zigzag stitches are also known as Sets or Victorian sets. Once the straight chain is completed, a tassle can be added to finish off the bookmark.
In this one small bookmark, the tatter will have learned 5 additional techniques. Mock ring, SCMR, mock picot, lockjoin, and shuttle join.

3 comments:
Great post!!! I think I'll make a few of them for gifts! Thanks for the pattern.
My grandmother taught me the basic of tatting, and I so appreciate your tutorial. I hope to use it sometime soon. If you like doing tutorials, you might want to enter our contest at Blooming Sisters! You can do so here:
http://bloomingsisters.wordpress.com/2011/09/08/are-you-ready-for-another-contest/
Hello All,
Can someone please help me? I am trying to teach myself to shuttle. However, I find myself having a few bumps along the way. I am currently trying to make or follow a pattern. The pattern is of 2 flowers with a stem that has to leaves on each side of it connecting them. At one point the pattern requires you to connect a chain (not to a picot) but instead to the base of a ring that you previously made. So this will be making the first of the 2 flowers, where the connection is of what will be the last petal to the center of the flower. What I am trouble with is figuring out "how to connect a chain to the base of a ring". I know how to connect something (like a ring or chain) via a picot. However, I have no idea how to connect the chain to the base of a ring. Can anyone please help me and tell how to do this or what technique to use to do this and how to do the technique. I have searched online and found where some places or people say to do it one way and others say to do it another way and there is just no clear cut answer, especially one that seems like it will work properly. I would really appreciate any help anyone can offer me with this.
Post a Comment