
 I haven't posted much lately as I was working on the album cover for my niece's wedding. I was still working on it the morning of the wedding! It seems to me that the tatting is the easy part. I constructed the album covers so that they were simple sleeves that could be removed for laundering. Although I tried to buy albums that were white to start with, the best I could do was a white album with a small circular picture on the front and back.
I used white satin fabric for the cover but the picture showed through so I lined the cover to make it thicker. I didn't want any raw edges showing so I just sewed the satin and lining together like a long tube, turned it inside out and then folded the long ends in and blind stitched them together fitting it to the album as I went.
I had the choice of attaching the lace to the fabric and hoping that I got it positioned correctly or making the cover and then attaching the lace. Not wanting to spend hours sewing down picots in the wrong position, I opted for making the cover first. The difficulty of course is that I had to work from the outside of the cover sewing the lace down to the satin, but not through the lining. I used a small plastic cutting board in between the layers which worked really well. It took a little longer but I was assured of having the frame in the right position on the front of the album. It was a little off, I think because the satin was so slippery and it was hard to pin the tatting in place and then remove the cover from the album to stitch without the pins sliding out.
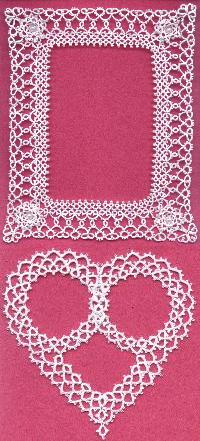
In the mad rush of getting dressed for the wedding I didn't have time to take a picture of the finished album but here are some scans I took earlier. The frame uses an edgings and flowers that were in earlier editions of the Tattedlace Pattern Collection newsletters. I wove a gold ribbon around the row of open rings and tacked them down under the flowers in the corners.
I was going to use a musical theme for the interior, but since I hadn't met Rick I didn't know whether he was as musically inclined as Lora was so I decided against it and went for a heart shape. I needed an open area for names and the date and began with the idea of 2 intertwining hearts that would let me embroider a name inside each one. I doodled in the drawing program with a round motif adding points at the bottom and played around with different ways of linking them together, none of which I liked the look of.
Time was running short so I tatted up my 2 round ring and chain motives as I considered how best to proceed. Once I had them done I laid them side by side I realized that the two round shapes made the 2 top curves of a heart. Adding an open point on the bottom gave me the space to embroider the date. I un-tatted the last motif until I could open it up again, linked the two motives together and joined it back together. After I added a ring and chain point to the bottom of the linked round motives, all I had to do was add another row of chains to join everything together and my heart was done.

2 comments:
The tatting looks gorgeous!!! Congrats!
The heart was rather serendipitous and it worked out so well. I hadn't thought of putting pictures in. Might be good for a smaller album cover Mom, Dad and baby.
Sharon
Post a Comment