
I know I haven't fully dealt with the medallion yet, but as a designer you need to think of the whole project as well as the individual pieces. If you have 2 parts that need to fit together you have to design them both together so that the connecting parts - connect.
 My second step was to create a band for the medallion. It needed to be something similar to the medallion so that they looked like they belonged together, not too skinny, and not too wide. I also had to think about how to attach the band. I could easily just tat them separately, but there are fewer ends if you can do it in one piece. The medallion was going to start with the snowflake so I was using both cloverleaves and individual rings and cloverleaves are a bigger shape for a wider band.
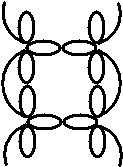
You want to think about the profile of different elements of tatting when you are designing a piece of lace. The diagram at the left shows nose to nose cloverleaves. It makes a nice wide band, but it is kind of ordinary and boring.The point where the 2 middle rings connect makes solid bars and where the side ring of one cloverleaf connects with the next cloverleaf there is an empty space. Visually it gives a ladder effect, which wasn't quite what I had in mind for the band.
I had used the inward facing cloverleaves to keep the small outer rings in place on the medallion
 but I really didn't need anything that large. As I looked at my first try I realized that I could just add in more little outer rings and that would give me the size I needed and it would still give me the filigree effect. So on the next snowflake I put some picots on the chain on either side of the small ring and I did a second row with chains and small rings filling in the spaces.
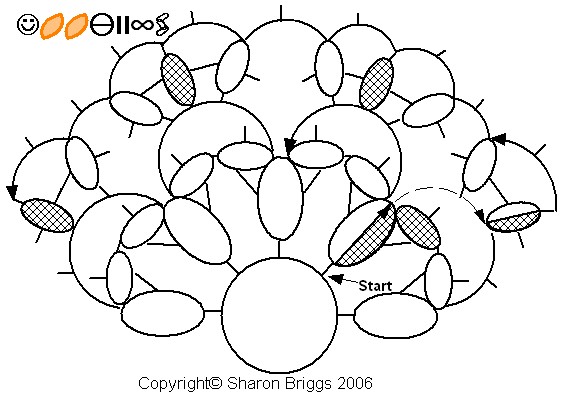
The partial drawing on the right is the design I ended up with. There is no stitch count and only part of the drawing. This is a design primer after all, you're supposed to be figuring this stuff out.
As I was making the outer ring and chain row, I realized I could just continue the chain right on out to the band doing chains and cloverleaves, then turn it at the end and come back doing more chains and cloverleaves and just continue around the rest of the medallion, repeating it on the second side, doing it all in one piece. I like things that are all in one piece, that means fewer ends to hide.
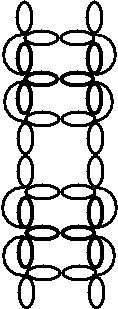
Those cloverleaves really are boring. So I dropped off one small side ring and ended up with a whole cloverleaf sandwiched in between 2 partial cloverleaves. It gave the same width to the band, but it broke up the ordinary cloverleaf shape and as an overall visual effect, resulted in solid blocks of colour separated by negative space in the band.
And again here is the drawing of the band without the stitch count.

Sometimes designing means that you do some things by planning and some things by trial and error. You can see the final results here. The picture shows the medallion and one side of the choker.
You can easily create your own choker. Select a snowflake you like, add a row to make it round or square or diamond shape, or whatever you like and add a matching row of edging for a band.
If you have and questions or comments, go ahead and ask and I'll try to answer them

1 comment:
hmmmm
I want to try this! I'll have to print this and give it a whirl. ty
Post a Comment