Thursday, November 09, 2006

More things to do with snowflakes

One of the easiest things you can do with a snowflake is join several of them together. Snowflakes are supposed to have six sides as that just happens to be the natural shape of ice crystals. When you put a grouping of hexagons together in a round shape you use 7 hexagons, one in the middle and one attached to each of the six sides.

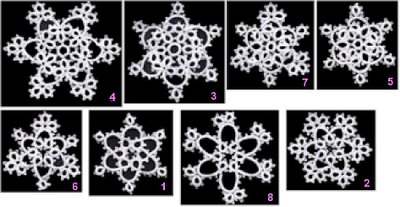
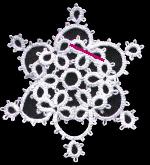
Several years ago I needed to create a doily in a hurry. My inspiration was nothing more than I just needed a quick gift. Having crocheted a lot of granny squares, knew that 7 joined hexagons would make a doily and I had 8 different hexagon shapes to choose from. The largest of the 8 designs was Snowflake 4, so it was my obvious choice. I tatted the 7 motives and joined ten together by their points.

That made a nice little grouping, but the motives were very pointy and they didn't have a nice smooth outer edge so the doily looked unfinished. If you have ever tatted a doily, you know that the further from the centre you get the longer it takes to tat a round and I didn't have a lot of time.

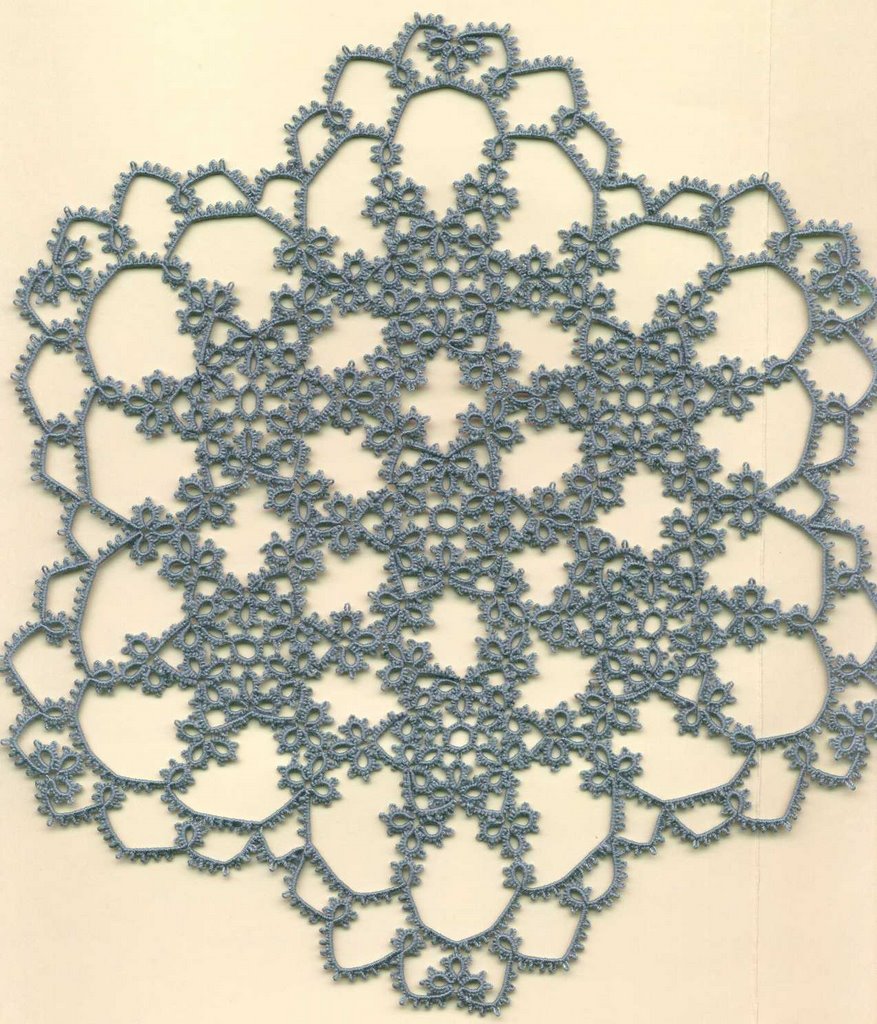
The simplest method of bringing it all together was just to tat a row of chain around the circumference of the motives. At the point where 3 motives were joined there were 3 cloverleaves. On the outer edge that meant that there were only 2 cloverleaves, so for continuity I tatted a cloverleaf of matching proportions at that point. Where there was just one cloverleaf, I tatted a single ring and joined them together by a chain.

The chains of the first row were deliberately made long both to save time and to separate the edging from the motives. The less connected it was, the less I had to figure out as far as matching the motif design. I could have worked the edging around each ring of the cloverleaf and followed the outer contour of the motives but it would have taken a lot more tatting and a lot more thinking. As it was, the negative space added a design element and made it easier to work the edging.

The single row had no depth or substance to it. It was just a big floppy chain. Adding the second row with more connecting points made it more solid and gave it shape. When you add an edging to something you want to repeat part of the theme to make it match and look like it belongs. The sparse 2 rows of edging added to the motives is kind of skimpy because I was short of time and had to make this in less than a week, but it still works.

Tuesday, November 07, 2006

Turning a snowflake into a heart

One of the basic things you need to think about when you are designing something is it's shape. What is the general outline? Is it square? Round? Oblong? A snowflake is mostly round with some points, and the little parts that make up the whole fit together like pieces of a pie with each piece of the pie being a single pattern repeat.

If you want to make a heart, how would you describe the shape? Hearts kind of look like triangles. Some are short and fat and some are tall and skinny, but all of them are wider at the top than the bottom and all of them have a point at the bottom.

If you want to start with a snowflake and turn it into a heart, what part of a round snowflake could you fit into a heart? Are there bits that hang over the edges? Are there areas you have to fill in?


Take a look at this picture. Does it give you any ideas? One of the smallest heart shapes you can make is just a simple cloverleaf surrounded by a chain. If you take a look at a lot of the heart patterns available, you'll see that may of them use a cloverleaf as their base. In a simple cloverleaf heart the central picot is often made longer to accentuate the heart shape.

Let's say you want to make a heart that's bigger than a cloverleaf. Do the circles in the picture suggest anything else? How about 3 snowflakes?

When you create a snowflake, you want a six sided shape with points at the tip of each side. For the purpose of creating a heart the points just get in the way, so the extra bits that make a round motif into a snowflake are just omitted.

Look at the area of the heart shape not covered by the circles. Notice that there are 2 small triangular areas on either side and another at the bottom. To create a heart from 3 snowflakes you need to add a little bit of tatting in between each top motif and the bottom one, and another little bit at the bottom to accentuate the heart shape.

Attaching motives together gives you the right general outline, but if you want an unmistakable heart you need to tie it all together by adding a defining row of chain.


That's what I did with this heart. I used the centre part of Snowflake 5 and omitted the outward facing rings. The 2 top motives are joined along the flat side of the hexagon shape and the bottom one joins at the point of the hexagon shape. That arrangement meant that the top motives were rounder and the bottom one had a point at the bottom.

The shape suggested a heart, but it really became a heart when the outer row of chain was added connecting to the middle of each chain on the motives and adding the cloverleaf to fill that space between the motives on each side. Since the bottom motif already had a downward point, adding a cloverleaf would have been too much. A single outward facing ring was enough to finish it off.

If the motif had been more round and not quite so pointed, a cloverleaf could have been used.
The same thing can be done with any round motif. Just select a design you like, attach 3 of them together in a triangular shape and then fill in the spaces to make your own heart.

A closer look at snowflakes

Take a look at the picture of the original snowflakes again. Now that we have examined some of them in detail, let's look at them all. See how snowflakes 1, 2, 6 and 8 all have the same centres? The variations come on the outward facing rings.


Snowflakes 3 and 4 have the same centre ring with inward facing cloverleaves attached to it, but different outward facing rings. Snowflakes 5 and 7 are different again. Instead of all rings or all cloverleaves in the middle, these 2 designs alternate a single inward ring with a cloverleaf. That presents a problem. Did you notice it?

In these designs all of the rings have been the same size (3-3-3-3-3-3 for a total of 18 stitches) A cloverleaf has 3 rings and it's bigger than a single ring. The middle ring of a cloverleaf is taller than a single ring of the same stitch count.


Take a look at the picture of Snowflake 3 shown here. A line has been drawn through the cloverleaf showing where it joins to the cloverleaves on either side. See how that connecting line is below the base of the middle ring? If the cloverleaf with the line through it is removed and replaced with a single ring, something has to be adjusted. That single ring will have to be much larger than that middle ring of the cloverleaf in order for the cloverleaves on either side to join to the centre of it.


You can see snowflakes 5 & 7 have alternating cloverleaves, and larger single rings (3-3-3-3-3-3-3-3 for a total of 24 stitches). This allows the joining picots of the cloverleaf to join to the second and sixth picot of the larger single ring.