Most of the vintage tatting pattern books have been scanned and added to the Antique Pattern Library where they may be downloaded for FREE.
http://www.antiquepatternlibrary.org/
Anyone looking to complete their collection of books should check out what is available, as new books are added regularly as people have the time to scan the books for inclusion in the library. All of these works are vintage and in the public domain.
Recently the tatting community has become aware of a web site which is SELLING these same patterns. This web site: Tatting Patterns
http://www.timelesstattingpatterns.com/ sells the patterns for $37.00 which is extremely expensive when you consider they are available for FREE. There is nothing illegal about selling these patterns as they are in the public domain and if someone puts together an electronic compilation and sells them they are not breaking any laws. However it is important for all tatters to know that they should not BUY the electronic book, they should instead go the the Antique Pattern Library where they can download all of these patterns and more. In fact, it would be much more beneficial to donate the $37. to the Antique Pattern Library which is a non profit organization trying to archive all of the old patterns for posterity, not only in tatting but also in knitting, crochet and embroidery, than to buy this publication.
One of the more objectionable things about the web site at: http://www.timelesstattingpatterns.com/
is the Gallery which has numerous pictures and captions of beautiful and colourful tatting which has been harvested from various web sites, blogs, and photo albums. Some of the pictures are things which tatters have made from these vintage patterns, and the colourful pieces are certainly more eye catching that the black and white drawings in the old books.
Other pictures are for things from other publications not in the public domain and a few of the pictures are of original, one of a kind designs, which people were working on and posted to their blogs. These pictures along with captions that went with them form other people's pages imply that the tatting belongs to Timeless Tatting Patterns and that "Timeless" will be producing the patterns for them.
All of which means that "Timeless" is benefitting from the work tatters have put into creating the laces and putting the pictures of them on their own web sites. Taking pictures from web sites without the owner's permission is a copyright violation. Using those pictures to help sell an electronic publication of public domain material appears to be a form of false advertising. Now, the "Timeless" web page doesn't say that these colourful pictures of tatting represent things in their publication. It just posts them in their Gallery, but why post them at all if not to mislead? They don't really have anything to do with what is being sold.
So if you're a tatter, avoid the "Timeless" web page, except to check for purloined pictures.
Additional Note: Posting similar information on your own blog or web site will help to get the information out to a wider audience. The more people aware of the situation, the sooner it will stop. The gallery has been down for maintenance and back up and as of this posting is down again. Continued pressure on the web site owner and the server will help to keep the gallery closed. Pressure on the gallery owner in the form of polite emails from everyone concerned requesting the removal of the images, and pressure on the server from people with purloined pictures requesting the same. There is more information on what to do and how to do it on the 25 Motif Challenge blog in the "Tatters Unite" posting.
Monday, June 30, 2008

Saturday, June 21, 2008
Mounting Lace on a Barrette
 Some questions in the tatting lists recently prompted me to show you how I attach my tatted lace to a barrette. The first thing to do is cover up the ugly metal bar. This method takes a little time, but it not only covers the bar it gives you a base to attach your tatting to. You will need ribbon like gross grain ribbon about a half inch wide either to match your tatting or in a neutral colour, a sewing needle and invisible nylon thread.
In this instance I have a white tatted flower and my ribbon is white so I can begin by using ordinary white thread. Open the barrette and remove the centre spring by bending it a little and pulling it out first on one side, then on the other. Put it aside while you work on the bar.
 Measure off a length of ribbon about 2.5 times the length of the bar. In this case it's about 8 inches. You need to have more than enough to go completely around the bar. Notice that this ribbon happens to have a pattern of white dots on it. Don't worry about tone on tone pattern as it won't really be noticeable when you're done.
 Insert the ribbon under the clasp and pull it about half way down the inside of the barrette as shown here.
 Wrap the other end around the barrette and insert it under the hinge at the opposite end of the barrette like this.
 Fold the end about a half inch so that the cut end is folded under
and begin to stitch the end down making sure that it is wrapped snugly around the bar. Shiny metal and shiny white ribbon don't photograph well,

but you can see the fold and the beginnings of the first stitch.

Work across the centre seam to the edge of the ribbon and whip stitch along the edge just catching the outer edge of the ribbon on both the top and the bottom as shown below. When you reach the end slide the needle under the ribbon and out the other side and continue whip stitching down the second side of the barrette.
 Here is the completed bar with the ribbon sewn down both sides.
 Take the spring and insert it in on the hinge side with the arch facing away from the barrette. Bend it a little to get it under the clasp side. Now the barrette is wrapped in ribbon and ready for attaching the tatting.
 If sewing isn't something you want to do you can attach the ribbon by using a glue gun, just make sure that you don't get any glue on the top side of the barrette where it might show. Glue down the first side, then fold under the second end and make sure the ribbon is tight before you apply the glue.
This pattern has green leaves as well as a white flower and white thread is going to very noticeable on the dark green The invisible nylon thread works with any colour of thread and it's invisible when its on.
Tie a knot in the end of the thread and slip the needle under the ribbon on the top side of the bar bring the needle out in the middle on the ribbon close to one end go through the tatting and the middle of one end and then insert the needle under the ribbon again and take a stitch. Work along the bar taking a stitch in the ribbon and a stitch in the lace.

Add in the second leaf and continue tacking it down all along the length of the bar, as shown here. You may not be using leaves and flowers, but the process is the same.
 The last piece to be added is the white flower. Stitch through the middle of the flower and and into the ribbon tacking it in several places. Tie a knot in the thread feed the needle through the ribbon out through the side and cut.

Sometimes, depending on what it is I am attaching, I just leave long ends on the tatting and wrap them around the ribbon covered barrette and literally tie the lace onto the barrette criss crossing the thread around the bar and back through the tatting. This method, although not quite as secure, has the bonus of not having to hide the thread ends.
Again, if sewing's not your thing, you can use a hot glue gun, but you take the risk of damaging your lace. If that isn't a concern then go ahead and glue it.
Wednesday, June 04, 2008
Tatted Pink Carnation
This pink carnation is one of the designs from my book Transitions in Tatting. It was made about 10 years ago and it hasn't gone flat in all that time. The flower measures about  2.5 inches across and was tatting in Coats Opera thread size 20. Opera is a 3 strand thread and size 20 is closer to size 30 in a 6 cord thread. I added some simple leaves that were just cloverleaf tips with gradually larger rings and chains down one side and back up the other. The addition of a bar pin on the back allows me to wear it whenever I need a splash of colour.
 2.5 inches across and was tatting in Coats Opera thread size 20. Opera is a 3 strand thread and size 20 is closer to size 30 in a 6 cord thread. I added some simple leaves that were just cloverleaf tips with gradually larger rings and chains down one side and back up the other. The addition of a bar pin on the back allows me to wear it whenever I need a splash of colour.
I have another one in white made with size 30 thread that I have mounted on a hair barrette with green leaves of a similar kind on either side. Both of these get used regularly and other than an occasional swish through soapy water and a quick rinse when they become soiled I don't do anything to them.
Saturday, May 31, 2008
Supply Find
I've only lived here for 20+ years, yet this week was the first time I made a trip down to the Coats and Clark clearance centre. I've known it was there, I just never got around to making the trek, partly because it's in an out of the way place and partly because I didn't know it was open to the public. What prompted me to check it out was some folks on a local email list recommending it. When I did investigate it, I discovered that it is only open 3 days a week.
We had to visit a client about a job and they were just a few blocks away from the Coats and Clark location so I had to drop in. I was hoping for lots of different crochet threads, but what I found was rooms and rooms full of yarn and very little crochet cotton.
I was wearing a tatted collar so that I could show the staff the kind of thread I was looking for, but they didn't have any crochet cotton on hand. I did discover some spools of Dual Duty Plus which is suitable for bookmarks, but as this is the clearance location the colour selection isn't terrific.
The larger spools of thread are Machine Quilting and Crafts thread size #50. These were all plastic wrapped and it was hard to tell what size 50 would look like tatted up, but I was thinking I might do a doily with the thread so I bought enough for that purpose. I opened one of the spools and tatted a wee ring when I got home.

Size 50 is, well, tiny as far as doily threads go. It's fine enough to make bookmarks out of although they'd be a little thicker that I like. Size 50 wouldn't be my first choice for doily thread.

They also had both metal and plastic Susan Bates shuttles. Again not my first choice for tatting but at $1.50 I got one anyway. Even if I don't use it, it gives me a shuttle I can give away if I need to, or one to show students what is available and point out the differences between the metal and plastic shuttles.
If you look close at the base of the dark blue thread you'll see a tiny ring. I had to show the staff what these odd looking contraptions were used for. I left them with my business card and my email address so if they get in any crochet thread they can let me know.
Luster Sheen is 100% cotton and as you can see it does tat. I will either crochet a shawl and add a tatted border, or I'll tat the whole thing. I haven't decided which yet. It's going to take a humungous shuttle to tat with it, but with all those colours, it should go with everything.
I bought the cross stitch kits because they were very cheap and I thought my sister might enjoy them.
Not a bad haul for a place that didn't have what I was looking for!
Thursday, May 15, 2008
Tatting a wild rose
Roses are a common motif in tatting comprised almost entirely of chains and they are quite simple to make once you understand how they are done. You begin with a central ring and the length of your picot defines how much of an arch there is in your petal and how much space there is between the central ring and the rest of the rose. The last picot space is actually a mock picot. So you make the ring and begin the first chain of the rose with a lock stitch.  A lock stitch is just an unflipped stitch and because it isn't flipped, it won't slide on the core thread. Without the lock stitch the chain might start out with an open space at the beginning, but when you snug up the stitches at the end of the chain, the space will close. So begin the chain by measuring out a short length of thread the same size as all the other picots. Make the first half stitch and if it flips make sure to pull on the chain thread to unflip it again. After all that practice flipping stitches, it's sometimes hard to remember NOT to flip.


 Make the last shuttle join of the round into the mock picot. There is only one mock picot in a rose and it's at the end of the central ring.
 Roses can be used in lots of tatting and they are too pretty a technique not to master them.
A lock stitch is just an unflipped stitch and because it isn't flipped, it won't slide on the core thread. Without the lock stitch the chain might start out with an open space at the beginning, but when you snug up the stitches at the end of the chain, the space will close. So begin the chain by measuring out a short length of thread the same size as all the other picots. Make the first half stitch and if it flips make sure to pull on the chain thread to unflip it again. After all that practice flipping stitches, it's sometimes hard to remember NOT to flip.The lock stitch may seem to be a little unstable and want to flip. But as soon as the second half of the stitch is completed normally, that is, flipped, it will stay in place. The space that is formed between the ring and the chain will look like any other picot when the rose is finished, but it isn't a picot, it's a picot space formed by the shuttle thread on one side and the ball or chain thread on the other side. The picot space in tatting when it is formed by two threads is called a mock (fake) picot.
Continue tatting the rest of the chain in the normal manner. When you have completed the chain make a shuttle join into the next picot. Joins in tatting typically are made along the tops of the stitches because you are joining one section of tatting to another. In a cloverleaf you join the outer edge of one ring to the outer edge of another ring. When you tat a motif or a doily you join to the top of the preceding work. When tatting a rose you join to the BOTTOM of the work. So instead of a normal join you use a shuttle join. In a normal join, a loop of the thread over the back of the left hand (assuming you are tatting right handed) is pulled through an available picot and the shuttle pushed through the loop. In this type of a join, the stitches slide on the shuttle thread. In a shuttle join a loop of the SHUTTLE thread is pulled up and then the shuttle is pushed through the loop. In this kind of join the stitches no longer slide on the shuttle thread. Make sure that your chain is snug before making the shuttle join.
After you make the shuttle join and continue with the next chain you will notice that while the shuttle thread is attached to the picot below, the chain thread just lays across the top of the join. You will see why this is important later. Continue working chains around the central ring, and making a shuttle join into each picot, until you are back at the mock picot you started the round with.
Make the last shuttle join of the round into the mock picot. There is only one mock picot in a rose and it's at the end of the central ring.
On the first round of the rose you made the shuttle joins into the picots on the central ring. On the next rows there are no picots to join into. Instead you will use your hook to wiggle under the chain thread that lays across the top of the shuttle join. You may find you have to stretch the chains apart a little especially if you are working in finer threads.
Once you have gotten your shuttle under the chain thread make the shuttle join and continue around the rose.

Each successive row is joined into the top of the shuttle join of the previous row.
If you find that the thread space above the shuttle join is very tight, then loosen your tension as you tat the first stitch of each chain. That will give you a little room for the stitches to move when you do the joins on the following row.
If your tatting is so tight or if you are working in thread that is exceptionally fine you may have difficulty making the joins into the thread above the shuttle join. In that case you may choose to begin each chain with a very, very tiny (almost invisible) picot. This will give you something to join into and at the same time it will keep the ends of the chains neatly in place.
Consistent tension is what will make a nice looking rose. Each chain is slightly longer than the chains of the preceding rows and they need to lay neatly each one above the other. If one round has chains looser or tighter than another round, the chains will have gaps between them or they will overlap one another. If the chain is too tight or too loose when you do the shuttle join, undo the join and straighten it out.
Roses can be used in lots of tatting and they are too pretty a technique not to master them.Monday, May 05, 2008
Transitions in Tatting order form now up

The Transitions in Tatting order form is now up and clicking on the link
will take you to the page. I've also added it to the links list on the right.
One of the first patterns in the book is one I like to use for teaching and it's pictured here on the right. The design is intended to be worked in size 10 variegated thread.
I created this pattern so that it could be done using all chains an using a variegated thread it works the same way as using 2 colours of thread since you rarely have the same patch of colour both wrapped over your hand and coming from the shuttle. The central ring can be tatted as a ring or it can be tatted as a mock ring so that the whole bookmark is done in chains.
 I often cut out flat shuttle shapes out of card stock or plastic lids and prewind them with thread. For the "ball" thread I use my business card and wind the ball thread around it, holding the card and the shuttle together with a paper clip and that way everyone is starting at the same point. The paper clip is slid over the thread between the shuttle and the card and we can start with the mock ring in the centre. I explain the difference between a normal and a mock ring and show them how they are different, but I use chains in the first lesson and rings on the second lesson.
The tail of this bookmark is just a zigzag chain with a tassel. It's a simple enough project that beginners will be able to complete it easily. It gives them practice without adding in anything confusing so they can concentrate on getting the thread to flip and making their picots a uniform size.
There are several small bookmarks like this at the beginning of the book that use different techniques and let beginners learn things step by step.
If you are a tatting teacher looking for a simple pattern to work with, you have my permission to copy and distribute this pattern and picture.
Friday, April 25, 2008
Transitions in Tatting from Flat to Floral

The Transitions in Tatting from Flat to Floral book is printed and the order form is up on the web site now. Click here for more information and the link to the order form.
The cost of the book including shipping is:
if using Pay Pal:
Canada $32.65 Canadian
US $36.40 Canadian
International $42.80 Canadian
If paying by cheque/check
Canada $32.65 Canadian
US $37.55 US or $36.40 International Money order in Canadian funds
US $37.55 US or $36.40 International Money order in Canadian funds
International $42.80 International Money Order in Canadian funds.
Tuesday, April 01, 2008
Catching up
I haven't had much time to blog recently. I have my personal blog where I post, strangely enough, my personal stuff mostly about tatting. Then there is the huge time sucking black hole that is the 25 Motif Challenge blog, and more recently the Round Robin blog. Don't get me wrong, I love seeing all the wonderful tatting everyone else is doing and I don't mind pulling it all together so that the whole tatting community has a sort of central place to check in and see what's happening. It's just that I feel a need to keep it relatively current and sometimes real life has a way of taking up blogging time.


 Then I started in on a design idea that I've wanted to try for a long time. I used to do a lot of petit point. Most of it was done with one strand of embroidery floss on 40 mesh to the inch silk. The one on the left is about a half inch from top to bottom and mounted in a pendant. Tiny. I have always wondered if you could take a petit point chart and tat one of these little guys.


I began in December working on some new designs for the February TLPC newsletter. One of these required working a lot of split chains some of which needed split chains joined to split chains and even after it was completed it didn't look like what it was supposed to be. For the curious, it's a flat rosebud. Now that you know what it is, can you see even a remote resemblance? No? That's why it didn't make it into the newsletter.
Then there were the little square motives I did with woven picots.  They looked really cute and I though they'd make a nice bookmark. I forgot that when I was finished with a square I had no way of going from the chain at the base of the dimpled ring into the next square. After some mental gymnastics where I considered SCMRs, split chains incorporating woven chains and other complicated variations, I scrapped the idea of square and went with this model.
 They looked really cute and I though they'd make a nice bookmark. I forgot that when I was finished with a square I had no way of going from the chain at the base of the dimpled ring into the next square. After some mental gymnastics where I considered SCMRs, split chains incorporating woven chains and other complicated variations, I scrapped the idea of square and went with this model.

Then there was this project. Any guesses? I know what I was aiming for. This isn't it. There's possibilities, maybe, if you stand with your head sideways... Maybe not. Scratch another design.
 Then I started in on a design idea that I've wanted to try for a long time. I used to do a lot of petit point. Most of it was done with one strand of embroidery floss on 40 mesh to the inch silk. The one on the left is about a half inch from top to bottom and mounted in a pendant. Tiny. I have always wondered if you could take a petit point chart and tat one of these little guys.
I took one of the simplest charts I had with the fewest number of colours (after all, for every colour I'd need a ball of thread) and I went looking for all of the colours in perle cotton. Some people may not realize that Anchor and DMC use the same colours and dye lots for both their embroidery thread and their perle cotton Since size 8 perle cotton compares with size 20 crochet cotton (Anchor is a smidgen finer) I figured I could use perle cotton. I couldn't find them. At least I couldn't find all of the colours I needed in the stores I could physically go into and I didn't want to take a chance of ordering online waiting for it to come and then finding out one shade was on back order or something. I knew I could get the colours in embroidery floss and I knew that 3 strands of embroidery floss would come out to roughly size 20 so I got my skeins of floss and started on the design.
I needed something that would give me a small square of colour so I settled on a tiny 4 ring motif. That would let me work from side to side or up and down as the chart required. When working in petit point you usually start with the darker colours first because the threads can become soiled with handling and petit point doesn't get washed. With tatting it was necessary to start where the design could be built on colour by colour so it started with the lightest colour.
It was challenging to not only tat the piece but to work from the front and the back and plan the direction of work so as not to miss tatting one little square. I had to retro tat several times because I ended up needing my shuttles to be in a different position to continue.
I like it, I think. It looks kind of pixelated but from a distance, it's clearly a rose. It's 5.25 inches square and it would make a nice patch for something maybe a pieced throw pillow or a placemat. Without the background colour it could be sewn onto the back of a jacket or on a large pocket, or a wide waistband, or maybe appliqued on a bag. Now that it's done I'm not exactly sure what to do with it. It's kind of like an oil painting. Up close all you can see is colour and brush strokes, but from a distance it's a picture with depth and texture. Drawing the design seems like it would be very easy since it's just a repeated 4 ring motif. However I found it hard to clearly explain where to put each bit of colour and how to tat it so that it could all be worked continuously. There are 196 tiny motives and each one needed to be placed precisely so I couldn't just say work like previous one, I need to mark every single ring in the whole design. It took 7 tries to get it right.
One thing is for sure, it's another of those "I wonder if" things that I can check off my to do list.
Thursday, March 20, 2008
Taking orders for Transitions in Tatting Book

I have decided to reprint my book Transitions in Tatting. It's something that I've wanted to do for a long time, but it seemed like a monumental task. The very old computer I used to write the book on had very little memory and when the book was done it kept losing the pictures and diagrams of the patterns so I often found pages with text but where the pictures and patterns ought to be there was nothing but big gray markers the shape of the missing graphics. When I rebooted the computer and loaded up the book with nothing else in memory, it was fine, but anything else running on the computer and pictures started to disappear. If that weren't bad enough I didn't like a number of the pictures. The scanned images were fine but not having a digital camera at the time, the pictures of the 3D objects like the flowers weren't as good as I would have liked.
 Since I wrote the book I have gone through several computer changes. A new computer, several changes of operating system, a couple of hard drive changes and some software changes. Some things I used to create the book, don't exist anymore, like some of the software and some of the lace. The idea of fixing things so that I could reprint the book just seems daunting, almost like starting from scratch. The other day I came across some backup disks and discovered that my sweetheart husband is brilliant. Well, I knew he was, brilliant already, I just discovered one more reason to think that way. Right after I printed the book, he took all of the files, zipped them and burned them to CD. What I discovered the other day, were the CDs with the zipped files of the finished book. I can't change the things I don't like, like the photographs I'm not happy with, but I can print these files. I not only can print them, but I have printed them.
 So the question is, how many of you would like to buy a new tatting book? I called the book Transitions in Tatting because it starts at the beginning with basic traditional patterns done in 3 different notations, long, short and visual and then progresses into some modern designs like a couple of hearts, a couple of critters, and a beaded choker which are flat, then it progresses into 3D tatting. A small wrist bag big enough to hold a small ball of crochet cotton, and a beaded bridal bag, followed by a 3D treetop angel and several life size flowers including a daisy, delphinium, tulip, daffodil, star gazer lily, and orchid. I also included some leaf patterns to go along with these.The book is 76, 8.5 x 11 pages, but in my opinion, roughly the first third of the book wouldn't interest an accomplished tatter as it just contains a lot of traditional stuff like hens and chicks edging. I included the basic patterns in 3 notations at the beginning just to show people who are not comfortable with visual, drawn patterns how to follow them. If you are already comfortable with drawn patterns this section is kind of boring. That still leaves you with 50 pages of fun stuff.

 Carnation - shown above. I noticed when I used the carnation from the Tatter's Treasure Chest that the perky flower ball was small and after a while it flattened out in the middle. My carnation design is more the size of a real carnation and it doesn't flatten out.

 book on had very little memory and when the book was done it kept losing the pictures and diagrams of the patterns so I often found pages with text but where the pictures and patterns ought to be there was nothing but big gray markers the shape of the missing graphics. When I rebooted the computer and loaded up the book with nothing else in memory, it was fine, but anything else running on the computer and pictures started to disappear. If that weren't bad enough I didn't like a number of the pictures. The scanned images were fine but not having a digital camera at the time, the pictures of the 3D objects like the flowers weren't as good as I would have liked.
 Since I wrote the book I have gone through several computer changes. A new computer, several changes of operating system, a couple of hard drive changes and some software changes. Some things I used to create the book, don't exist anymore, like some of the software and some of the lace. The idea of fixing things so that I could reprint the book just seems daunting, almost like starting from scratch. The other day I came across some backup disks and discovered that my sweetheart husband is brilliant. Well, I knew he was, brilliant already, I just discovered one more reason to think that way. Right after I printed the book, he took all of the files, zipped them and burned them to CD. What I discovered the other day, were the CDs with the zipped files of the finished book. I can't change the things I don't like, like the photographs I'm not happy with, but I can print these files. I not only can print them, but I have printed them.
 So the question is, how many of you would like to buy a new tatting book? I called the book Transitions in Tatting because it starts at the beginning with basic traditional patterns done in 3 different notations, long, short and visual and then progresses into some modern designs like a couple of hearts, a couple of critters, and a beaded choker which are flat, then it progresses into 3D tatting. A small wrist bag big enough to hold a small ball of crochet cotton, and a beaded bridal bag, followed by a 3D treetop angel and several life size flowers including a daisy, delphinium, tulip, daffodil, star gazer lily, and orchid. I also included some leaf patterns to go along with these.The book is 76, 8.5 x 11 pages, but in my opinion, roughly the first third of the book wouldn't interest an accomplished tatter as it just contains a lot of traditional stuff like hens and chicks edging. I included the basic patterns in 3 notations at the beginning just to show people who are not comfortable with visual, drawn patterns how to follow them. If you are already comfortable with drawn patterns this section is kind of boring. That still leaves you with 50 pages of fun stuff.
Here's a list of the Table of Contents:
Flower Bookmark
Butterfly Bookmark
Daisy Bookmark
Heart Bookmark
Shamrock Bookmark
Split Ring Cross Bookmark
These are patterns I often use to teach beginners as each one is a simple motif with a long zigzag chain and tassel. Not a lot of work in each one so they are small beginner projects suitable for learning how to tat.
Traditional type patterns for just the basics:
Edgings
Insertions
Motif Patterns
Original patterns that become increasingly more difficult as you progress through the book and everything from here on has been worked with size 20 Opera thread:
Simple Heart
Floral Heart
Bunny
Turtle
Beaded Choker
Wrist Bag
Beaded Bridal Bag
3D Angel
Daisy
Rose and leaf - pictured above. Not life size , it's only about an inch across, but it makes a really great lapel pin.
Delphinium
Tulip and Tulip Leaf
Daffodil and Daffodil Leaf - these are shown in the gallery on my web site
Carnation - shown above. I noticed when I used the carnation from the Tatter's Treasure Chest that the perky flower ball was small and after a while it flattened out in the middle. My carnation design is more the size of a real carnation and it doesn't flatten out.
English Ivy
Stargazer Lily
The book will probably cost somewhere in the range of $30 and I'm taking advance orders. I'll even sign them, which I didn't do with the first printing unless requested. Somehow writing in someone's new book seems wrong, but way back then I simply didn't think of myself as an author. So if you'd like to send me an email at sharon at gagechek dot com or leave a comment on the blog, I'll be taking advance orders. 
The book has been reprinted and the cost is $30.00 Canadian plus shipping (to the US $6.40 and International air mail $12.80). Payment can be made through PayPal, just email me at sharon at gagechek dot com or tatdlace at gagechek dot com giving me your full mailing address and your PayPal email address and I'll send you an invoice for it.
Friday, February 29, 2008
Colour
And when not to colour. Some years ago Maus had a note on the round robin pages talking about doily colours. She pointed out that a doily using dark and light colours can look really pretty and very dramatic but when you lay it down on a dark wood table the dark colours can blend into the background. Similarly the light colours can almost disappear if the table surface is a light colour. None of that matters if the doily is going to be framed. So for round robins it's important for the participants to know where the doily will finally be displayed.
See this pink butterfly? The first one was done all in one colour and while you could tell it was a butterfly, it didn't really come to life until I changed the middle row of split rings to black. It separated both sides and defined the body of the butterfly.
Colour can make or break a doily. A doily that makes good use of negative space can be really beautiful and a designer may use colour to emphasize the design and make it really "pop". Think of a simple ring and chain edging. You can work it all in one colour or you can use one colour for rings and another for chains. Do the ring in red and the chain in green and you go from a ring and chain edging to a row of flowers. Similarly colour in a doily can be used to emphasize one element  while another is subdued.
 while another is subdued.
See this pink butterfly? The first one was done all in one colour and while you could tell it was a butterfly, it didn't really come to life until I changed the middle row of split rings to black. It separated both sides and defined the body of the butterfly.
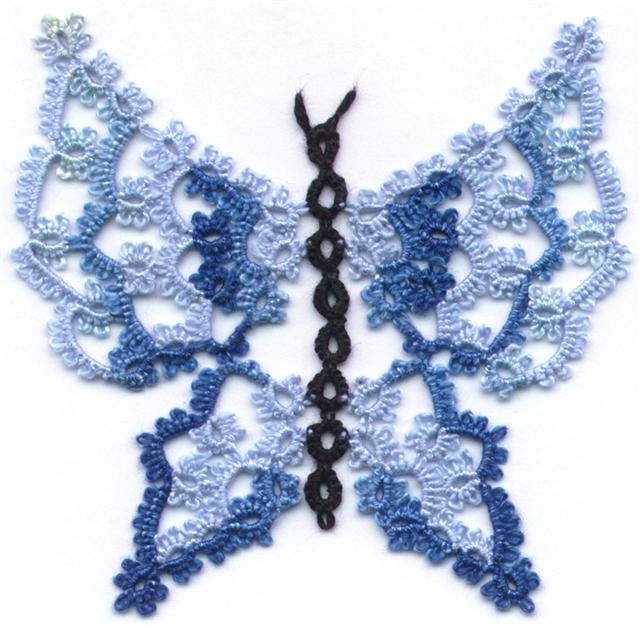
Variegated threads can add a whole new dimension to tatting and the effects can be terrific or terrible. This is the same butterfly using both solid and variegated thread, but the placement of the light and dark sections of the thread was deliberate. The butterfly  is made using 2 shuttles. One was wound with the solid blue that is a pale shade matching the palest colour of the variegated thread and the other shuttle was wound with the variegated thread. The darkest sections were used close to the butterfly body which is black just like the pink butterfly. The colour changes from dark to light as it works toward the outer edge of the butterfly wings. You might think that the whole butterfly was done in just variegated thread, but it wasn't.
 is made using 2 shuttles. One was wound with the solid blue that is a pale shade matching the palest colour of the variegated thread and the other shuttle was wound with the variegated thread. The darkest sections were used close to the butterfly body which is black just like the pink butterfly. The colour changes from dark to light as it works toward the outer edge of the butterfly wings. You might think that the whole butterfly was done in just variegated thread, but it wasn't.
Sometimes variegated thread can really add a wonderful dimension to tatting and sometimes it can completely ruin a beautiful design. In a doily where very effective use of negative space has been made so that shapes are evident within the design it is best to use a solid colour thread. A variegated thread will usually draw the eye to the colour and distract from the shape. In that instance colour and line would be at war with one another and neither win.
In a doily where the line and shape are simple and repetitive, variegated thread can break up the monotony and bring new life into the pattern. Long stretches of colour with gradual changes can make one effect on a design while another thread with short quick colour changes can bring a totally different effect. Sometimes the short quick changes can make a finished piece look choppy, but if the design warrants that kind of quick colour changes, it can be a very useful design tool.
Thursday, February 21, 2008
The Tatting of Kathy Niklewicz
I have been busier than a one armed paper hanger. I'm working on the designs for the newsletter and things are not flowing the way they ought to mostly because I haven't had quiet me time to just sit and tat. We've had to do a lot of running errands recently and the projects that I have been working on aren't progressing well 2 of the articles I had planned to include have had to be scrapped and now I have a new idea I'm working on that I hope will meet with better success. I have managed to send out all 5 of the Round Robin groups and I think I'm caught up on the 25 Motif Challenge.

Also included in the package was a custom US postal stamp with the same tatted motif pictured on it. That definitely gives tatting an exposure it wouldn't have otherwise.
 I'm so glad that Kathy sent me these pictures so that I could share them with you. She has such a wonderful way of presenting tatting that it's like it's a new art form.

The other day I was surprised to find in the mail a large envelope and when I opened it up there was a charming letter from a tatter I don't think I've "met" on any of the tatting lists. Kathy is an awesome tatter who is a member of the Beaver County Tatters of Old Economy PA, with enormous creativity. Sadly, she is blogless so we don't get an opportunity to see the things she has made so I just have to share it with you all.
Kathy's letter to me had a picture of one of Teri Deusenbury's hearts on it and the scanned picture doesn't do it justice. Kathy's note says that she attached it by pins to a velvet heart box and the pearls were sewn on after it was finished.
Kathy had intended to send her note to me at Christmas time but was delayed so included in her package was a Christmas card featuring Patti Duff's wreath design to which she added red rhinestones, a bow pin and a tiny ringing bell.
Also included in the package was a custom US postal stamp with the same tatted motif pictured on it. That definitely gives tatting an exposure it wouldn't have otherwise.
As part of the Beaver County Tatters, Kathy dresses up in period costumes and demonstrated tatting at a number of local festivals. She brings along her small Christmas tree covered with tatted ornaments and a small Victorian dollhouse with Victorian furnishings including tatted doilies valences and bedspread which get a lot of attention. She likes to design 3D items like this bell, egg, and heart and she often spends as much time decorating them as tatting them.
 Kathy says these adorable parasols are simple ring and chain designs with an edging around the top. Sometimes she fills potpourri inside tulle netting and then she attaches a crystal call at the base. The basket was copied from one she discovered in an antique shop.
 Her crowning achievement are these lovely Victorian Ladies Slippers which are about 4 inches long form heel to toe.
I'm so glad that Kathy sent me these pictures so that I could share them with you. She has such a wonderful way of presenting tatting that it's like it's a new art form.
Subscribe to:
Posts (Atom)