Monday, March 29, 2010

CTC - Big boys and their toys

When you need to buy something for a youngster, you head off to the toy store, but when you want something for the big boys you head off to this store. At least, in Canada you do. No matter whether your sweetie is into building decks or electronic consoles, cars or hunting, fishing or skateboarding, you'll find what you need under this sign.
When the flyer with the familiar logo arrives, the table gets cleared off so that each and every page can be carefully reviewed. My particular sweetie has many talents and interests and this is the one store we visit every week. He thinks I'm being a super understanding wife, but truthfully his lifelong accumulation of hand and power tools means that anytime I need something done, he has the tools for the job and the knowledge to use them. I'm a powerful enabler. If he can make do with the little version, I almost always suggest the bigger, more powerful one. I'm not stupid. I know that if I want a professional job done, he'll need professional tools.

Over the years it has paid off well. Honey, could you move that phone line over here? Sweetie, the washing machine quit. Darling, I need a trellis over there. How about making a bracket for this gizmo? Can we replace this sink? Whatever I've needed, I just ask for and eventually I get just the thing, custom fit, made to order, perfect.

Of course the downside, is that I get to spend a lot of valuable tatting time browsing the shelves of his favourite store. I can't complain. I got the blue screen of death on my PC last week. He had it back up and running in about 10 minutes, during which time I just switched over to the laptop. Last night the dryer quit just as I put a load of towels in to dry at about midnight. Half an hour later it was running again. I could resent the time spent examining the benefits of this tool or that, but what repair company is going to drop in and fix my dryer at midnight?

The store? Canadian Tire, of course, but you'd know that if you were Canadian.

Wednesday, March 24, 2010

If you tat long enough...

I was doing an update yesterday on the 25 Motif Challenge and noticed a comment made by a newer tatter about how she thought she was finished with a pattern and cut the thread, only to realize seconds later that the design wasn't quite finished. It got me thinking about all the little "I can relate to that." episodes that we all have experienced at one time or other.

Things like:


  • The aforementioned, cutting the thread too soon.

  • Snipping through a picot while trying to cut off the finishing ends

  • Joining to the wrong spot.

  • Missing a picot.

  • Skipping an entire pattern repeat.

  • Running out of thread at the very last ring.

  • Hiding ends and having them pull back out.

  • Starting CTM so that you don't have ends to hide and then making a mistake at the beginning that you have to cut out so that you now have 4 ends to hide.

  • Using an entire ball of thread like a shuttle to avoid having to wind the second shuttle.

  • Unwinding a full shuttle to add beads in because you miscounted when you started.

Now if you can't relate to any of these things, just wait, you will eventually.


Here's something you won't see in my upcoming snowflake book.


As you can see, this design that started with the typical 6 points of a snowflake has devolved to where it would have only 3. What was I thinking?

Monday, March 22, 2010

Finesse

Just about every tatter I know personally, is someone I taught to tat. It's kind of like teaching someone to drive. Your habits, good or bad, become theirs.

I've been tatting rather prolifically, for a lot of years, over 30 anyway. There aren't enough tatters nearby to have a regular frequent get together. Once a year, isn't enough to effect changes in the way I tat. I'm pretty set in my ways. I'm not a granny sitting in a rocking chair that's too old to change. I'm also not too stubborn to change when I see a reason to.

Since I don't have a local tatting group to bounce ideas around with, a lot of what I know and what I learn comes from the on-line community. Sometimes I see different aspects of tatting being presented in such a way that it suggests that tatters who don't do things that way are doing it wrong.Being a very independent sort or person my reaction is 'who says?'

So just to give equal time to people who may do things differently, here's my perspective.

Front side/back side - I don't do it. I personally don't think it looks any better than tatting it half and half. I just don't. So I'm not about to jump through hoops to keep all of my stitches the same way around. To re-train myself to switch each time I RW would slow me down and I have too many designs spinning around in my head that need to get tatted and put down on paper. Besides, do a 3D Daffodil and which is the front, the inside of the outside of the flower? The top of the bottom of the base. How about a carnation? See? it gets nuts trying to figure out which side it up.

Sometimes I do front side/back side tatting (confused? so am I). When I'm working a design with multiple split rings joining together I work them so that they are all the same way up. The juxtaposition of multiple rings connecting to the same point with some of the rings, or some parts of some rings not all the same way around drives me nuts.

Counting the join as the first half of the next stitch. - I don't do this one either. To me, a join is a join and a stitch is a stitch. I have been successfully tatting anything and everything for years making a join and then a full stitch and my lace looks just fine, thank you very much.

Posting the shuttle through the ring before closing it. Tried it once. My other closed rings looked fine, the one where I posted the shuttle through looked twisted and I had to open the ring up so that I could put the shuttle back through. I have too much tatting to do to try that one again.

Tatting proficiency? Hmmm. Definition PROFICIENT skilled or expert. 30 years of tatting and teaching others to tat, 10 years of designing and publishing patterns, I guess that qualifies.

If not, I'm sure the tatting police will soon be at my door for spreading sedition. They're welcome, I'll just put the kettle and while they're peacefully sipping tea I'll wrap them in tatting so they can't get away. I'm sure they'll come around to my way of thinking eventually.

Tuesday, March 16, 2010

I love my iron

Now don't think I've gone all weird and am in love with doing laundry, far from it. BUT, as a tatter, my iron is a pretty special tool. Case in point. Yesterday I finished a snowflake design that I though was looking pretty good until I finished that last join and I knew that this design just wasn't going to work without some serious blocking. Blocking is not my favourite thing to do. I accept that as a tatter, it comes with the territory, but I don't have to like it.
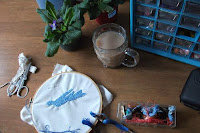
As I slapped the snowflake down on my ironing board and pinned it out it occurred to me that this little job is made easier by the cleaning feature on the iron. Since the kettle is usually hot from making a cup of tea, I usually just pour a little of the already hot water into the iron and by the time I have my "cotton tea towel that doubles as a pressing cloth" on the board and the lace pinned in place, the iron is steaming hot. A quick swipe of the iron across the board to check it out and then the cloth gets folded over the lace and the iron on top. A quick push of the cleaning lever and a spray of boiling water hits the cloth covered lace. The feature is meant for cleaning out the iron and I use it for that too, but in short spurts it works gteart for wetting the lace. Then I leave the iron on it for a few seconds to mostly dry it out. I pull the pins, cover it again and give it another quick press. Instant blocking. I love it. I always use a pressing cloth on lace because I've used steam irons before that spit out scale. If I anything goes wrong the damage happens to the pressing cloth and not the lace. I've overdone the pressing before too. The pressing cloth has the scorch marks to prove it, but the lace is fine. The ironing board has 2 covers and 2 pads on it. That's because I scorched the first one. My old board had an asbestos cover, made back before they knew the dangers of asbestos, could tale any amount of heat, but the new one couldn't and I forgot. The double padding makes for easier blocking. I just angle the pins in and with the pressing cloth between the pins and the iron I can zap it with a lot of heat without scraping the finish off the iron or damaging the lace.

The iron was a gift from my honey about a bzillion years ago. I wondered about it when he got it for me since I was single at the time and all my clothes where the non-iron variety. I suppose when he saw me steaming hair ribbons with the kettle he figured I needed an iron. I guess he didn't know that velvet ribbon can't be ironed. At any rate, here I am, years later, very thankful that it makes blocking lace a 5 minute job.

Upon hearing that other people are using this technique, I reflected on the times NOT to use this method. It's fine for cotton threads. Don't use it on tatting that incorporates blending filaments. They are plastic and they melt. Don't use it if your tatting includes plastic beads. I always use glass. I didn't once. Thankfully I was using a a paper towel as a pressing cloth, so there was no harm done, except to the tatting.

Thursday, March 11, 2010

DIY

This house is getting older and so is what's inside it. For years now the bathroom sink has needed replacing but my dearest and I couldn't agree on what to do with it. My disagreement stemmed mostly from the fact that I hate the hideous green counter top and flooring. Those are the bits that aren't showing as much wear and the pieces that I'd like to be rid of.
A couple of years ago I tried to persuade him that a one piece moulded sink and counter would be a great idea and I was delighted that he agreed and after careful measuring to see if it would fit, we brought one home. After ripping the counter top off of the cabinet we laid the new unit it and it was wonderful. It got rid of both the ugly green counter top and the disintegrating sink. There was only one problem, the position of the drain hole didn't match up with the drain in the house and while we could move it, we ran into some additional problems because the perfectly square counter top didn't fit neatly against the less than square walls. So the counter top sink went back.

Fast forward a couple of years and the subject came up again. One of the issues with the old sink is that it was glazed metal and around the edges the glazing had worn away leaving bare metal that rusted. We covered it periodically with enamel paint, but it needed to be replaced and my sweetheart was all for going with a material that wouldn't rust. So when a ceramic sink came on sale he thought we should take a look.

We popped into the local Home Depot and had the clerk haul one out and open it. It looked a lot smaller than our existing sink. At 6 foot 3, my sweetie is a lot of things, but petite isn't one of them. A tiny basin, just won't do. So we went back to looking at the metal one. It would have worked, I guess, but I didn't like the idea of all the work, just to have something exactly the same. Then I looked at the display and saw something with a bigger basin, but in ceramic. It looked like it might fit So we brought it home along with some new valves.

Another one of the things that puts me off working on the bathroom plumbing is that there are no shut offs for it. As soon as work needs to be done in the bathroom, all the water has to be shut off. So for the duration of the project there's no water and worse no toilet! I don't know whether it's just the fact that the facilities are out of commission or whether I have an uncanny knack for drinking a gallon of water just before, but I always seem to be in desperate need of them when I can't use them.

So the first thing that went in was the shut off valves. Some precision cutting, a little flux, a little solder, apply a little flame and in these babies go. Ah relief! I don't care how long the project takes as long as I have access to that one primary piece of porcelain plumbing.

The next problem was making sure that the drain hole on the new sink matched up with the drain in the house. It wasn't just a matter of having to cut a new larger hole in the counter top, it was essential that when the hole was cut, that the pipe coming up fit into the hole going down. Easy, right? Not so. To match up the existing pipe the sink had to be moved forward about as far as it would go. It was a near thing too because while the sink fit into the counter top, under the counter top a section had to be cut out of the cabinet framing.

All that holds this baby in is weight and a lot of silicon caulking so just to make sure that it does hold in it was clamped down for 24 hours to make sure that it was fully dried before we used it.

Once everything was in place we reattached the drain pipe, but it didn't sit flat down without applying a lot of pressure. Continual pressure on a ceramic basin sounds like an invitation for trouble, so we moved the drain pipe 11/16 of an inch. More precision cutting and a little sleeve slipped on both cut sides. Not much, but enough for everything to fit neatly together.

So here it is looking much like it did before we started. I still have that hideous green counter top, but I'll never see rust again ... at least not here.
It makes it sound simple doesn't it? Well, it was simple for me. All I had to do is watch. All of the hard bits were done by my honey. It sure helps to marry a talented and gifted guy. And he's cute too!

Saturday, March 06, 2010

Design Leaks and Pretty but not Pointy Designs

You may have noticed that I haven't blogged much recently. That's not exactly true because I have been keeping up with daily posts on the 25 Motif Challenge blog. If they aren't done daily, it becomes almost impossible to keep up, so I've been putting other things on hold just to make sure that the challenge blog gets done. There is a team of people, but with regular things like work, families and other normal life stuff getting in the way we don't always have the time for it. Unfortunately, when several people aren't able to keep up on their designated day, it suddenly becomes an all day project. When that happened several times in a row, I just decided that I couldn't handle another all day update, so I started doing them daily.

So the challenge blog is on track and the Design-Tat course is up and running for a third term so I've been a very busy tatter, only, I'm not doing much actual tatting.

Remember how I said I was trying for 10 designs in 2 days? Want to know how many I got done? Come on, ask me. Never mind I'll tell you any way. I got 2 done. Two measly designs and one of them can't even be used because it doesn't have points, it has rounded lobes like a flower. Pretty, but not pointy.

Then there was last week which was more or less a write off on account of a cold. You know something? It really helps when you can breathe. Between having a tissue covering my nose to catch the drips when I was upright and having my nose plugged completely when I wasn't, breathing became an interesting exercise in futility. I knew I was done for when I sat for an entire evening with a pair of wound shuttles in my hands and didn't tat a stitch.

When I finally managed to get the design off the shuttles it didn't lay as flat as it ought to and I can't use it anyway. I realized as I was doing another update for the 25 Motif Challenge that the snowflake not only has rounded points, it's a whole lot like the Iris Niebach design Dale Marie was working on.


I can't look at other people's tatting when I'm designing or elements of those other pieces just leak into my tatting. See the similarities? I feel like I've plagiarized a design although that wasn't what I was doing, I was thinking about mignonette and decided it had too little structure of a snowflake, so I just used the Josephine knots and incorporated them with some dimpled rings, because, like it was February, and Valentines, and all that. So here's the 3rd of the 10 I was supposed to do, but it too, is being rejected. So of 10 planned designs I have exactly 1 that's usable.

If you hear screaming coming from the north, it's just me getting frustrated.

Sunday, February 28, 2010

Olympics

Canada - Hockey, 'nuff said.


Edited to add:
The men's hockey game was such a nail biter, I couldn't write any more than I did. I had to shut off the computer to watch the game. Now that it's all over, I'm patriotic enough to be glad that Canada won, but USA didn't make it easy. The 2 teams were so perfectly matched, either one of them could have won. It's hockey the way we like to see it on both sides of the border. We won this time. See you again in 4 years.

Friday, February 26, 2010

Finished Embroidered Bird and Tatting or Bust

The bird is done and I'm satisfied with the way it turned out. I've washed and pressed it and it seems to be roughly the same size as the first block done in 2007 and it didn't pucker as badly as I thought it might. It's the same fabric but I scanned the bird with a black background which is why it appears darker that the butterfly. It didn't really take all that long to complete, I just kept putting it down because I couldn't see the faint transfer lines at night which is when I do most of my hand work. After I did the butterfly in 2007 I couldn't think of anything that I wanted to do with it. It's an 8 inch square, which isn't big enough for a pillow or anything useful, so it's been stuck to the inside of my tatting cupboard door. I have been toying with the idea of embroidering butterflies and birds on a bunch of blocks and tatting a bunch of butterflies to applique on some more blocks and then putting the whole thing together as a quilt top. The first block was done in 2007 and it's now 2010. At this rate I'll be as old as Methuselah before it's done.

At any rate it's done and I can move on to more tatting. I have a dozen ideas in my head but I know if I don't stick with a project once I start it, it won't get done. Since I already have 20 of the 30 snowflakes done that I want for the book, I'd better get at it. Especially since I wanted them all done before I start the next Design-Tat course March 1st.

That's 2 days away and it's impossible to design and tat 10 snowflakes in 2 days, you say? If Olympians can do the impossible, why can't I?

Saturday, February 20, 2010

You LOST it? : Better

Our early Saturday morning ritual was interrupted by a phone call from Mike, our energy audit guy. I thought the furnace and everything to do with it's installation was behind us, but apparently not.His call this morning was to inform us that he'd (or according to him, his kids) lost our paperwork and it would all have to be completed again. The first audit is to tell how energy efficient the house is. The second one is to show how much improved it is after we block all the holes. The red thing is a frame that fits inside the door frame and it blocks all the air, while the fan, that yellow thing at the bottom blows the air out and a pipe that you can't see in the picture, runs into the meter that Mike is reading. With furnace service people in and out 8 times since the installation of the furnace we didn't have a lot of time for picking up materials and doing work. What we did do for the second audit was to leave the blinds and curtains closed the way they normally are in the winter and Mike was surprised at the readings he was getting. Without the paperwork, we don't get the government grant which is potentially 50% of the cost of the new furnace. So this morning he had to come over and get the copies of the reports that we have and duplicate the forms he needs to send in. Nice guy Mike, but from now on tell your kids Daddy's office is off limits.

I managed to re-do the bird I already showed you, with a darker blue outline thread. It made a world of difference. I like this version much better. The long and short stitch does allow for nice colour blending, doesn't it? I don`t like the flowers. I started with a light centre and darker outer area, but I though it was too vivid and switched it, but the pale outer shade is kind of merging into the cream coloured background and disappearing. They either need to be changed totally or I need to take a very dark burnt orange in a single strand and outline the flowers to make them stand out. I think that's the way I'll go since it's less work and I'm already tired of working on it.

I've been talking about doing a new Design-Tat course and I now I have enough participation to do another class. I was astonished at the number of people interested in the first classes, but I expected a less enthusiastic response to the course when it cost something. I looked at some of the other, comparable, courses and noticed that they were charging between $40 and $75
and I know that a big chunk of the tatting community is comprised of seniors that just don`t have that kind of money. On the other hand my knowledge and teaching ability are worth something. When I started, I thought I knew a little bit that I could share, but as I got into I realized that I actually know quite a bit. It`s amazing when you sit down to write things out and explain them, that you realize that you have accumulated a lot of worthwhile information. So, I think the $20 cost is reasonable.

I really struggled with the patterns for my first book Transitions in Tatting as many of the designs were 3D flowers. How do you draw in 2 dimensions, a pattern for a piece of lace that is in 3 dimensions? Almost every pattern had to be drawn and re-drawn and re-re-drawn until I was reasonably certain that the average person would understand them.

I do tech support for my husbands software and I'm accustomed to thinking in terms of how to explain things simply so that the average inexperienced person will understand and not confuse things. I am usually quick on the pick up of anything I attempt and for years I had done crochet work. Every time you get to the end of a row, you reverse work and turn it left to right. Then I started tatting and tried turning it left to right when it said reverse work, but as soon as I did the pattern made no sense. It took a phone call to an experienced tatter to help me understand what I was doing wrong and show me that RW meant turn it top to bottom and not left to right. Such a simple thing, but to me it was a complete blank wall.

Remembering that blank wall helps me to think outside the box when I'm explaining things, to see how other people might be misunderstanding what I'm saying. After all, if I say "dog" and think big and black, but you think small and white, we're not really talking about the same thing, are we?

Wednesday, February 17, 2010

O Crap!

You may have noticed that I haven't been tatting much. That's because I decided to take a breather and do something different. I went through my stored pictures and found one that I liked and re sized it to fit on an 8x8 inch square. Then I printed it on the laser printer and ironed the image on the cloth so that I can embroider it..

This project is also giving me fits. I know that I did the first image, a blue butterfly on an 8x8 square. Imagine my confusion when the finished square was closer to 7.5 inches square. I had to adjust the image by half an inch to make them roughly the same size before I started.

This cabinet holds my embroidery threads left over from the days when I did a lot of petit point. Petit point uses several shades of different colours to paint pictures in thread so I selected three shades in the colours I wanted and began to stitch. I like using long and short stitch to blend colours together for a realistic effect. Because the laser print image isn't as dark as a transfer image, I used an outline stitch in the darkest shade for the central image while I could still see it clearly and then started laying down colour in the medium shade and then switches to a paler shade for part of the picture.
It looked like crap so I cut and pulled all the threads and decided to do the whole thing in the medium shade. Theoretically, it should look good with the outlines in a dark shade and the rest in a lighter colour. About 2 days into painting the image it dawned on me that the reason to butterfly was smaller was that it had shrunk when I washed it. I didn't wash this one before I started and I know better, which means that when it shrinks that half inch, everything is going to pucker.

So here it is done in 2 shades. What? You can't see 2 shades? Drat! That means that this bird that has already taken about a week of stitching, may pucker enough that it's totally unusable and I have to re-do the outline parts. I've spent too much time on it not to finish it, but when I do finish it and wash it, it's liable to turn into garbage. I need to re-do the outline areas in a darker colour to make them stand out and I'm already disenchanted with it.
But here I am ready to re-do the outline. I'm working in the light from the window, because these 2 colours are so close to one another, that I can't tell the difference under regular lamp light.

The darker colour laid across the bottom of the picture is the next shade darker and so far it's working well. Too bad this may be an exercise in futility.

Sunday, February 14, 2010

Where's my chicken stock?

Some time ago my Sweetie was diagnosed with Meniere's which has necessitated some diet modifications, principally the reduction of sodium. While this means some additional work for me, I don't mind cooking as long as he doesn't mind cleaning up. So most of the time this arrangement works out really well. My Sweetie is a treasure and I wouldn't know what to do without him.

Today we were having dinner guests and rather than using the oh so convenient, boneless chicken breasts, I opted for the bone in chicken and boned it myself. While dinner was cooking the denuded bones simmered away quietly on the stove becoming a delicious and fragrant stock that was used to replace the high sodium content soup called for in the recipe.

As was our custom, my beloved sweetheart cleared away the dirty dishes and washed the grimy pots, pausing only momentarily to ask me what he should do with the contents of the stock pot still simmering on the stove. I told him to just put it all in a container and store it in the fridge, and thought nothing more of it.

After our company had gone and I was moving things around in the fridge to make room for more left overs I noticed something peculiar about the contents of the container that held the residue of the stock pot.

See anything strange about the stock in this container? You guessed it, he threw out the stock and saved the bones which is exactly what he thought I'd told him to do.

It could have been worse. Years ago, at the cottage, my Dad had gone out fishing and caught several nice size bass and pickerel. They were large enough that rather than clean and scale them, he filleted them, running a knife along side the bone and then just under the skin on both sides, leaving 2 nice big pieces of boneless fish. He wrapped up the fish portions and laid them aside in some paper towel, then he wrapped up the garbage in the newspaper he had been cutting them on for disposal in the wood stove which was used for heating and sometimes cooking.

To make sure that the fish guts were thoroughly burned he first went out to the woodpile to get some more wood to add to the fire. Mean while Mom got ready to cook the fish for supper and in order to clear things out of the way she grabbed the paper wrapped parcel and threw it in the fire. Dad came back, added wood to the stove, threw the fish guts in to burn and started looking for the carefully prepared fillets. Unfortunately, Mom in her zeal to clean up had thrown the fillets in the fire. I'm not sure what we had for supper that night, but there's one thing I know for sure, it wasn't fish.

Another thing I know for sure....we won't be having homemade chicken soup for lunch tomorrow and missing stock or not, I really appreciate a Honeybun who will clean up in the kitchen, because I hate washing dishes almost more than anything I can think of.

Saturday, February 13, 2010

My Favourite Edging

One of the ladies on HBT asked about favourite edgings. This one is mine. This is the hanky I use most often. It gets stuck in the lapel pocket or tucked in my purse and then back in the drawer. I don't bother doing a proper blocking job so it doesn't look as good as it might, but that's just me.

This variation has six small rings 8-8 but the rings are kind of crowded. I suppose if I had made the picot on the first ring really big, they would have laid flatter, but this one was done a very long time ago and I've gotten smarter since. (Smarter about tatting. Stop all the snickering in the peanut gallery.)


Anyway, here's a version of the edging if you want to give it a try. The hanky edging was done in size 80. The inset which was done in 2 colours to show you where to switch shuttles was done in size 8 perle cotton.

I like this edging because:

It's pretty.

As you can see from the diagram, it easily flows around corners.

It makes a nice wide edging, almost one inch deep in size 80 thread, in one pass.

It has enough variety that it isn't mind numbing to tat.

On the other hand, it isn't something I would attach to clothing because it would need blocking with every wash and I'd rather be tatting than blocking.

Wednesday, February 10, 2010

Simple Heart

Things have gotten away from tatting for a while and I'm currently taking a breather working on some embroidery, which I'd show you, but due to working in poor lighting, a colour choice I'd made looks like a dog's breakfast and I'm going to rip it out first. How's that for a run on sentence? Anyway, since Valentine's Day is fast approaching I thought I'd share with you a heart design I did ages ago. Someone may have posted it somewhere, but since I'm not sure who or where or if it's still up, I thought I'd post it here. When in doubt, the stitch count is 3. It uses one split ring and if you haven't mastered split rings, just cut after the first row and start again. Enjoy!

Sunday, February 07, 2010

All about nothing

Just in case any one is interested in our on going tale of furnace adventures, on Thursday they came in and the serviceman said that in the 2 stage furnace, the guys that installed it, had used a jumper, so that it was only running on the second stage so he switched it over and tested everything out. When it shut off, we had left it off to ensure that he would get a proper readout, so the house was getting cool and we had donned heavy sweaters. The furnace was running when he left and the house warmed up again to a comfortable living temperature and cycled off.

Some time later we realized that it hadn't come back on. We shut it off to reset it again and the furnace came on again and as soon as things heated up and it cycled off and it stayed off again, so we called to report it not working and were told that the only thing that they could think of was either a defective or damaged circuit board so they'd see if they could find a new one. Each time this has happened the furnace has quit late at night when places of business are closed, so it's been a challenge to get someone out her to look at it and it's been a challenge for them to get replacement parts. Some things you can carry on the truck, but you can't always have everything needed, there just isn't room. We were told that they'd let us know if they could get the part by midnight. At midnight, when we hadn't heard one way or the other we called again, and again, and again, each time getting the answering service who said they would relay the call. We finally got a sleepy response for the tech guy. They couldn't get the part and he'd forgotten to call back, but they'll give us a call the next day as soon as they get the part.

At this point we can reset the furnace and get heat, but after the latest adjustment instead of running normally for several hours or days, it runs one cycle and shuts off so we know if we go to sleep it will shut off within an hour. I have learned though this on going experiment that the internal temperature in the house will drop roughly one degree Fahrenheit per hour so if we change the setting to something like 75 then it will probably be okay as long as it doesn't get really cold outside. For you tender folk in the southern climes, 28F is not that cold for a night time temperature and insulated brick houses don't leak heat the same way that a wood house does.

So we turned on the space heater for the parrot and snuggled down under the electric blanket to wait for morning. As expected the furnace shut off and hubby tried to reset it in the middle of the night, but it wouldn't come on again. He tried again in the morning and it came on, but shut off after one cycle.

By noon the serviceman came with the replacement circuit board which he installed and it's been running perfectly ever since. Hubby thinks that the first guys might have cracked the circuit board trying to force cold stiff wires through the side of it to wire it up.

While testing the new circuit board we set the temperature high enough that the furnace came on, then opened the windows and doors to let the heat out so that the house would cool off enough for the furnace to kick in again which it did without trouble. In the interim the technician pulled the thermostat off the wall to make sure that everything was wired in correctly. The thermostat manual had an instructional card in it with fold lines that could be slipped into a slot on the thermostat so that you had a handy guide to refer to for setting the program on it. When the front of the thermostat is removed it just looks like a piece of card sitting there so the technician pulled it out. Not knowing what it was he threw it away. So now we have to look online for setting instructions.

All boring stuff, I know. I have zero tatting to show you. The last thing I tatted was the snowflake that wants to be a 3D something or other that I did January 31st. I haven't tatted since. I got that lovely shipment of thread and I haven't even opened it other than to take a picture of it. Now for some people that might not mean much, but I usually whip off something during the day. I might miss one day, possibly 2, but this has been 7 days and I haven't even picked up a shuttle except to move it. I don't even feel inspired to tat anything. Maybe I'll go embroider something until this funk has passed.

Thursday, February 04, 2010

The thread has arrived, the heat hasn't

My thread shipment came today. See what I mean? Nothing in yellow/orange colour. What's stupid about this is that I know the colours I gravitate to and I know that I always need a little of those fall colours, but I somehow, it always ends up like this. The furnace guys came yesterday afternoon and replaced the thermostat because they were sure that would fix the problem. See the lovely new thermostat. It looks a lot like the one they removed but it's programmable, which doesn't matter to us since we're here all the time. When you work at home you don't need to program it. Even if we aren't home, the parrot is, so there's no time during the winter when we don't need heat.

After waiting all day for the guys to show up we had to get out after supper and run a few errands. One of the things on the shopping list was laundry soap. rolling around on the floor under the furnace trying to read a flashing light that's about 6 inches off the floor, results in a lot of dirty shirts and jeans. So when we got home the first priority was doing some laundry. The clothes came out of the washer and into the dryer. A quick turn of the knob and nothing.

The dryer started but only kept running if you held the button in. There's nothing worse than having a load of soaking wet clothes and a dryer on the fritz. I'm so glad I married and handy man. Disclaimer: No appliances were injured during the filming of this event.

I left him working on the switch and went to bed. This morning the dryer is working. Of course the furnace isn't. It quit again during the night. We have another call in to have them come back and look at it. Apparently they can't fix it unless it breaks down again, so we need to wait for it to quit, turn it back on immediately and then read the colour and number of flashes. I love hearing "when it quits the next time...." There shouldn't have been a first time!

The troubleshooting guide that comes with the furnaces states that green flashing is normal operation, amber flashing is normal operation red flashing means there is something wrong. Initially it flashed red. One of the several times it has quit it was amber.

They suspected that the problem was either a faulty thermostat, which they have now replaced, or possibly a nick in the covering of one of the wires causing it to short out. When they walked Rob through doing the bypass of the thermostat the first night, he cut off the ends, stripped and re-wired the thermostat connection. They were hoping that if it was a short because the wire got nicked that it would have been corrected by the rewire. No such luck. They've just called to say that they are sending a different furnace guy over. He'll be here in a couple of hours. Stay tuned for more of the on-going furnace adventure.

Further update - Two new furnace guys have just come and gone. Apparently, in this 2 stage furnace, the guys that installed it had a jumper, so that it was only running on the second stage. I think they said that it was what you needed to do with some of the furnaces, but not this one. The unit is a York furnace which is a generally reliable unit. Maybe, and here's what we're hoping, the fact that it was only running on the second stage, caused it to overheat and shut off. If so, everything should stay toasty warm until spring.

Wednesday, February 03, 2010

Where has all the Yellow gone?

Notice anything about this palette of thread colours? There's no orange and very little yellow. Day lilies, which is what I'm thinking my recently failed snowflake most resembles, are yellow and orange and ochre and bronze and all of those shades of yellow and orange that I don't buy. They aren't colours that I like, so when I go to buy thread I grab the red/pink/purple/blue shades and come home to tat flowers. That's when I realize that I need green for leaves. I'm getting better at remembering to buy leaf colours, but that yellow in the middle of the flower I keep forgetting. I bought a ball of yellow thread once several years ago and it's almost gone. What looks like a creamy yellow in the picture is really just an off white ball of thread. The left over yellow I have is not an especially appealing shade of yellow, but it's what was available at the time.

I knew I was getting low on some thread colours, so I've recently put in an order for more thread.

Guess what? I ordered blue and navy, red and pink, purple and mauve, green and.......not a yellow or an orange to be seen.

I tend to buy thread for the project I'm working on at the moment and use it up. So if I'm in a store that sells thread, which isn't that often, and I don't have a particular project in mind, I can't think of what to buy. Recently I was in a sewing machine repair shop and found some Sulky thread that I have heard tatters talk about so I bought some. I'll bet you can't guess what colours I came away with.
Pink and purple with matching variegated shades. It looks like the flower will be on hold for the foreseeable future.

Tuesday, February 02, 2010

It's Alive!

Well it looks like the primrose just needed a little more water because today it's bright and perky again.
The furnace hasn't quit on us today and we've finally had a call from the installation company. They are coming tomorrow to replace the thermostat and check the wiring and after that, we'll see what happens.

No tatting. I'm put off and don't plan on picking up the shuttles again until I feel more inspired.

Monday, February 01, 2010

Utterly random

That's how I feel today. It started with a sock. Why is it that you carefully pair up socks before you start the laundry, but somehow you ALWAYS end up with one odd sock?

The blue primrose is a little flower I treated myself to because they were on sale and when I walked by the stand of them they smelled divine. The sad thing next to it was the red one I bought Friday. A lovely little plant just ready to burst into blossom and chock full of buds to come. That was before we'd had another furnace failure. I'm not blaming its demise on our erratic indoor temperatures, although I doubt that the constant change has helped much. It's not totally dead, but it may not revive enough to bloom.


This is how it looked when I brought it home - I even remembered to take a picture of it.

A lovely little primrose just ready to burst into blossom and chock full of buds to come. That was Friday before we'd had another furnace failure. I'm not blaming it on our erratic indoor temperatures, although I doubt that the constant change has helped much. It might have been in shock coming from the 9F temp outside into the sometimes 73F inside. It might have been dried out from sitting on a rack in the store. I might have over watered it to compensate. So I bought another one just in case. That's my story and I'm sticking to it.

And the tatting.....If I was designing a trumpet shaped 3D flower this would be an awesome design. Since what I'm actually designing is another snowflake, it's an abysmal failure. I'm having far too many of those lately. Out of the projected 30 designs I have 20 done and 12 drawn so I'm not much further ahead even though I have been tatting steadily.

I thought about knitting socks but knitting seems too tedious to me. I know what you're going to say. How can anyone who tats call knitting tedious. It is to me. I suppose it's because I don't enjoy it. I can tat, crochet or embroider for hours, but knitting just doesn't do it for me. Then there's the whole knitting in a circle thing needed for socks that I have never mastered. The other day I saw a reference to a circular knitting machine and thought that's just what I need. A machine to speed up the process so that I could endure the tedium. A quick search of the internet and that idea fizzled quickly $1750.00 delivered. No way baby! That much dough will buy me a lot of tatting thread.

I love tatting, but it's totally impractical. you can't make socks or shirts or blankets out of tatting like you can with knitting or crochet. Tatting is beautiful, elegant, timeless and lovely. But it's definitely not practical.

See what I mean, utterly random. Maybe if I get my brain back in gear, I'll have better success designing. Or maybe not.

Sunday, January 31, 2010

They didn't tell us

We were told when we got this new furnace that we would have considerable savings on our heating costs. They didn't tell us it would be a result of the furnace periodically quitting and allowing the house to drop down to Arctic temperatures. I think there ought to be a list of simple restarting instructions and an alarm that goes off when the heat drops below it's normal setting. Don't you agree? In case you haven't guessed, yes the furnace did quit again last night.


What I really want to blog about is this:
It may not seem like much to you, but when I moved out on my own I bought a lot of things to set up housekeeping for the first time. One of the things I bought was a basic set of flatware with service for 8, just because I liked having friends over for dinner and wanted enough utensils so that no one had to eat with their fingers unless they wanted to. After 25 years of use the knifes started developing pits along the blades, the tips of some of them were bent as a result of being used as screwdrivers, (I'm not mentioning names) and some of the tines of the forks don't line up (again not mentioning names) and many of the spoons have their handles bent in a n S shape (I have no idea what they got used for). So it was time to get a new set.


Now I THOUGHT that this was a simple matter of just selecting a pretty design, but apparently not. Anything with an embossed design was rejected as being conducive to pitting. Satin finishes were likewise summarily dismissed. Patterns with angular or sharp edges were cast off as being too hard to cut with, (I thought food was cut with a knife, but apparently not).


Armed with this list of criteria I ended up with this:


Plain, simple, unadorned, but don't drop it on a plate, these suckers are heavy....and don't fit in my cutlery tray. The other half has bee joking that the knives are as heavy as his hammer. (NO you can't use these as substitute tools!) So now I need a new one of those. But at least I now have a serving set that matches my flatware and I'm no longer worrying about what might be leaching out of the metal with every mouthful we eat. The pattern, if anyone is interested, is Oneida's Lincoln.

Friday, January 29, 2010

Not AGAIN!!!!!

After our little heating episode Thursday morning, which was resolved by turning it off for ten minutes and then re-starting it, it ran all day. About 10: 00 PM I noticed that it was getting a bit chilly. If the weather outside gets cold it can feel cooler in the house so I checked the indoor/outdoor thermometer on the wall. The top is outdoor and that isn't 94, it's 9.4 F which is bloomin' cold. See the lower number? That's our indoor temperature of 71.7 which isn't too bad....
Except that the thermostat is actually set for 74 and it shows an indoor temp of 72. You know what that means? It means that late at night on the coldest night of the year so far, our lovely new furnace has quit again.

OK, so we know what to do. Cut power to the furnace for 10 minutes and then start it again and we have heat once more. Or at least we have heat for an hour when it shuts off again. So we make another call to let the furnace company know that their lovely piece of crap has quit again.

Of course since this is, the coldest night of the year, they are being inundated with emergency calls and people with furnaces that won't come on at all, especially those with small children, elderly or infirm family members take priority, and that's as it should be. Unfortunately, that means that we are at the bottom of the list and no one is going to run right over and fix our problem but the technician does stay online with hubby long enough to walk him through a check of some of the more critical issues.

First thing is to check for flashing lights in the sight window. Lights? Sight window? Do you see a window?

There is a tiny window but all that you can see through it is the pilot flame and while it flickers like a flame, it certainly doesn't flash.

So my honey tells the guy that there's no flashing light at all.

Then he gets down on the floor in the tiny foot wide space in front of the furnace to undo the front of the furnace and look inside. Guess what? See that big yellow sticker? Know what's hidden underneath it? The sight window. Inside, the red light is giving 2 flashes. Know what that means? No? Neither did I until I read the troubleshooting guide. It means there is something faulty in the furnace. NO! Really? I never would have guessed it.

Our helpful techie guy goes through re-wiring the furnace to by-pass the thermostat and the furnace runs non-stop until we turn it off. At 1:00 AM Friday morning his instructions were to leave it running until it gets too hot, then turn it off until it gets too cold.

Gee thanks. Doesn't seem like a good idea to me, does it to you? You can either fall asleep with the furnace running and burn the house down, or fall asleep with it off and wake up to frozen water pipes. OR as another alternative, set your alarm clock to go off every hour all night long turning the furnace on and off, OR, my personal favourite, just stay up all night.

We ran the furnace until the house got too hot and then shut it off. After about half an hour it started getting chilly again and hubby could see that shutting the furnace on and off wasn't going to be an option if we wanted to get any sleep. Fortunately, he had taken pictures of the wiring before any of this happened so he wired it all up properly again and thankfully it ran all night.

This morning the technician called to see how things were going and when he found out that hubby had already re-wired it, he said they'd look at it when they had a little more time. (translation, never, unless we call to complain again).

Since I thought I might be sitting up all night turning the furnace on and off, I took the opportunity to test out some of the ebay thread. Several people suggested that the thread may not be usable due to it's age and the possibility that it had been improperly stored, so since the thread at the top of the pile was green, I thought I'd tat a shamrock or two. The extra kink in the thread caused by the little dip in the dimpled ring is sure to cause it to break if the thread is weak. It looks like it's OK, or at least this batch is. I expect that it will all be usable. I don't have to retro tat that much and when I switch from size 20 to size 80 or sewing thread, I normally relax my tension a lot.

This ball, like most of it in this batch is vintage Coats and Clark size 70.