Friday, October 26, 2007

Adding a link, Adding a Links List

Here are some pictures to show you how to add links in Blogger.

First of all, click on the Basic heading to access your basic settings.
Scroll down until you get to Global Settings and make sure the compose mode is set for Yes so that you get the wysiwyg editor. Hey, I'm not a computer geek, so I want things real simple.
When you create a new post there will be a bunch of little icons along the top. The one that is circled in the picture above is the icon to click on to set a hyperlink. If you want a particular word or phrase to be click able, first highlight the word or phrase. Then click on the hyperlink icon.
That brings up the hyperlink window set to Type http:, and you can click on the little arrow to change it to an email link.
Enter the URL you want to link to. URLs always start http:// so make sure you copy the full link information from the address bar of your browser, or if it's one of your Favourites copy the address from the properties of the link. You are less likely to make mistakes if you copy and paste the URL than if you type it out. Paste the URL in the space provided. The example above shows the link for Jane Eborall's blog. Then click on the OK button and the text (remember the text you highlighted?) will now have a line under it showing that it's a link.

Note: If you are using the link from your Favourites, find the favourite and right click on it. That will open a menu with a lot of stuff in it. Go down to the entry that says Properties and click on it. That will open the Properties dialog and the URL is in the middle of it. Highlight the URL, right click and select COPY from the pop up menu.

If you want the link to really stand out you can also colour the text. Just highlight the text again and then click on the little colour box icon. It's the one to the left of the hyperlink icon. It will open up a menu with a lot of coloured squares. Click on the colour you want and now you hyperlink is a different colour from all of your other text.

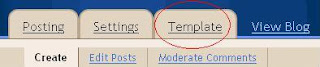
To add links in the side bar begin by clicking on Template.

Which will display this screen

Select Add a Page Element which will bring up a menu page of items you can add to your blog. Select Links List by clicking on the button ADD TO BLOG.

This will give you another option in your Template called Links. Click on Edit.

Which will display a screen like this one where you can add, edit and delete links to be shown in your sidebar. Click on Add Link.

Enter in the URL that you want to add and a name that you want to show up in your side bar. In the example above it's Jane Eborall's blog and the name that is to be displayed is Jane.

Once the link is added it shows up on screen with the name you have given the link the words Edit, Delete and an arrow pointing down. Click on Edit if you want to change or modify the link. Click on Delete to remove the link and click on the down arrow to move it down in the links list, or on the up arrow to move it up in the links list. To add another link click on Add Link again and follow the same process.

When you are satisfied that you have everything set up the way you want it, Click on Save Changes. Now when you look at your blog there will be a links list.

Once you have added the LINKS element to your blog you can go in at any time and add to it just by clicking on Edit and entering the new URLs you want to add.

It's as simple as that.

Tuesday, October 23, 2007

I've been tagged

I've been tagged, by several people including Marilee, Jane and Gail


Here are the rules which you must abide by if you are tagged.

1. Link to your tagger and post these rules.
2. Share 7 facts about yourself: some random, some weird.
3. Tag 3 people at the end of your post and list their names (linking to them).
4. Let them know they’ve been tagged by leaving a comment at their blogs.


Seven random or weird things, hmmm, let me think. There's nothing weird about me, so it'll have to be random.

1. I've been a Christian for 40 years which is almost the same amount of time I'm know my wonderful hubby.

2. I love cheese, I think I'd rather have a big chunk of cheese than a chocolate bar.

3. I'm a tea drinker, skip the booze, just give me a good cup of nice hot tea.

4. My eyes are a beautiful shade of green, but only when I'm really upset and crying, so the beautiful green is off set by a blotchy red face. I'll never make it in the beauty category.

5. I get motion sickness on carnival rides so I avoid them.

6. I tat everywhere, in the bathroom, walking down the street, waiting at the check out, on the bus, train, in the car, in my sleep and I don't think it's even a little bit weird.

7. I love cooking and baking and trying out new recipes and I've often printed off a new recipe from the internet and cooked it for dinner when we're having guests, even if I don't have all the ingredients at hand. (You have to be adventurous about some things.)

So many folks have been tagged now it's hard not to tag someone already tagged, so I tag
Sue because she's gone too long without posting.
Mary who spent so much time hosting the exchanges that she didn't get to enjoy the fun of blogging about what she was doing.
LaRae because like Sue, she hasn't posted for a while.

Wednesday, October 17, 2007

The embroideredy that didn't work

I have been trying to finish off some things lately that have been hanging around for a while. Some time ago I posted a picture of a partially embroidered butterfly. There was a discussion on the Yahoo group, hand-embroidery, about creating a transfer from a printed page and out of curiosity I had to give it a try. It turns out that any clip art, or scanned colouring book image can be turned into an instant transfer when you use a laser printer. Laser printers make use of powdered ink mixed with wax. When you apply the heat of an iron to the printed page you get a decent transfer image.

At the time the ladies in the hand-embroidery group were working on each one doing their rendition of an embroidered butterfly, so I used the butterfly image as a trial transfer. It worked so well I instantly thought of doing a quilt with a whole series of embroidered blocks. I jumped into the process with great enthusiasm, and selected a skein of turquoise embroidery floss that I had been saving to do the butterfly.

Turquoise is an odd colour. It's just that mix of blue and yellow that it makes it difficult to pair up with other colours and still look good. I did the outer border and then started working on the inner part of the wings. The first colour I tried I didn't like, so after several hours of work I ripped it out. The next colour I liked but not the kind of stitch I had chosen to use, so again I ripped it out. The third time I tried it using a third combination of stitching and colours, and finally found something that looked OK. By this time I had done hour and hours of stitching and my hands really started to hurt. So by the time I got the butterfly done, I was in too much pain to continue. Today I picked it up and finished it off.
For some reason the camera just doesn't want to take a decent picture of it. I guess it's been doomed from the start, but I had to get it finished just so that I can put the embroidery tools away. I love the turquoise colour, but the thread is dull and lack lustre. It wasn't easy to work with, but after everything else I was determined to work with it. When I came to doing the flowers I ran into the same problem of matching up contrasting colours that didn't just clash with the vivid turquoise. The thread is manufactured in China and doesn't have the same sheen and twist as DMC or Coats Anchor and it snagged and snarled all the time I was working with it.

The stitching doesn't show up very well in the picture, but the dark pink flowers have pale pink straight stitches inside the daisy stitches and there is a similar light green straight stitch inside each of the leaves. I had planned on doing the flowers in satin stitch, but when it got down to, I just want this thing finished, I opted for something less time consuming.


When it was all done I, popped it out of the hoop and hand washed it in Ivory soap to get rid of the printer ink and the soiling from working on it, and slapped it down on the ironing board to press it dry. Out of habit from working with lace I sandwiched it between sheets of paper towel and applied the iron. Good thing I did. The lovely vivid turquoise thread bled like mad into the paper towel. I have a perfect imprint of the turquoise section.

The butterfly is done, and now that I know that I could create all kinds of unique transfers just by scanning, cutting, pasting and printing, I'd love to embark on making a whole quilt of embroidered pieces. Unfortunately, I also discovered that my hands won't take the hours of stitching the would be required. So I guess I'm not going to get a one of a kind embroidered quilt, but I am going to be able to sleep at night without major pain medication. Just as well really. I don't have enough hours in the day to tat and embroider. I picked up a pair of pillowcases I may do as a gift, but I don't think I'll be doing much more than that. Now I need to think of something to do with an embroidered 8 inch square that has been embroidered in thread which might bleed when it's washed again.


I think I may take all of the suitable transfer images that I found on the internet and put them into a PDF file. At least then if I do decide I want to do another chunk of embroidery, they'll all be in the same place. I can always put the file into the PDFPick software and use the embroidered butterfly as the front cover to remind me of what's in it.

Monday, September 24, 2007

Tatted Dress

Laura recently posted a picture of a tatted dress, hat and purse that had been acquired by the Mobile Alabama Tatter's Guild and it reminded me of another tatted dress. Some years ago a few of the Toronto area tatters joined together in an email list for a brief time. One of the participant's mentioned that her mother had tatted a dress many years ago. Since my computer has had the files migrated through several different drives a lot of the older data has been deleted, so I am working from memory.

The woman who tatted the dress was Sheila Dusome and at the time I heard about it she lived in Barrie, Ontario. As I recall, her daughter said that the dress was tatted one winter without the aid of any kind of a pattern. Sheila worked on it in the evenings and did the shaping entirely by varying the size of the rings used. The dress wasn't made for any particular purpose, Sheila just wanted to tat a dress to wear. Years later the dress was also worn by her daughter who is the model in this picture and I think the daughter's name is Sharon. The dress was taken to the Maple Leaf Tatter's workshop and anyone who attended that year might have more information on it.
I have lost all of the contact information I had for Sharon or I'd just write and ask her for the details. Her mother didn't have a computer, so all of the contact we had with Sheila was through her daughter.
Sharon sent me this picture of her wearing the dress. I don't think it was floor length, it was probably mid calf, but still and enormous amount of work. If anyone attended the workshop or was a member of the Toronto Tatters email list and has more information, please feel free to share the details.

Tuesday, September 18, 2007

Five years of creating newsletters

I have been doing the Tatted Lace Pattern Collection for that last 5 years. I've designed snowflakes, doilies, necklaces earrings, edgings, motives and a lot of 3D stuff like flowers, snowflakes, and Christmas angels. Here's a review of the designs from the past year:


There were 2 doilies, a snowflake, 2 pairs of earrings, a heart frame, 2 bookmarks, 3 3D flower designs, a motif turned into a V-neck collar, a chatelaine, an amulet bag, 2 edgings, a necklace, and a snowman family.

I can see my tatting progress each year because it's all recorded in the newsletter. I know how much I tatted, what kinds of things I've made and relatively how long they took. I know that none of them took more than 3 months because every 3 months there's another newsletter. I don't look back over the year and think, "What did I make this year?", I know what I made because it's all recorded in the newsletter. At least, most of it is. I tat more than what is represented here but this is a big chunk of it.

One of the benefits of the 25 Motif Challenge is that it give people an opportunity to keep a record of their own progress. A lot of people when they started out, didn't think that they could tat 25 motives in a year. Maybe for beginners it is a bit of a stretch, but piece by piece your skill and your speed improve and suddenly you realize that you are doing it, you are accomplishing that impossible goal of 25 Motives.

Over the last 5 years I have designed and executed an average of 19 patterns per Volume. It started out as a black and white publication that was mailed out 4 times a year. Now it is a colour publication emailed out 4 times a year. The subscription price when I started was $20 Canadian and 5 years later it's still $20 Canadian.

If you are interested in ordering the newsletter, or if you are interested in past volumes, click here for the order form. If you want past volumes, please specify. The pictures for the projects in each volume can be seen here.

Volume 1 Edition 1, Edition 2, Edition 3, Edition 4

Volume 2 Edition 1, Edition 2, Edition 3, Edition 4

Volume 3 Edition 1, Edition 2, Edition 3, Edition 4

Volume 4 Edition 1, Edition 2, Edition 3, Edition 4

Saturday, September 15, 2007

A new look

A couple of years ago I tatted a lace collar for my sister for her birthday. I used a basic ring and chain base, several rows of mignonette, and a very frilly floral edging I had designed, to create this ruffled piece of loveliness.
I had envisioned the floral edging being flat, but a gross mis-calculation resulted in a bzillion more repeats than necessary. However, by the time I had completed about one third of the final row I knew that the only way to fix it was to cut off the last 2 rows and redo the penultimate row with single large outward facing rings to space out the floral repeats in the final row. This realization occurred at the same point at which I knew there were not enough hours in the day to cut off the rows and experiment with an alternate variation and still have it completed in time for her birthday. I tatted on with this gloriously full ruffle and completed it as shown.

Some time later my sister admitted that while she liked the ruffles, the collar was too large for any of the clothes she owned and that she much prefers her dresses and blouses with the neckline - at the neck. Consequently she wondered if the collar could have a piece cut out of it and made smaller so that the neck opening was smaller.

I did mention that there are several rows of mignonette, didn't I? It's really hard to hide short ends in the bare threads of mignonette. I was really loathe to try retro tatting 4 or 5 tiny mignonette rings to give me enough thread to hide ends and I suggested that a better alternative was to add more rows at the neck to decrease the circumference of the opening. It sounded like a good plan at the time and the collar was returned for re-working.

The first problem occurred when I pulled out a ball of thread to start working on it. The thread I had was a different dye lot. I know it's white, but there are shades of white and this collar used a bright white and the ball of remaining thread in my stash was creamy white. The little bit of the bright white thread I had was insufficient to finish the collar so I put the collar aside while I considered what to do.

The second problem was to design some inner rows that would bring the neckline up the required distance. I sat down with the drawing program and sketched out the existing pattern and several variations of inner rows to see what I could come up with....................

The third problem was that everything I tried looked awful. A single row of ring and chain large enough to fill the gap was too big and heavy for all the delicate rows of mignonette. It made the lace look clunky instead of light and airy. Two rows of ring and chain either filled in too much of the neckline or not enough. Rows of chains didn't match the design and more elaborate edgings detracted from the elegant and lacy floral edging.

I put it away to think about how to resolve my problems of no thread and no pattern, which, when you think of it, are pretty basic problems. That was in Feb 2006 when I drew out the pattern of the existing collar to put it in the newsletter.


The other day I was rummaging around in one of my storage chests and I found a bag with some tatting bits and a ball of thread. Not just any thread, the thread, the thread that is the exact size and dye lot for the collar. I had put it away for safe keeping, so safe that I couldn't find it. Since none of my drawings had worked I figured I might as well just attach the thread and "wing it".

It worked. The collar now has a smaller inner circumference. There are 2 more rows of mignonette about half the depth of the lower rows and one top row of mignonette/small ring. It's still light and airy, the rows gradually and naturally decrease so that it lays flat and it looks like it was designed that way. I'm quite happy with the results.

All that's left to do is finish up the sides and modify the closure slightly. I still haven't decided whether I should stay with the single closure at the top or use 2. The original, and another at the new top. Either way, the collar is done now, and I can block it and send it back to my sister.

Tuesday, September 11, 2007

Buttertart Squares

One of the recipes that keeps them coming back for seconds. Buttertart Squares. Ooey, Gooey, Yummy. I've tried a lot of recipes and then I took the best parts of all of them to make this one.

Buttertart Squares

Base
1 cup butter or margarine
1/2 cup icing sugar
2 cups flour
Cream butter and sugar together then add flour and press int well greased oblong pan.(Mine is a 13 1/2 x 8 3/4 glass Pyrex dish.)
Bake 10 min at 350

Topping
4 eggs
2 cups brown sugar
1/2 cup all purpose flour
1 1/2 tsp baking powder
3 cups raisins
1 cup chopped walnuts
Beat eggs and sugar until frothy.
Add the rest of the ingredients and pour over base. Bake at 350 for 25-30 min or until done.
Cool and cut into squares.

Thursday, September 06, 2007

Catch up

I feel like I sort of dropped off the face of the earth blog wise. This last month or so has been kind of crazy. Hubby over worked himself and was consequently in pain so I got him a hot water bottle. Heating pads are nice but there aren't always electrical outlets in reach. While filling the bottle it "burped" spilling boiling water over the back of my hand. I had blisters right where the tatting thread lays across the back of my hand.

My sweety was diagnosed with Meniere's and some days he gets to feeling pretty dizzy. On a scheduled trip to the hospital we took a cab and the cab driver closed the door (not just pinched, the door actually latched) with my hand still in it. My left hand was swollen for a while so not much tatting or typing got done.

Then I got news that my brother was in the hospital and we kind of hung around the phone/computer waiting for updates. So again, not much got done. Then we got the news that he had passed away. The first funeral was in Connecticut where he and his wife have lived for that past 11 years. Some of the family made it down to the States. His wife and kids and 3 of my siblings were there. My BIL officiated and had some of the service taped.

The following week there was a service up here in Canada and we saw the taped portion of the service from the week before. It was interesting that his boss from IBM was at the funeral and he spoke of Bob in quite glowing terms and mentioned that the team he was working with set up programs for IBM globally and each person knew their own section well, but Bob was the only one who understood how all of it worked together. He seemed at a loss as to how he was going to replace Bob. I can understand it. Bob was brilliant, capable and well able to organize other people and encourage them to tackle and surmount any obstacles.

There was some talk at the funeral on Thursday of cancelling the family reunion, but we decided to go ahead with it and the whole tribe except for Bob's family attended. Sue probably wasn't in the mood for a festive occasion, but had she attended, the mood would have been more subdued, but we would have just closed in around her and comforted her. I think 2 funerals after a month of camping out in a hospital was just too much for her and I expect she just crashed with the kids.

Knowing that I'd have a long car ride going up to the camp where the reunion was held, I decided it was a great opportunity to sew some tatting onto my bag. I mentioned in an earlier post that my jeans are black and the 2 craft bags I use are also black so I figured that I would eventually add tatting to all of them. The other day I was cleaning up and had to move some tatting aside, so I slid it onto one of my bags and decided that it looked pretty good. I used the ride to sew it all down. I had intended to attach this to a pillow, but in 2 years I haven't attached it yet, so a bag is as good a place as any to display it.
Attaching tatting to a bag already filled with lumpy stuff makes it difficult to do anything neatly or accurately. I noticed after I had it all sewn down that there was a big blank spot in the middle so I filled it in with a butterfly that happened to be stuffed in one of the bag's zippered compartments.
It doesn't show very well in the picture, but the flowers are 3D. I tacked them down around the edges but left them so that they still stand out. One bag done, 2 more to go.

Tuesday, September 04, 2007

Presenting...

The Snowman Family

Tatting for the Christmas season.

Tuesday, August 28, 2007

Sadness


Bob Rout - My Brother

Jan 1, 1946 - Aug 28, 2007

Monday, August 27, 2007

Teaser


Thankfully the car door didn't do any damage to my hand. Rob's first word after finding out that my hand still moved was to ask if I'd be able to tat. It's good to see we have our priorities straight :-) So I am still tatting. Here's another wee peek at a bit of something going into the newsletter.


I know the picture is blurry, it's from the web cam and I'm too busy to go get the digital camera, but you won't guess what it is anyway.

Friday, August 24, 2007

More Threads

I had a "fun" time yesterday. Hubby was diagnosed with Menieres and made a scheduled visit to the hospital for a check up. He way too dizzy to drive, (I don't drive) so we took a taxi. While waiting for the interminable tests to be done I had an opportunity to talk to a lady whose friend did lace of some sort, but she didn't know what kind. Then an older gentleman who had been watching us throughout our discussion walked over and introduced himself saying his wife was a tatter. It turns out his wife is Joyce Harper and I was in a round robin with her several years ago. We had a nice little chat before hubby and I had to change rooms for yet another test. I took my big craft bag full of a change of clothes for hubby and I and all my tatting supplies, but got very little tatting time in.

After we were done we called a cab to go home. When the cab came it was a van and hubby opened the door for me to get in. My bag got stuck of the armrest and I put my hand on the outside of the van to keep my balance while I twisted around to untangle an pull my bag in. Meanwhile the driver, finally figuring that he ought to do something other than sitting like a bump on a log decided to get out of the van. He opened the door which pushed my hand off the door and as I used my left hand to brace myself to pull all the stuff over my left shoulder my fingers went around the frame between the front and back door and the driver slammed the door shut. All four fingers inside. OUCH! After we got home I made a quick trip to the doctor's for x-rays. Nothing broken, just swollen and the important thing is, I can still tat.

You would think from the amount of blogging that I get done that I don't do anything. I'm actually online and blogging quite a bit, just not here. Most of my time is spent in the 25 Motif Challenge blog keeping it up to date. In between I try to keep on top of designing new things for the Tatted Lace Pattern Collection which I publish. I'm behind with getting it out, but in my defense I did manage to get the challenge kicked off for another year. At least I think I have, I'm still trying to get a couple of things going. Before I made any changes I wanted to write to the affected participants so they knew what was happening. It was an extra step and more work, but one I thought was necessary.

I'm still working on the goodies for the newsletter and part of the delay is that I wanted to add a few more flowers made with different threads to the bunch already pictured. I can't get the newsletter done until I can take these off my blocking board. So here is the same picture with a few more added at the bottom.

Manuela is a nice crisp 6 cord thread that's nice to work with that's a little less shiny that the Olympus, but shinier that the Flora. That means that in my opinion, the Olympus slides easier and the Flora less easy and the Manuela is right in the middle. They are all nice threads to work with, but if you are making a doily or any larger project, Manuela comes in a 50 gram ball, Flora in a 25 gram ball and Olympus in a 10 gram ball. That means that for an average size doily, (12 inches across) you could use 1 ball of Manuela, 2 balls of Flora or 5 balls of Olympus. I'm just throwing this information out there so that a beginner has some useful information on purchasing threads.

DMC Cebelia size 30 is a 3 strand thread slick, shiny and soft. Its a nice thread to work with that slides easily Cebelia and Coats Opera are comparable threads. they are both 3 strand soft threads that are nice to work with. The don't take well to a lot of retro tatting.
Coats Royale size 20 is another 3 strand soft thread much like Cebelia and Opera. It works up to the same size as the Flora size 20. and comes in large balls but only in white (and ecru?).
The last thread on the board is a Coats Button Craft thread Dual Duty Plus. It's a glace thread with lots of body and although there isn't a size on the spool it works up about the same size as the DMC Cebelia 30 or the Altin Basak 50.
And now that I've shown you all these threads I can pull the flowers off my blocking board and use them!

Thursday, August 02, 2007

Thread Comparison

As a tatter we use a lot of different threads. A single strand of thread can be easily pulled apart. Two strands are a little bit harder to break, but when you start twisting strands together they become much stronger. If you take embroidery thread you can see that it's made up of 6 strands of thread, but if you look closer, each of those strands is made up of 2 loosely twisted strands. If you look at perle cotton the strands of thread are much thicker, but there are only 2 strands not six and the strands are more tightly twisted.

A 3 strand thread can have finer individual strands than a perle cotton, but the strands are twisted much more tightly together.

You may have heard of people talking about 'S' twist and 'Z' twist. The letter S starts on the top right and moves to the left. The letter Z starts at the top left and moves to the right. In the same way strands of thread can be twisted together by twisting them from the right to the left or from the left to the right. Flora and Olympus are 6 cord threads which have strands of thread twisted in both directions. First pairs of strands are twisted together in one direction, then 3 pairs are tightly twisted together in the opposite direction. A 6 cord thread is strong and durable. It will take tatting and retro tatting without becoming worn or fuzzy.

Most tatting threads are cotton. You can use other fibres, but the majority of the time you use cotton. Cotton is soft, fluffy and fuzzy and when it's spun together it's still fuzzy. Threads with lots of fuzzy bits in it doesn't tat very well. John Mercer a 19th century chemist devised a method of chemically treating cotton fibres to remove the fuzzy bits and it also gives the thread a nice shine. The process is called Mercerization and even today we see the word mercerized on most of the threads we use for tatting. Fuzzy bits don't slide very well so most of the threads that are really good for tatting are mercerized. Polishing the thread gives it extra lustre and makes the knots slide easily.

Sometimes I want a really fine thread to create something delicate like an edging to float on the edge of a wedding hanky. Other times I want a nice thick thread to make a quick project. Whatever I'm making, I sometimes find that while I have the right colours in my stash, they're not all from the same manufacturer or they're not all marked with the same size.

Take a look at the picture on the left. All of these flowers were tatted using the same pattern and there are 7 different brands of thread that all look remarkably close in size. There is a measuring tape down both sides one in metric and the other in inches so you can judge for yourself.

The first thread is Flora size 20 and it's a 6 cord thread that's nice and crisp the stitches slide easily and the thread doesn't fall apart if you have to undo and redo sections of your tatting. It isn't as well polished as some 6 cord threads so it has more of a matte finish. This is marginally the largest of the samples.

The second thread is Opera size 20. It's a 3 strand thread that's more polished than the Flora so it's shinier and it's softer to the touch. It will take some gentle retro tatting without too much effect, but if you have to re-work the same piece several times the thread gets fuzzy and starts to fray.

The third thread is Oren Bayan size 50 which is a 3 strand thread and shiny like the Opera thread but it seems to be a little more tightly twisted and a little crisper and stronger so that it has less of a tendency to fray.

The fourth thread is Altin Basak size 50 another 3 strand thread. It may not be apparent from the picture, but this sample is the smallest of the 7 flowers. The thread is tightly twisted and well polished, but not as shiny as the Opera or the Oren Bayan. Again, as it seems with all of the 3 strand threads, they don't handle re-tatting very well.

The fifth sample is Olympus size 40. In my opinion it is the best thread of any of these shown to work with. It's a crisp 6 cord thread with a nice polish. If you tat tightly with a 6 cord thread, the project will hold it's shape without much need for blocking. The thread has a nice sheen to it and it will take multiple attempts at tatting and un-tatting without any apparent affect on the thread.

The sixth thread is DMC Perle (or Pearl) 8 which is a 2 strand thread. The thread is soft and lustrous, and the stitches slide easily but the thread won't take well to multiple attempts to tat and un-tat. It can separate and fray easily if you grab only one of the strands doing a join, but if you work carefully the sheen makes for a lovely finished product.

The seventh sample is 3 strands of embroidery floss. This is a no-name thread and didn't make a very satisfactory flower. DMC or Anchor embroidery floss have a nice sheen that makes the stitches slide easily. However, this sample makes the point; 3 strands of embroidery floss makes a finished project roughly the same size as all these others.

I haven't done Cebelia or Manuela size 20, but I will and you will see that they too are almost the same size. So there you have it. 7 different threads with sizes marked on them from 8 to 50 and yet the finished size of the tatting is almost the same. So the next time you need a colour and you don't have it in the selected brand, you'll know what you can substitute, and if a pattern calls for a brand you don't have, instead of giving up until you can get to the store, select and alternate brand, and get to tatting.

Monday, July 30, 2007

Happy Anniversary

While there are a lot of things I could blog about, like the week from h--- where installing a garage door opener required repairing the ShopVac and rebuilding the storage loft and the 1 month old computer with all of hubby's programming, our business records and personal banking records suddenly quitting. Or the fact that I have tatted the same 3D flower in 7 different types of threads to show the thread comparison. BUT all I'm going to post is this:

The headpiece I made for our wedding. Happy Anniversary honey, I love you more and more every year. Thanks for being mine.

Saturday, July 14, 2007

Needle Tatting or Shuttle Tatting

One of the most frequently asked questions is, 'What is the difference between needle tatting and shuttle tatting.' I suppose the best answer is 'Everything and nothing' .

When the needle tatted piece is tatted very tightly on a fine needle, the end results look the same as a shuttle tatted piece which is worked in a somewhat loose manner, so that there is no apparent difference. The process of how the pieces are made is totally different and therefore the finished pieces may look the same, but they aren't usually.

With needle tatting the stitches are formed on a needle, similar to the way you 'cast on' stitches in knitting, doing knit one, purl one and then the threaded needle is pulled through the stitches. The finished lace however is only as fine as the needle you are using to make it. The typical method for doing this creates a "mock" ring. You can make a true ring, but most instructions you will see create a mock ring.

Mock rings are just chains formed in a loop and joined at the base. They are not as stable as true rings so they can lose shape after they've been washed a few times. If the work gets cut or torn the whole thing can unravel, so to stabilize it (make it keep it's shape) and prevent it from unravelling you have to tie a knot after every ring.

Needle tatting can be done making true rings which produces a sturdier lace that won't unravel if it gets cut. Remember that the thread has to be drawn through the stitches that are formed on the needle, so one of the drawbacks is that the thread can become worn from the friction of pulling it through the stitches and there is just so much thread that you can manage on a needle. Shorter lengths of thread are easier to handle, but result in more ends to hide.

Needle tatting is easier to learn, but the finished product is typically looser, floppier and more padded looking than the same piece shuttle tatted. The needle you work with has to have a big enough hole in it to put the thread through, but a big hole also means a fatter needle. Since the stitches are formed on the needle a fat needle makes fat stitches. Fat stitches aren't as tight or crisp looking as stitches formed directly on the thread.

Some designs can only be done with a needle because the design requires being able to get the thread into places where a shuttle won't fit. Stringing beads on a needle is certainly faster, so for making jewellery, people often choose to use a needle.

In shuttle tatting the stitches are formed directly on the thread so the work is as fine as the thread you are using and the finished piece generally looks crisper than a piece done with a needle. As mentioned a project which has been shuttle tatted loosely and one which has been needle tatted very tightly, will look the same. Rings are true rings that don't need anything to hold them in place. If shuttle tatting gets cut or torn it will only unravel back to the last whole ring. The thread you use is held on the shuttle and wrapped around the left hand then the shuttle is manoeuvred around the thread on your hand to form the stitch and by switching the tension between the right hand holding the shuttle and the left hand, the stitch is flipped or transferred to the thread on the left hand.

Co-ordinating both hands simultaneously to get the stitch to flip takes a bit of practice. So shuttle tatting is harder to learn, but the results are worth the effort. Using the same thread the needle tatted article will generally look puffier and more padded. Both finished items will look quite similar and the untrained eye would not see any difference.

Which method you use depends on your preference. People who do both use the method most appropriate for the project. You couldn't shuttle tat with yarn very well, but you could needle tat with it. Then again, with the size of holes you'd have in the rings a project made with yarn wouldn't be very warm ;-) People with arthritis who have a hard time flexing their fingers, find needle tatting easier on their joints. The same is true for any kind of hand/wrist/arm injuries. There is a place for both types and it's mostly just a matter of preference.

Tuesday, July 10, 2007

Embroidered Butterfly


I've taken a bit of a break from tatting to do some embroidery and I'm not at all happy with the way this is going and I think what is giving me the most trouble is that I don't have a specific purpose for the finished piece, so I have no goal to work towards. I like butterflies and so I used the butterfly design from the Yahoo group
hand-embroidery challenge. This is a poor scan of it still in the hoop and the bright turquoise blue is really much brighter.

I began by selecting colours and I was all over the map. I have no goal. I finally decided that I was definitely going to use the turquoise blue. I love the colour. I came in a no name batch of embroidery thread and years ago I bought the whole batch for that one colour. I haven't used it yet because A- it needed to be something special and B- it doesn't blend with any of the other colours I have in the Anchor and DMC floss.

Once I decided to use the blue I had to match other colours to it. I selected a darker teal blue and a very pale silvery blue that is almost white. I can work with a monochromatic palette, but I thought I'd add in another colour for some interest. My chest of embroidery floss has several hundred blended colours of thread from years of doing petit point pictures, but the only colour that appealed to me when laid alongside the eye popping turquoise, was an equally vivid yellow.
I thought that I would do the butterfly going from dark blue nearest the body and the brighter blue on the outside. I wanted a stitch that would cover the area quickly and I worked a couple of rows of fly stitch starting from the tip of the wing and working toward the body. Then I did the outline of the outer edge of the wing in chain stitch in the bright blue. U-G-L-Y I liked the fly stitch effect but the colour was too dark. I ripped it out and tried again using the yellow for the central stitch to see if it brightened things up. U-G-L-I-E-R. I ripped it out again the dark blue just wasn't going to work. I outlined the second wing in bright blue as I thought about what to do with it.
The yellow and blue seem happy side by side so I tried again using just the yellow. Better, but I didn't like the stitch so I ripped again. By this time the fabric was beginning to show signs of wear so I started in on the second wing and started just filling the area with rows of straight stitches. It covered the area, but it had no real eye appeal. I outlined the area in split stitch as I considered what to do. Yellow is not my favourite colour, so to partly cover it up I began couching down the straight stitches with the pale blue. I'm not sure if I like the effect or not.
I began a second row of chain stitch in the bright blue and I've done this kind of thing before where I follow the outline in ever decreasing rounds until I end up in the middle and the lines of the stitching draw your eyes to no where. I stopped before I had gone to far to turn back because I have the feeling I'm not going to like how this shapes up.
I have an idea to turn these oval shapes on the outer edge into the "eye" that you see on some moth wings. They were outlined in black to stand out. With the pale blue I used a spider web filling stitch which gave me a raised round shape in the middle and I extended the weaving to fill in the oval shape. I am thinking I might use the dark blue on top of it as an iris with a yellow french knot in the centre. But I don't like how it looks and I'm thinking maybe I should rip now before I waste more time on it.

Then there's the body. I did it in black and added some pale blue highlights and I'm not sure if I love it or hate it. I used 3 strand of thread but I'm thinking that one strand would let me get in between the rows of split stitch easy so that the pale blue just peeks out in between the black.
When I started I chose an 8 inch square of fabric and then I started thinking I could do a bunch of squares, maybe all the same butterfly but done with different colours or maybe several different designs done with harmonious colours that could be pieced together as a quilt. (It's that goal thing again.) After re-doing the same part of the same wing a zillion times my thumb started hurting in a major way. There's not much to show for all of the stitching I've done, mostly because I've ripped it all out.

I tat excessively and the repetitive motion causes pain at the base of the thumb. I have discovered, that holding a needle to embroider aggravates that already tender digit. Now I find that the pressure of resting the base of the thumb on the desk to use the mouse hurts too. So it looks like embroidering enough squares to make a quilt is going to be out of the question.
I need to tat. I have an obligation to the subscribers who have purchased the Tatted Lace Pattern Collection Newsletter to create the designs for them. I can't afford to let any other activity, not matter how enjoyable, impair my ability to do that. It's frustrating me, because by nature I like to jump into an actively with both feet. I rarely have unfinished projects, they are either in the process of being done, or they are completely abandoned. I am being pulled to either, just get this done now or just give up on it entirely.

Friday, June 22, 2007

Chatelaine


Someone asked me if I had a pattern for a chatelaine and I didn't at the time. Traditionally a chatelaine would hold the keys to all of the valuables in the house and it would be worn either around the neck or on a belt at the waist.

I don't like the idea of something hanging around my neck, so I wanted a design that could be hung from a belt or a belt loop. I was also thinking that if you are sitting and tatting (not many of us stand to tat) that something at the waist would be closer to your work anyway.

I figured that if I was making a tatted chatelaine, it would probably be for a tatter to use. I suppose different fibre arts would use different tools, but I only included those things that I use all the time. I have a pair of scissors, a fine crochet hook and several needles for hiding ends. My scissors are the folding variety and quite heavy, so I wanted the tatting to be strong enough to hold the weight and not break.

I needed a base medallion to attach the various "ends" to so I came up with the idea of tatting onto a plastic curtain ring and attaching a spring clip like the kind on a dog leash, to the plastic ring. That way most of the weight is on the plastic ring, not the lace. The spring clip attaches easily to a belt loop or can be slid over a belt. I also wanted the design to be flexible enough that it would be easy to add more ends for more tools, like picot gauges or magnifying glasses, or whatever else people might need. The simplest way to attach these tools was a jump ring and lobster claw clasp. The lobster claw allows you to remove the tools when necessary.

One of the tools I use the most and always have to go look for, is a needle to hide my ends. I use several different needles, depending on the size of thread I am working with at the time. If I'm using size 80 thread I want a very fine needle that will let me hide the ends without pulling the tatting out of shape. Very fine needles don't have an eye big enough for threading size 10 thread into, so I need a larger needle for that. I want to be able to carry the needles around with me and not get stuck with them. My solution was to use a piece of felt the same colour as the tatting. The end with the felt sewn onto it folds up and secures with an invisible dome fastener. The needles are slid into the felt and the felt is folded over and snapped closed. Even tatting needles could be secured this way.

I did a sketch using beads and the sketch kind of reminded me of a flower with a light colour in the centre a darker colour outside and then green on the chains. Unfortunately I didn't have enough beads of the right colours to do the whole thing, so I made the one pictured without beads. I did the sample at right with beads to see what it would look like. I like the idea of beads on it and I may do another at some time with beads.
I don't didn't use a chatelaine until I was making the little beaded black amulet bag shown in a previous post. Every few stitches I needed to use a fine hook to make a bead join. I had a very fine size 16 hook and I lost it. Since I had just made the chatelaine it seemed like a very good idea to attach it to something big enough that it wouldn't get lost again. I asked Rob to cut it off at the flat bit and drill a hole in the end. Now it's on my new chatelaine and I'm not likely to lose it again. (just in case I bought 2 anyway LOL) When I started the amulet bag I used the chatelaine continually as I alternated using needles to thread on beads and the hook to make bead joins. Now it has become a standard part of my tatting stuff. I know that if I grab my shuttles thread and the chatelaine I'll have everything I need to work on any of my projects.
The pattern for this design is in the latest Tatted Lace Pattern Collection newsletter.

Tuesday, June 19, 2007

Decorating Dilemma

I have my jeans selected for the Tatting Treasures from Trash challenge. I was thinking I could just zip a seam along the bottom and I'd be done. I used to sew a lot, but I haven't done much machine sewing for years. Since I started this challenge, I feel obligated to actually make a bag out of jeans rather than using an existing bag. But I have this problem.......


When I'm out an about and I need to carry more than just shuttle and thread I use one of 2 fanny packs. (My apologies to those of you from other parts of the world that object to the term.) I'd show you the other one too, but they are identical.


When I'm teaching and I need to carry books, several types of thread, handouts and all kinds of paraphernalia, I use this large heavy duty craft tote. It has a couple of pouches on the outside and another zippered pouch on the inside and it's big and durable.

When I'm away from home and need to carry several projects to keep me busy I use this intermediate size bag which is roomy with a couple of pouches on the outside and a zippered gusset in the bottom that opens it up to be a little larger for when I over stuff it.

Notice a recurring theme here? All of these bags are basic black, that goes with everything. I never worry about being co-ordinated, I just always use basic black. Notice the jeans? They're basic black too. All of the jeans in my closet are black except for the blue pair with the ripped out knees I keep for painting in.

So here's my problem. Do I decorate one (or all) of these bags for the challenge? Heaven knows I have enough bits, pieces and half done laces to completely cover them all. The stuff I showed here was just a part of the collection. Or do I make the jean bag?

I obviously don't need another black bag, so I was thinking about making a back pack so that I had something to use when we go bike riding, except that bike riding is one of those times when I don't usually carry any of my tatting with me. Between needing to concentrate on riding and juggling the parrot, I don't have free hands for a shuttle. Carrying the parrot while wearing a back pack is an invitation for the bag to get chewed. Lace and bag alike are likely to get ripped.

Also, making a backpack out of this pair of jeans is going to be awkward because of where the wear spots are. I can do it, but it will mean taking it apart and salvaging usable bits to re-assemble. That makes for a lot of machine sewing and spending tatting time fussing with other stuff that I don't want to do.

On the other hand, since I started this ball rolling I feel obligated to go through the process.....What do you think? should I make a bag or go with an existing bag?

Tuesday, June 12, 2007

More FPs than WIPs

This little amulet bag is one of the designs from the latest TLPC newsletter. It was such a stinker to do mostly because I was working in black thread, doing split rings and adding in beads. I have no idea what someone would use one of these little bags for, but a while ago someone said they were interested in a pattern for one, so I designed one.

Actually, the bag itself wasn't that hard to do except for the first bottom row where the front and and back are joined together. The first time around I tatted all 4 rings of the first pattern repeat and then I couldn't climb up into the next row. The black thread was hard to see and doing the bead joins with a teeny tiny hook, I kept splitting the thread and having to carefully untangle it without shredding the thread.

I created it with a fold over closure and to keep it closed I added a see through dome fastener which doesn't show up in the picture. The pointed section could be omitted and it would just have an open top.
The fringe was added at the end. I simply took a long length of the thread, strung on the blue beads, added one black bead at the end and then ran the needle back through the beads. I played around with doing a design in the fringe and after drawing up a few possibilities I scrapped them all and went for simple.
I make an effort to create new and different things for the newsletter. Several people have said they really like doilies so I design some doilies, but other people have said they don't care for doilies at all so it becomes a challenge to come up with new interesting and different things for each issue. A number of people in the 25 Motif Challenge decided to join the challenge just to see if they could tat that many items in a year. Doing the newsletter, I know what I do each year as many of the articles find their way into the newsletter.
Some of the things I create are intended to be gifts, but other things, like the amulet bag I have no use for, they were created solely because it was a pattern someone requested. They go into my stash of completed items and when I find an appropriate person to gift it to, it's gone. Consequently I'm getting quite a collection of Finished Projects rather than Works in Progress. The only WIPs I have are the ones I am currently working on and as soon as a WIP becomes a FP I start another one.
By the way, if anyone has ideas for patterns they'd like created, let me know. As soon as my current WIP is done I need another idea!

Tuesday, June 05, 2007

Square Motif Play

I created this square motif for the 25 Motif Challenge. I had seen a picture of a crocheted something or other on the internet and I took the general idea of it and recreated it in tatting. Since I like to see the pattern within pattern created when you join motives together I did 4 of them. They were pretty enough but 4 little joined motives don't look like much of anything. I kind of liked the negative space in the middle and wanted to recreate it on the outside border. I also wanted to repeat the arches used in the corners so that I could carry a design element of the motif into the outer border

This was my first attempt. A week's worth of tatting time just to see that it looked like crap. Grrrr! The arch between the motives ruffled like mad and just wouldn't lie flat. The chains around the corners took away all of the square definition and made the corners round. Really ugly and no way to fix it except cut it off.

Once I cut the offending border off I had an arch section of the exact proportions that I could play around with. I didn't want to do anything elaborate on the corners because I wanted the focal point to be the arches, but I also didn't want them rounded.

Here's the final result and I'm quite pleased with how it turned out. The negative space created pattern within pattern so that the joined motives look more like a planned whole than just a collection of motives. Your eye is drawn to the X created between the motives and it takes a moment to see that it's just 4 motives with a border.

Sorry to burst the bubble of those who think that designers just "get it right" the first time. The truth is that sometimes it's just a lot of slow slogging doing it over and over again until you like the results.